AutoPostUser guide
Connecting TikTok to AutoPost
The complete guide: from a Private TikTok account and TikTok's official permission to your first photo and video going live, plus the administrator steps for AutoPost's TikTok app
Save this guide
PDF version to read offline or print · 5.4 MB · 65 pages
Contents
1. At a glance
What you'll achieve
After following this guide, AutoPost can send a video or a photo to your TikTok account: right away when you press Send now, or automatically at the time you schedule.
It works through TikTok's official permission with AutoPost's own TikTok app. You don't create an app, you don't enter any keys, and you never give your TikTok password to AutoPost. You just approve the permission once on a TikTok page.
Who does what
This guide is written for two readers.
| Reader | What they do | Chapters |
|---|---|---|
| AutoPost users (you, if you want to post to TikTok) | Set the TikTok account to Private, press Connect TikTok, approve the permission, then write posts in New post. No apps or keys involved. | 1–12 |
| AutoPost administrator (PT SKK) | Registers AutoPost's TikTok app at developers.tiktok.com, verifies the domain, sets up the sandbox, pastes the app keys on the server, then submits the app for TikTok's review and audit. | 13–20 |
Users only need chapters 1–12. Chapters 13–20 explain the behind-the-scenes work that makes the Connect TikTok button usable.
- 1Set your TikTok account to Private
- 2Press Connect TikTok in AutoPost
- 3Approve the permissions on the TikTok page (Continue)
- 4Fill in the TikTok panel in New post
- 5The video or photo goes live (private) on your profile
AutoPost and TikTok status (29 September 2026)
We're being upfront so there are no surprises.
AutoPost's TikTok app (AutoPost PT SKK) is registered and runs in Sandbox mode — TikTok's test mode.
Its production version hasn't been reviewed or audited by TikTok yet. It hasn't been submitted (chapter 19).
On 29 September 2026 the full flow was tried for real on production AutoPost: the account connected, then one photo and one 6-second video went live on the TikTok profile — as private posts.
While this lasts, TikTok's documentation says these limits apply:
| Limit | What it means for you |
|---|---|
| Only accounts registered by the administrator can connect | In Sandbox mode, TikTok only accepts accounts that the AutoPost administrator registered as target users (chapter 17). Other accounts can't approve the permission yet. |
| Your TikTok account must be Private when posting | TikTok rejects public accounts. That's why Step A comes first. |
| All posts are visible only to you | Whatever privacy you choose, posts from AutoPost go live as private. In our test (privacy Only me) the posts did show a padlock icon. |
| At most 5 AutoPost users per day | TikTok's limit for apps that haven't been audited, counted per 24 hours across all of AutoPost. |
What we've seen ourselves is only the success path with one Private target-user account. Rejection of a public account, of an account that isn't a target user, and the 5-user limit have never been triggered by us; we wrote all three from TikTok's documentation.
The Social accounts › TikTok page and the TikTok panel in New post show a similar audit status note. This guide will be updated as soon as the TikTok audit passes.
Estimated time
| Situation | Estimate |
|---|---|
| User: setting Private + connecting | About 5 minutes |
| User: first post until it goes live | About 5 minutes (TikTok processes it for ±1 minute) |
| Administrator: app, domain, sandbox, target user, env | About 1–2 hours, plus waiting for DNS (TikTok says it can take a few hours) |
What you need
| What to prepare | Details |
|---|---|
| A TikTok account | A personal account that can be set to Private. While in Sandbox mode, that account must also be registered by the administrator as a target user. |
| The TikTok app on your phone, or tiktok.com | To set the account to Private (Step A) and to see your posts. |
| A browser on a laptop or computer | Where you open AutoPost. Sign in to tiktok.com in the same browser before connecting. |
| A video or photo | An MP4 or MOV video, or a JPEG/WebP photo, uploaded via Upload from gallery in AutoPost (max. 50 MB). TikTok also accepts WebM, but Upload from gallery only accepts MP4 and MOV videos for now. |
| An AutoPost account | You're already signed in to the AutoPost app. |
What AutoPost sends to TikTok
| Post content in AutoPost | Result on TikTok |
|---|---|
| An MP4 or MOV video + text | A video post. The whole text becomes the video caption (max. 2,200 characters). (TikTok accepts WebM, but it can't be uploaded via Upload from gallery yet.) |
| One JPEG or WebP photo + text | A photo post. The first line of the text becomes the photo title (cut to 90 characters); the whole text becomes the description (max. 4,000 characters). |
| The Link field | Added on a new line at the end of the text (unless it's already in the text) and counted. |
| Text only, no video/photo | Not possible. TikTok requires a video or a photo. |
| A PNG or GIF photo | Rejected. Save it again as JPEG or WebP. |
| Media from another site (someone else's http/https address) | Rejected. Media for TikTok must be uploaded to AutoPost. |
| TikTok options (privacy, interaction permissions, content disclosure, AI label) | Sent exactly as you chose them in the TikTok panel — there are no defaults. |
AutoPost doesn't add any watermark, logo, or promotional text to your videos or photos.
Not supported by AutoPost yet: posts with several photos at once (carousel — if the media list holds more than one item and the TikTok account is ticked, every save path is held), adding music from TikTok, drafts to the TikTok inbox, and editing or deleting posts that are already live. Deleting is done directly in the TikTok app.
2. Key terms
| Term | Meaning |
|---|---|
| AutoPost's TikTok app | The app PT SKK registered at developers.tiktok.com under the name AutoPost PT SKK. This app is what asks your TikTok account for permission. One app for every AutoPost user. |
| Sandbox | TikTok's test mode for an app. Only accounts registered by the administrator (target users) can use it. On the permission page, the app name gets the suffix (Sandbox). |
| Target user | A TikTok account the administrator registered in the sandbox so it can connect the app during test mode. TikTok's documentation says at most 10 per sandbox. |
| Audit | TikTok's check of how AutoPost shows the posting options (privacy, interaction permissions, disclosure, consent sentence). Until it passes, all posts are private and the account must be Private. |
| Permission | The rights AutoPost asks for. Only two: user.info.basic (display name, username, and profile photo) and video.publish (posting videos or photos to your profile). |
| Private account | A setting in the TikTok app: only followers you approve can see your videos. Until the audit is done, it must be on. |
| TikTok panel | An extra box in New post that appears when the TikTok account is ticked. Where you choose privacy, interaction permissions, commercial content disclosure, and the AI label. |
| Token | The access key from TikTok after you grant permission. TikTok's documentation says the access token lasts 24 hours (AutoPost renews it automatically) and the permission period (refresh token) lasts 365 days. |
| Processing on TikTok | After sending, TikTok fetches the media from AutoPost and processes it. In our test it took about 1 minute; meanwhile the post card in AutoPost is labeled processing, not "sent" yet (6.2). |
3. Step A — Setting your TikTok account to Private
According to TikTok's documentation, until AutoPost passes TikTok's audit, TikTok rejects posts from AutoPost to public accounts. Set the account to Private first — before connecting and before every post. Pick one of the methods.
3.1 On tiktok.com (we tried this)
Open tiktok.com, sign in, then open your Profile.
Press the gear button (settings) in the row with the Edit profile and Promote post buttons. The settings page opens.
In the Privacy section, under Discoverability, turn on Private account.
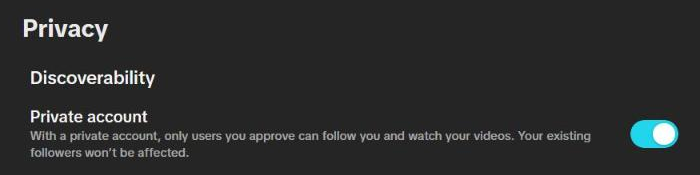
TikTok's note under the switch: with a private account, only users you approve can follow you and watch your videos; your existing followers aren't affected. On one of our test accounts, the Comments setting (who can comment) was set to Followers after the account was made private.
3.2 In the TikTok app on your phone
We haven't captured the steps in the phone app; the menu names can differ slightly depending on the app version and your phone's language. If in doubt, use method 3.1.
Open the TikTok app, then open your Profile.
Tap the menu (three lines) at the top right, then Settings and privacy.
Choose Privacy.
Turn on Private account.
3.3 How to tell the account is Private
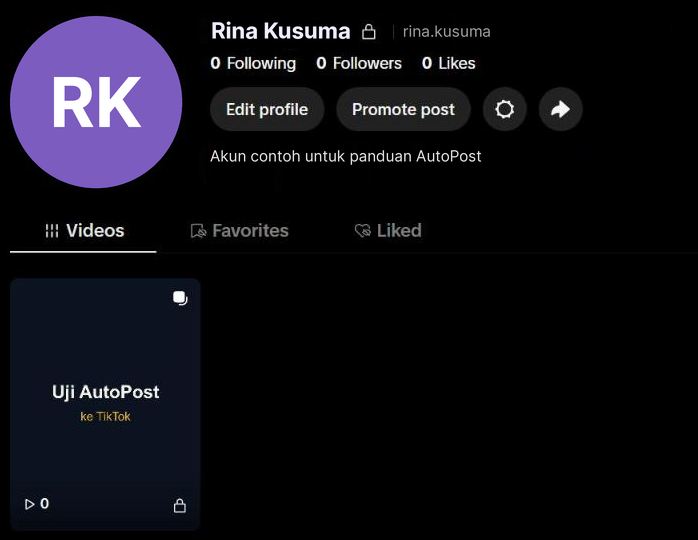
On your tiktok.com profile, a private account shows a padlock icon next to the name (see the image in 6.5). According to TikTok's documentation, the Everyone privacy option is only offered for public accounts — so if the TikTok panel in AutoPost still offers it, TikTok still considers your account public (5.4).
4. Step B — Connecting in AutoPost
4.1 Opening the TikTok page
In your browser, open tiktok.com and sign in with the TikTok account you want to use.
In AutoPost, open the Social accounts menu. On the TikTok card, press Connect (it reads Manage if an account is already connected). The TikTok page opens.
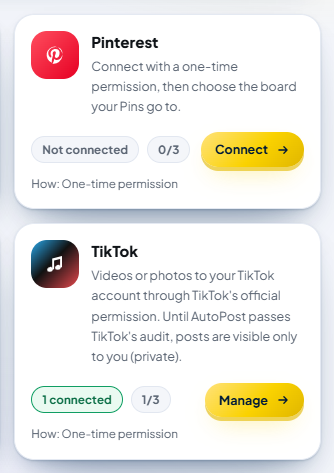
That page has a yellow-bordered box TikTok is still awaiting audit (a summary of the limits in chapter 1: private posts, the account must be Private, at most 5 users per day), a How to connect card with four numbered steps, and the Connected accounts card on the right.
4.2 Pressing Connect TikTok
Make sure your TikTok account is already Private (Step A).
Press the gold Connect TikTok button in the How to connect card.
The browser moves to TikTok's permission page. Finish within 10 minutes.
4.3 Approving the permission on the TikTok page
TikTok shows a permission page in English: "AutoPost PT SKK (Sandbox) wants to access your TikTok account".
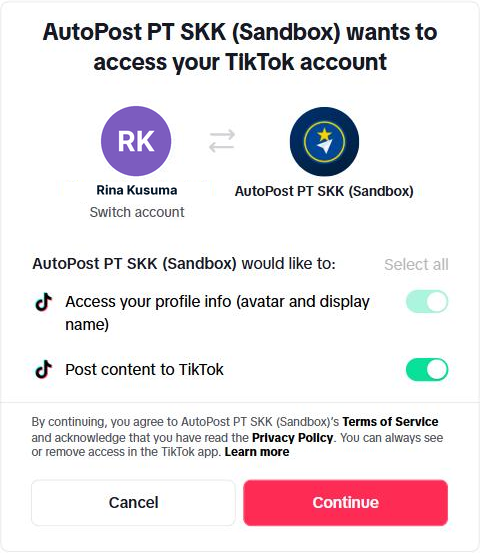
| Line on the permission page | What to do |
|---|---|
| Account name + Switch account | Make sure it's the account you want to connect. If it's wrong, press Switch account and sign in with the right one. |
| Access your profile info (avatar and display name) | Required (its switch looks faded). Same as the user.info.basic permission. |
| Post content to TikTok | Leave it on. Same as the video.publish permission. Without it AutoPost can't post. |
| Continue | Press to grant the permission. |
| Cancel | Cancels. You return to AutoPost with the message "You canceled the permission on TikTok…". |
Press Continue. Above the button, TikTok notes that by continuing you agree to the AutoPost app's Terms of Service and have read its Privacy Policy, and that you can always see or remove this access in the TikTok app.
We've only tried pressing Continue. Pressing Cancel or turning off Post content to TikTok hasn't been tried for real; the messages in the table above and in 9.1 come from AutoPost.
4.4 What AutoPost does behind the scenes
When Connect TikTok is pressed, AutoPost creates a random security code (state) and stores it encrypted in a browser cookie that lasts 10 minutes.
After you press Continue, TikTok sends you back to AutoPost's return address. AutoPost checks that the security code matches, that you're still signed in with the same AutoPost account, and that the posting permission was really granted.
AutoPost exchanges the authorization code for an access token (24 hours) and a refresh token (365 days).
AutoPost reads your TikTok profile (display name, username, profile photo).
The tokens are stored encrypted (AES-256-GCM) in the database. The temporary cookie is deleted.
The access token is renewed automatically by the AutoPost worker when less than 6 hours remain. TikTok may issue a new refresh token each time it's renewed; AutoPost always saves it.
4.5 Signs of success
You return to the TikTok page in AutoPost. A green box appears at the top:
“@rina.kusuma” was connected after testing it with TikTok. Its token is stored encrypted.

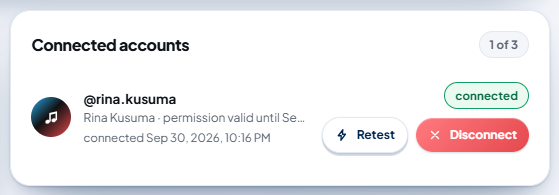
On the right of the page, your account appears in the Connected accounts card (counter "1 of 3") with a green connected label, the display name and permission period (for example "Rina Kusuma · permission valid until Sep 29, 2027 (renewed automatically)"), when it was connected, a Retest button, and a red Disconnect button.
4.6 Reconnecting without the permission page
If you connect the same account again while its permission is still valid, TikTok may send you straight back without showing the permission page. A green banner reads:
“@rina.kusuma” was already connected — we refreshed its token after testing it with TikTok.

The account isn't recorded twice; only its token is replaced.
4.7 What "1 of 3" means
Each AutoPost account can connect at most 3 TikTok accounts. The database enforces this limit. Once you have 3, the text next to the button reads "Already 3 accounts: this button can only reconnect the same account. Disconnect one account to add a new one." A fourth account is rejected with the message "There are already 3 TikTok accounts. Disconnect one first if you want to replace it."
5. Step C — Filling in the TikTok panel in New post
5.1 Quick rules before you write
Media is required: a video or one JPEG/WebP photo. Text only or a PNG photo can't be sent.
Media must be uploaded to AutoPost via Upload from gallery (max. 50 MB per file). For video, Upload from gallery accepts MP4 and MOV; TikTok does accept WebM, but it can't be uploaded here yet.
According to TikTok's documentation:
Video: 3 seconds to 10 minutes (and no longer than your own account's limit), up to 4 GB, 23–60 fps, sides 360–4096 px.
Photo: JPEG or WebP, up to 20 MB, at most 1080p.
Text: a video caption can be up to 2,200 characters; for a photo, the first line becomes the title (max. 90 characters) and the whole text becomes the description (max. 4,000 characters). An emoji counts as two.
According to TikTok's documentation, about 15 posts per day per TikTok account (this allowance is shared with every app you use).
Each post is chosen individually: privacy, comment/duet/stitch permissions, and commercial content disclosure — there are no defaults.
5.2 Ticking the TikTok account
Open New post and write your text.
Press Upload from gallery and choose a video or photo.
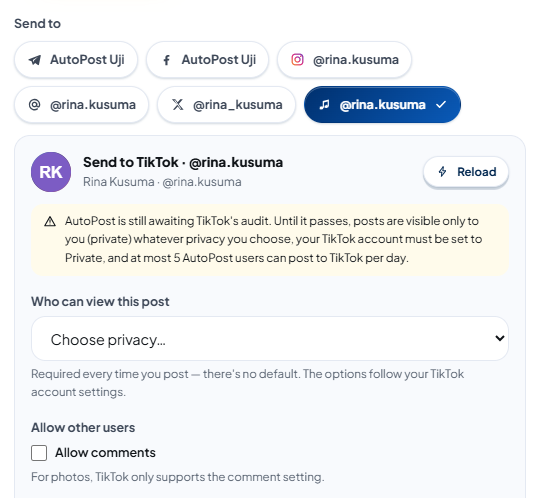
In the Send to section, tap the TikTok account until it's ticked (dark blue with a ✓).
As soon as the TikTok account is ticked, the TikTok panel appears right below Send to.
5.3 The panel header: account name and Reload
Every time the panel appears, AutoPost asks TikTok for your account info (TikTok's guidelines require this every time). While it waits, it shows "Reading TikTok account info…". Then the panel header shows your profile photo, Send to TikTok · @rina.kusuma, and your TikTok display name.
The Reload button reads that info once more — use it if you've just changed your account settings in the TikTok app (for example, just set it to Private).
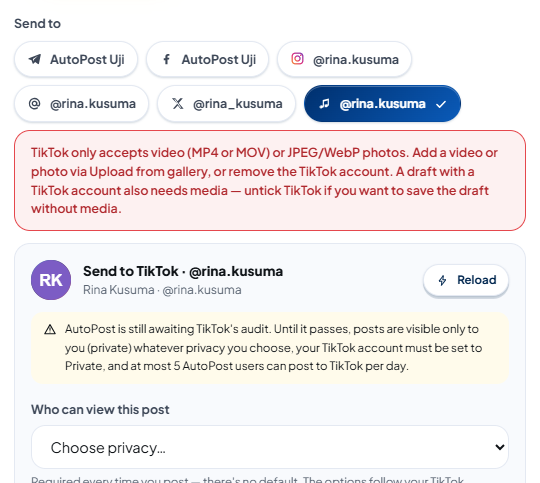
Below it there's always a yellow audit status note: "AutoPost is still awaiting TikTok's audit. Until it passes, posts are visible only to you (private) whatever privacy you choose, your TikTok account must be set to Private, and at most 5 AutoPost users can post to TikTok per day."
If TikTok refuses to give the info (for example, the daily posting limit is reached, or the permission needs renewing), the panel shows a red box "TikTok can't accept posts from this account right now" with the reason, and the send button is held. What each reason means is in 9.3.
5.4 Who can view this post (privacy)
Choose one option from the Who can view this post list. This choice is required and has no default — the box starts at "Choose privacy…".
| Option in AutoPost | Value on TikTok | When available (according to TikTok's documentation) |
|---|---|---|
| Everyone | public | Only for public accounts. Private accounts don't get this option. |
| Followers | your followers | Private accounts. |
| Friends (mutual follows) | friends who follow each other | Public and private accounts. |
| Only me | only you | Always. |
The options come from TikTok and follow your account settings, so they may differ from the table above.
5.5 Allow other users: photos and videos differ
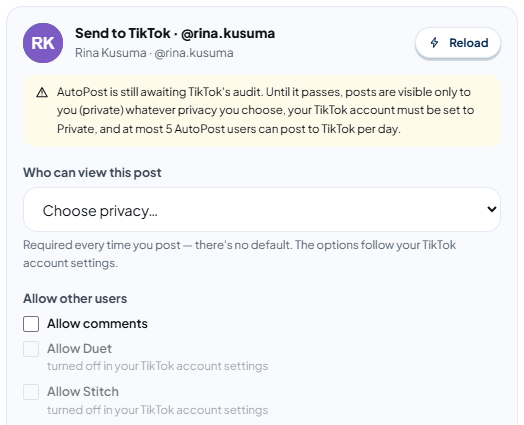
All checkboxes in the Allow other users section are unticked at first. Tick the ones you want.
| Media | Options shown |
|---|---|
| Photo | Only Allow comments. Below it: "For photos, TikTok only supports the comment setting." |
| Video | Allow comments, Allow Duet, and Allow Stitch. |
Options turned off in your TikTok account settings appear grayed out with the note "turned off in your TikTok account settings" and can't be ticked. In our test with a Private account, Duet and Stitch were grayed out like this.
5.6 Disclose commercial content
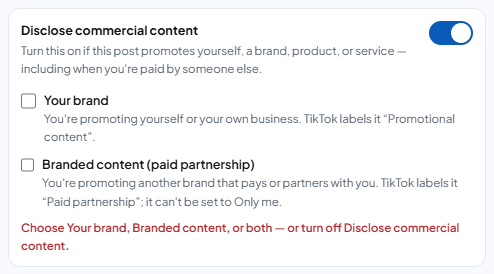
Turn on the Disclose commercial content switch if this post promotes yourself, a brand, a product, or a service — including when someone else pays you. The switch is off at first. Once it's on, two options appear:
| Option | Use when | Label on TikTok |
|---|---|---|
| Your brand | You're promoting yourself or your own business. | "Promotional content" |
| Branded content (paid partnership) | You're promoting another brand that pays or partners with you. | "Paid partnership" |
The rules:
While the switch is on, at least one option must be ticked. If not, red text says: "Choose Your brand, Branded content, or both — or turn off Disclose commercial content." and the send button is held.
Branded content can't be "Only me". The Only me option in the privacy list changes to "Only me (not available for branded content)". If you already chose Only me and then tick Branded content, the privacy is cleared with the message "Only me was cleared because branded content can't be private. Choose privacy again."
Turning the switch off clears both ticks.
5.7 AI-generated content
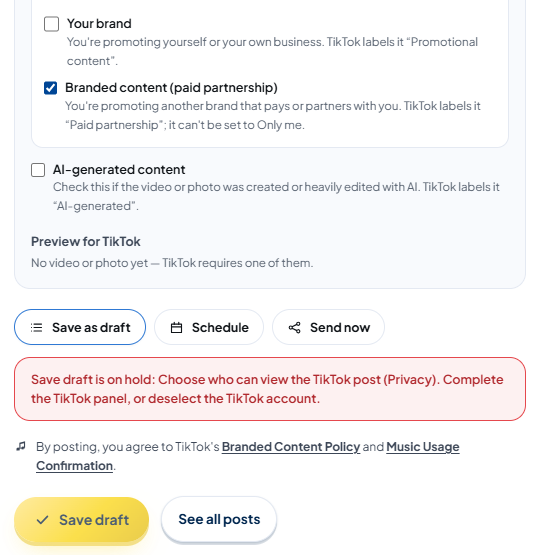
Tick AI-generated content if this video or photo was created or heavily edited with AI. TikTok adds the label "AI-generated". This checkbox is also off at first. TikTok's documentation mentions this label for videos; for photos, AutoPost still passes the tick along, but we haven't confirmed that the label appears.
5.8 Preview for TikTok
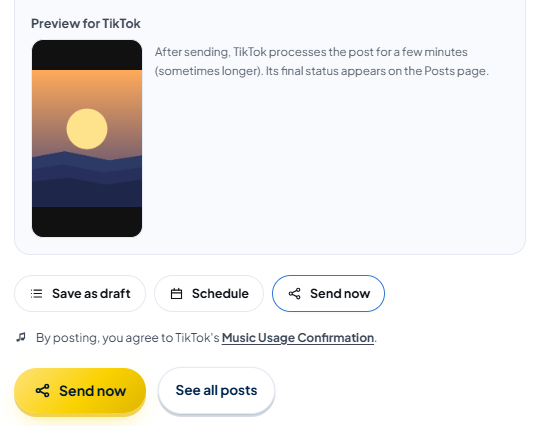
At the bottom of the panel, Preview for TikTok shows your video or photo in a vertical 9:16 frame.
Video: AutoPost reads the duration first ("Checking video duration…"), then shows, for example, "Duration 6 seconds · this account's limit is 600 seconds" (the limit comes from TikTok for your account; 600 here is just an example). A video longer than your account's limit or shorter than 3 seconds is marked red and the send button is held.
If the duration can't be read, the button is also held with the message "The video duration couldn't be read, so AutoPost can't confirm this video is within your TikTok account's limit. …" — upload the video again (MP4 or MOV).
If the media is an address from another site, a red warning appears: "This media comes from another site. TikTok only accepts media uploaded to AutoPost — use Upload from gallery so your TikTok post doesn't fail."
A permanent note: "After sending, TikTok processes the post for a few minutes (sometimes longer). Its final status appears on the Posts page."
5.9 The consent sentence above the send button
While the TikTok account is ticked, TikTok's consent sentence appears right above the send button:
By posting, you agree to TikTok's Music Usage Confirmation.
If Branded content (paid partnership) is ticked, the sentence becomes: "By posting, you agree to TikTok's Branded Content Policy and Music Usage Confirmation." Both names are links to TikTok's official pages (they open in a new tab).
Pressing the send button means you agree. AutoPost records the time of that consent with the post.
5.10 Limits per platform
The Limits per platform card on the right counts the text for TikTok:
| Media | Row | Limit |
|---|---|---|
| Video | TikTok · video caption | 2,200 |
| Photo | TikTok · photo description | 4,000 |
The small note under that row may read:
"The Link field is added at the end of the TikTok text and counted."
"The first line becomes the TikTok photo title and is cut to 90 characters; the full text still goes into the description."
"More than 2200 characters is rejected by TikTok — shorten it or deselect the TikTok account." (for photos: 4000)
5.11 When the button is held
While the panel is incomplete, every save path is held — including Save draft. A red box appears above the button, for example:
Send now is on hold: Choose who can view the TikTok post (Privacy). Complete the TikTok panel, or deselect the TikTok account.
(The opening becomes "Schedule is on hold:" or "Save draft is on hold:" depending on your choice.)
Without a video or photo, a red box appears:
TikTok only accepts video (MP4 or MOV) or JPEG/WebP photos. Add a video or photo via Upload from gallery, or remove the TikTok account. A draft with a TikTok account also needs media — untick TikTok if you want to save the draft without media.
A PNG or GIF photo is held with "TikTok only accepts JPEG or WebP photos — TikTok rejects PNG and GIF photos. Convert the photo to JPEG, use a video, or remove the TikTok account."
6. Step D — Sending, scheduling, and checking the result
6.1 Send now
Choose Send now (next to Save as draft and Schedule).
Read the consent sentence, then press the gold Send now button.
Because TikTok is still processing, a green message appears:
Not sent yet — 1 will be retried automatically. No need to press Send again; follow the result on the Posts page.
Below the button, AutoPost also reminds you:
“Send now” really sends to the accounts you choose — Telegram, Facebook Page, Instagram, Threads, TikTok, and X are active; Pinterest will follow once its access is approved. TikTok takes a few minutes to process posts, and until AutoPost passes TikTok's audit, the posts are visible only to you (private).
That "Not sent yet" message isn't a failure. AutoPost has already handed the post to TikTok; TikTok is fetching the media from AutoPost and processing it. Don't send the same post again — that would create a second post.
6.2 From "processing" to "sent"
Open the Posts menu. While TikTok is processing, that post card:
has a blue clock icon and a blue pill labeled processing — not "failed";
shows a purple pill "1 retrying automatically ± time" — the time is the estimate of the next check, for example "1 retrying automatically ± 22:14";
has no Resend failed button — on purpose, so the post isn't sent twice;
opens Details per account with the status retrying and the message "TikTok is fetching and processing the media (usually a few minutes). We'll check again shortly." or "TikTok is still processing the post. We'll check again shortly."
The processing label is used while no account has failed or been sent and the rest are still waiting. Because of that, this card also shows up in the Failed tab, still labeled processing. If the same post was already sent to another platform, the card is labeled partial with the same purple pill.
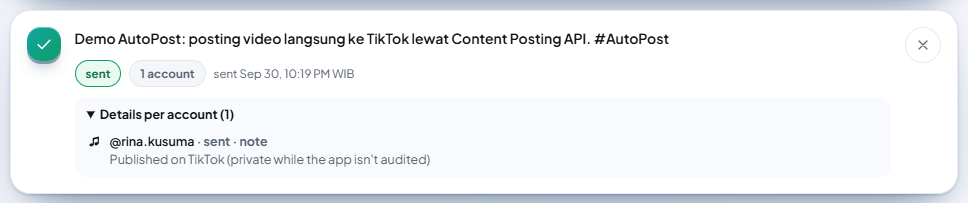
AutoPost checks the status on TikTok in the next worker round (30 seconds later at the earliest; the worker runs about every minute), for up to 60 minutes, without using up retry attempts and without ever resending to TikTok. The Posts page doesn't refresh itself — reload the page to see the latest status. In our test on 29 September 2026, the status changed to sent about 1 minute later.

A post with the Only me privacy gets a note in Details per account: sent · note — "Published on TikTok (private while the app isn't audited)".
6.3 Schedule
Choose Schedule, then fill in the date and time (WIB).
Check the consent sentence, then press Schedule post. "Post scheduled." appears.
Your TikTok panel choices and the time of your consent are saved with the schedule. The AutoPost worker sends it by itself at the right time, then checks its status as in 6.2. Before sending, AutoPost asks TikTok for the account info once more: if your privacy choice is no longer available (for example, the account switched between public and private), that post fails with the message "The privacy option is no longer available for this TikTok account …" (9.4) and isn't retried.
We haven't really tested scheduling to TikTok; only Send now has been proven. It uses the same worker path that sends schedules to other platforms.
6.4 Save draft
A draft with a TikTok account saves the media, the text, and all the panel choices. In the Posts menu, that draft has a Send now button; TikTok's consent sentence appears again right above that button (6.6).
6.5 Seeing the result on your TikTok profile
Open your profile in the TikTok app or on tiktok.com. Posts from AutoPost appear in the Videos tab with a padlock icon in the bottom-right corner — a sign that the post is private. Your account name also has a padlock icon because the account is Private. Photo posts are marked with a photo icon in the top-right corner.
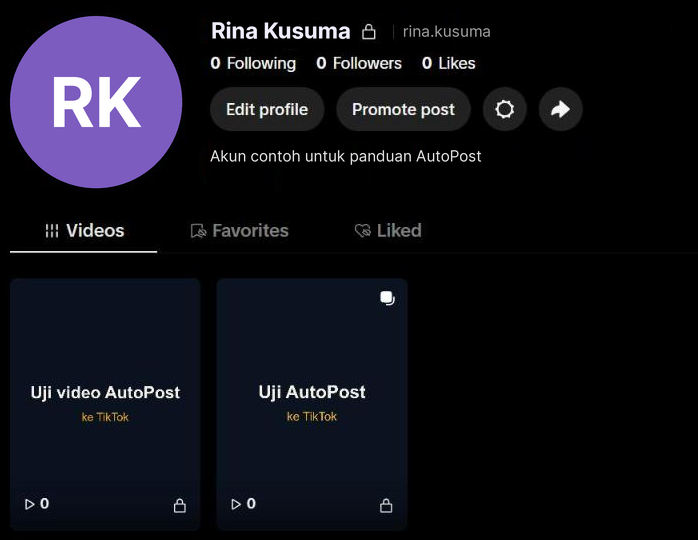
In our test on 29 September 2026, the photo was sent first and reached sent at 22:08 WIB (image below), then the 6-second video was sent afterwards and reached sent at 22:13 WIB (image above).
6.6 Resending from the Posts page
A failed post has a Resend failed button in the Posts menu (drafts and schedules: Send now). A post labeled processing (6.2) deliberately has no such button — wait for the result. If the post has a TikTok target that hasn't been sent, TikTok's consent sentence appears again right above the button — TikTok requires consent every time you post. The panel choices used are the ones saved when the post was created.
Before pressing Resend failed, read the reason in Details per account (section 9.4) and fix the cause first — for example, set the account to Private. If the reason says "Check your TikTok profile … so it isn't posted twice", open your TikTok profile first.
7. What you can't do with TikTok yet
| Feature | Why |
|---|---|
| Auto post | Under TikTok's guidelines, content taken from other websites must not be posted automatically, and you must approve every post yourself. TikTok accounts aren't offered in the Auto post form; if you have a TikTok account, the form shows the note "TikTok can't be used for auto posts". |
| Link to post (New post › from a link) | Same reason. The page says "TikTok isn't available here." and points you to New post. |
| AutoPost Android app | The TikTok panel only exists on the web. On the phone, TikTok accounts are only listed with their status: "Posting to TikTok is managed from the AutoPost web app …". |
| Several photos at once, TikTok music, drafts to the TikTok inbox | Not built yet. |
| Editing or deleting posts that are already live | Do it directly in the TikTok app. Deleting a post in AutoPost's Posts menu doesn't delete it on TikTok. |
8. Managing connected accounts
8.1 Retest
The Retest button in the Connected accounts card opens the token, renews it if less than 6 hours remain, then reads your profile and account info on TikTok again. If all is well, a yellow banner appears:
"Retest finished — the account is still healthy and ready to send."
"Retest finished — the account is healthy and we extended its token too."

If TikTok is busy (rate limit, network, a brief outage), the account status is not changed; the message ends with "We didn't change the account status — try testing again shortly." If the permission has expired or been revoked, the account is labeled needs reconnecting. Other errors give the label has a problem. The cause appears in red under the account name.
Retest also updates the name and profile photo if you changed them on TikTok.
8.2 Reconnecting
Press Connect TikTok again and approve the permission with the same TikTok account. AutoPost refreshes the token (it doesn't create a new account), and scheduled posts keep working. If the permission is still valid, TikTok may send you straight back without the permission page (4.6).
Reconnect when:
the account is labeled needs reconnecting;
you revoked AutoPost's permission in the TikTok app and want to use it again;
the 365-day permission period is almost over (the account card says "The TikTok permission is about to expire. Reconnect this account.").
8.3 Disconnect
The Disconnect button removes the account from AutoPost and revokes AutoPost's permission on TikTok. AutoPost asks "Disconnect this account? AutoPost's permission on TikTok is revoked and its token deleted."; press Yes, disconnect to continue. The result: "Account disconnected — its row and token are gone from the database."
If TikTok won't revoke the permission (for example, the network drops or the token is already dead), an extra yellow box appears:
AutoPost's permission on TikTok couldn't be revoked automatically. Revoke it yourself in the TikTok app: open Settings and privacy, find the app permissions section, then remove AutoPost.
Disconnect also removes that account from scheduled posts aimed at it, and the old send records for that account in Details per account disappear too. If you only want to refresh the token, don't disconnect — reconnect (8.2).
We haven't run Disconnect for a TikTok account for real; the order and messages above follow AutoPost.
8.4 Revoking the permission in the TikTok app
TikTok's permission page notes that you can always see or remove an app's access in the TikTok app. Look for the app permissions section in Settings and privacy, then remove AutoPost PT SKK (during the test period it may read AutoPost PT SKK (Sandbox)). We haven't captured the exact menu name. After that, according to AutoPost, the next post fails with the message "AutoPost's TikTok permission is no longer valid (revoked or expired). Reconnect this account." and the account is labeled needs reconnecting. Disconnect that account in AutoPost if you don't want to use it again.
8.5 Adding a 2nd and 3rd account
While in Sandbox mode, the next account must first be registered by the administrator as a target user (chapter 17).
Set that account to Private.
In the browser, sign out of the first TikTok account and sign in with the next one (or use Switch account on the permission page).
Press Connect TikTok and approve the permission.
At most 3 TikTok accounts. We haven't tried this with a second account; the flow is the same as for the first.
9. Troubleshooting
All AutoPost messages below are copied exactly from AutoPost. On the TikTok page, messages start with "Failed:"; in Details per account, a message that will be retried gets the suffix "(retrying automatically, attempt N of 4)" — except the "still processing" messages (9.4), which don't use up retry attempts. Parts that vary are marked "…" or "N".
As of 29 September 2026, we've only seen the success path ourselves (connecting, photo and video with the Only me privacy, the "Not sent yet" banner, the sent status, Retest, and reconnecting). We've never triggered the error messages in this chapter for real; their causes and fixes are written from AutoPost's code and TikTok's documentation.
9.1 When pressing "Connect TikTok" or returning from TikTok
| Message | Cause & fix |
|---|---|
| The TikTok connection isn't open on the AutoPost server yet. Try again later. | The TikTok app keys aren't on the server yet. There's nothing for you to do; wait for the administrator (chapter 18). |
| KUNCI_ENKRIPSI_AI isn't set on the server, so the token can't be stored encrypted yet. / KUNCI_ENKRIPSI_AI isn't set on the server, so the token can't be saved. | The server setup is incomplete. Report it to the AutoPost administrator. |
| APP_URL_PUBLIK isn't set on the server. | The server setup is incomplete. Report it to the AutoPost administrator. |
| The TikTok connection session has expired (more than 10 minutes) or the browser blocked the cookie. Press Connect TikTok once more. | More than 10 minutes since you pressed the button, or the browser blocks cookies. Repeat 4.2 in the same browser and finish within 10 minutes. |
| The security code (state) doesn't match — this request was rejected. Start again from the TikTok page. | You opened two attempts at once, or came back through another tab. Start again from the TikTok page in AutoPost. |
| You canceled the permission on TikTok. Press Connect TikTok again and choose Allow if you want to continue. | You pressed Cancel on the permission page. Try again and press Continue (the "Allow" button in this message). |
| TikTok rejected: … | TikTok sent another error from the permission page. Read the rest of the message. In Sandbox mode, the most likely cause (not tested by us): your account isn't registered as a target user yet (chapter 17). |
| Your AutoPost session differs from when you started. Sign in again, then connect again. | You switched AutoPost accounts midway. Sign in with the right AutoPost account, then try again. |
| The posting permission wasn't given. Press Connect TikTok again and keep the video posting permission ticked. | The Post content to TikTok switch was turned off on the permission page. Try again and leave it on. |
| TikTok didn't send a permission code. Try connecting again. | The return page opened without a code from TikTok. Repeat from 4.2. |
| The TikTok authorization code has expired or was already used. Press Connect TikTok once more. | The return page was reloaded, or it took too long. Repeat from 4.2. |
| TikTok rejected AutoPost's app credentials on the server (TIKTOK_CLIENT_KEY/SECRET). The AutoPost administrator needs to check them; your own account permission hasn't changed. | The app keys on the server are wrong. It's not your fault — report it to the administrator (chapter 18). |
| The return address doesn't match the Redirect URI registered in AutoPost's TikTok app. The administrator needs to check it. | The return address in the TikTok app doesn't exactly match the server yet (section 16.4). Report it to the administrator. |
| TikTok didn't provide a token. Try connecting once more. | TikTok's response was incomplete. Try once more. |
| TikTok didn't return a valid account identity (open_id). / The TikTok account identity is invalid. | TikTok's response was incomplete. Try again; if it keeps happening, report it to the administrator. |
| AutoPost's TikTok permission is no longer valid (revoked or expired). Reconnect this account. | The new token was rejected right away while reading the profile. Repeat from 4.2. |
| There are already 3 TikTok accounts. Disconnect one first if you want to replace it. / This platform's limit of 3 accounts has been reached. Disconnect one account first. | The 3-account limit. Disconnect one account first (8.3). |
| This account is already connected. | The same account was recorded at the same time by two attempts. Reload the page; the account is already in Connected accounts. |
| The database doesn't know the TikTok platform yet — run migration database/0021_platform_tiktok.sql. | A message for the administrator (the database hasn't been updated). Report it to the administrator. |
| TikTok is rate-limiting requests. We'll try again in about N seconds. / TikTok is having trouble (HTTP N). We'll try again later. / Couldn't reach TikTok from the server. We'll try again later. | A brief outage at TikTok or on the network. Wait a moment, then connect again. |
9.2 During Retest, Disconnect, or in the account status
| Message | Cause & fix |
|---|---|
| The account to test wasn't recognized. / The account to disconnect wasn't recognized. | The page has been open for a long time. Reload the page, then try again. |
| Account not found. / Account not found or already disconnected. | The account was already disconnected in another tab. Reload the page. |
| KUNCI_ENKRIPSI_AI isn't set on the server, so the token can't be opened. | The server setup is incomplete. Report it to the administrator. |
| The AutoPost server is having trouble opening account tokens. We didn't change the account status — try again later. | A server key problem, not your account. Try again later; report it if it lasts a long time. |
| The token can't be opened (the server encryption key differs from when it was saved). Reconnect. / The TikTok token can't be opened (the server encryption key changed). Reconnect. | The old token can't be read anymore. Reconnect (8.2). |
| The TikTok permission has expired. Reconnect this account. / The TikTok permission period (365 days) has ended. Reconnect this account. | The 365-day permission period is over. Reconnect (8.2). |
| The TikTok permission is about to expire. Reconnect this account. | A warning (red text on the account card). Reconnect before it runs out. |
| The TikTok permission expired or was revoked. Reconnect this account. | The permission was revoked in the TikTok app, or the refresh token was rejected. Reconnect (8.2). |
| TikTok token renewal postponed: … | The AutoPost worker hasn't managed to renew the token yet; it will try again. If it persists, press Retest. |
| TikTok didn't return a new access token. | TikTok's response was incomplete during renewal. Try Retest again shortly. |
| … We didn't change the account status — try testing again shortly. | A brief disruption (rate limit, network, TikTok's servers). Try again shortly. |
| … The account hasn't been disconnected and its permission hasn't been revoked — try again. | The database refused the deletion. Press Disconnect again. |
| … The account hasn't been deleted yet, but it's marked as needing reconnection and its permission was revoked. Try disconnecting again. | The permission is already revoked, but the row hasn't been deleted yet. Press Disconnect again. |
| The account is being disconnected: AutoPost's permission was revoked from TikTok. Disconnect again to remove it. | A red note on the account card from the case above. Press Disconnect once more. |
| AutoPost's permission on TikTok couldn't be revoked automatically. Revoke it yourself in the TikTok app: … | The account was removed from AutoPost, but the permission on TikTok remains. Revoke it yourself (8.4). |
9.3 In the TikTok panel and when saving
The red box "TikTok can't accept posts from this account right now" in the panel is followed by one of these reasons:
| Reason in the panel | Cause & fix |
|---|---|
| TikTok account info couldn't be read. Check your connection, then press Reload. | Your connection dropped. Check your internet, then Reload. |
| Your session has ended. Please sign in again. | Your AutoPost session expired. Sign in again. |
| TikTok account not recognized. / TikTok account not found — reload the page. | The account was disconnected or the page is old. Reload the page. |
| The TikTok account can't be read right now. Try again shortly. | A brief database problem. Reload shortly. |
| The AutoPost server isn't ready to open account tokens yet. / The AutoPost server is having trouble opening account tokens. Try again later. | A problem on the AutoPost server. Try again later; report it if it lasts. |
| This account's TikTok permission needs renewing. Reconnect it in Social accounts › TikTok. | The account is labeled needs reconnecting. Reconnect (8.2). |
| The TikTok token can't be opened. Reconnect this account. | Reconnect (8.2). |
| This account's daily TikTok posting limit has been reached (about 15 posts per day, counted across all apps). Reschedule for tomorrow. | TikTok's daily allowance is used up. Try tomorrow. |
| TikTok is currently blocking this account from posting. Check the notifications in your TikTok app. | TikTok has restricted your account. Check the notifications in the TikTok app. |
| The daily user quota of the AutoPost app on TikTok is full (until TikTok audits it: max. 5 users per day). Try resending tomorrow. | The limit of 5 AutoPost users per day has been reached. Try tomorrow. |
| TikTok is rate-limiting requests. We'll try again in about N seconds. | Too frequent. Wait, then Reload. |
The red box "… is on hold:" above the send button (and the message when the button is pressed):
| Message | Cause & fix |
|---|---|
| TikTok account info is still loading — please wait. | The panel hasn't finished reading the account info. Wait. |
| Choose who can view the TikTok post (Privacy). | Privacy isn't chosen yet (5.4). |
| That TikTok privacy option is no longer available for this account — choose again. | The account settings changed since the panel opened. Choose privacy again. |
| TikTok: Choose Your brand, Branded content, or both — or turn off Disclose commercial content. | The commercial switch is on with nothing chosen (5.6). |
| TikTok: branded content can't be set to Only me — choose another privacy option. | Branded content + Only me (5.6). |
| Checking video duration… | AutoPost is still reading the video duration. Wait a moment. |
| The video duration couldn't be read, so AutoPost can't confirm this video is within your TikTok account's limit. Re-upload the video (MP4 or MOV) via Upload from gallery, or deselect the TikTok account. | The browser can't read the video file. Upload it again as MP4 or MOV. |
| The N-second video is longer than this TikTok account's limit (N seconds). Shorten the video or deselect the TikTok account. | The video exceeds your account's limit. Shorten it. |
| TikTok videos must be at least 3 seconds long. | The video is too short. |
| TikTok only accepts video (MP4 or MOV) or JPEG/WebP photos. Add a video or photo via Upload from gallery, … | No media yet (5.11). |
| TikTok only accepts JPEG or WebP photos — TikTok rejects PNG and GIF photos. … | A PNG/GIF photo. Save it again as JPEG. |
| Instagram and TikTok only accept posts with an image or video … (or Instagram, Pinterest, and TikTok …) | Several platforms are held together because there's no media; the messages are combined. Add a JPEG photo (accepted by all of them). |
| The text is too long for: TikTok. | Over 2,200 (video) or 4,000 (photo). Shorten it (5.10). |
| …: larger than 50 MB — choose a smaller file. | AutoPost's upload limit is 50 MB. Make the video smaller. |
Server messages when saving (rare, because the composer already holds these first):
| Message | Cause & fix |
|---|---|
| TikTok only accepts videos or photos. Add a video (MP4/MOV) or a JPEG/WebP photo, or remove the TikTok account. | No media. |
| Media for TikTok must be uploaded to AutoPost (Upload from gallery), not linked from another site. | The media is an address on another site. Upload the file. |
| TikTok doesn't accept PNG photos. Save the photo again as JPEG or WebP and resend. | A PNG photo. |
| TikTok only accepts JPEG or WebP photos. Save the photo again and resend. | Another photo format (GIF, HEIC, and the like). |
| TikTok only accepts MP4, MOV, or WebM videos. Convert the format and resend. | Another video format (MKV, AVI, and the like). |
| The text is too long for TikTok: N of max. 2,200 (emoji count as two). Shorten the text or remove the TikTok account. | The video caption is too long. |
| The text is too long for a TikTok photo post: N of max. 4,000. Shorten the text or remove the TikTok account. | The photo description is too long. |
| TikTok “@rina.kusuma”: The TikTok options (privacy, interaction permissions, and consent) aren't filled in. Open the TikTok panel in the composer and complete them. | The panel wasn't sent with the post. Reload New post and fill in the panel. |
| TikTok “@rina.kusuma”: First choose who can watch the TikTok post (privacy) — there's no default choice. | Privacy is empty. |
| TikTok “@rina.kusuma”: Commercial content disclosure is on: choose “Your brand”, “Branded content (partnership)”, or both — or turn the disclosure off. | See 5.6. |
| TikTok “@rina.kusuma”: Branded content (partnership) can't be posted with the “Only me” privacy. Choose another privacy. | See 5.6. |
| TikTok “@rina.kusuma”: Agreeing to TikTok's Music Usage Confirmation is required before posting. | No consent was recorded. Press the send button from New post. |
| The server isn't ready to save TikTok options yet (migration database/0022_opsi_sasaran.sql hasn't been run). The post wasn't saved. | A message for the administrator. Report it to the administrator. |
9.4 When sending or after scheduling
These messages appear in Details per account on the post card in the Posts menu.
Still processing — not an error:
| Message | Meaning |
|---|---|
| TikTok is fetching and processing the media (usually a few minutes). We'll check again shortly. | The post has been handed to TikTok. Wait (6.2). |
| TikTok is still processing the post. We'll check again shortly. | Still processing. Wait. |
| Unknown TikTok status (…). We'll check again shortly. / The TikTok post status can't be read yet: … | The status answer isn't clear yet. AutoPost checks again without resending. |
| Published on TikTok (private while the app isn't audited) | A note on a successful post with the Only me privacy. |
Needs your action:
| Message | Cause & fix |
|---|---|
| Until TikTok audits the AutoPost app, your TikTok account must be set to Private (in the TikTok app: Settings › Privacy › Private account) and posts are visible only to you. Switch the account to Private and resend. | Your account is public. Set it to Private (Step A), then Resend failed. |
| The privacy option is no longer available for this TikTok account (e.g. the account switched between public/private). Choose the privacy again in the post and resend. / The privacy option is no longer available for this TikTok account. Choose the privacy again in the post and resend. | The account settings changed since the post was created. Create a new post with a suitable privacy (6.6). |
| AutoPost's TikTok permission is no longer valid (revoked or expired). Reconnect this account. | Reconnect (8.2), then resend. |
| The permission to post to TikTok wasn't given to AutoPost. Reconnect this account and approve the video posting permission. | The video.publish permission is missing. Reconnect and leave Post content to TikTok on. |
| AutoPost's TikTok permission was revoked. Reconnect this account. | The permission was revoked while TikTok was processing. Reconnect. |
| The TikTok token is empty or damaged. Reconnect this account. / The TikTok permission has expired. Reconnect this account. | Reconnect (8.2). |
| … Check your TikTok profile before resending — the post may already be published. | The permission stopped working while TikTok was processing. Open your TikTok profile first; if the post is there, don't resend. |
| TikTok didn't answer within 20 seconds, so the result is uncertain. Check the TikTok profile before resending so it isn't posted twice. (also: "dropped the connection mid-send", "answered with a server error (HTTP N)", "sent a response that couldn't be read", "didn't return a send number") | TikTok may have already received the post. AutoPost deliberately does not retry automatically. Check the profile first. |
| TikTok has been processing for more than 60 minutes. Check your TikTok profile before resending so it isn't posted twice. | See 6.2. |
| This account's daily TikTok posting limit has been reached (about 15 posts per day, counted across all apps). Reschedule for tomorrow. / This account's daily TikTok posting limit has been reached. Reschedule for tomorrow. | Try tomorrow. |
| The daily user quota of the AutoPost app on TikTok is full (until TikTok audits it: max. 5 users per day). Try resending tomorrow. | The limit of 5 AutoPost users per day. Try tomorrow. |
| TikTok is currently blocking this account from posting. Check the notifications in your TikTok app. | Check the TikTok app. |
| TikTok flagged this post's text as a spam risk. Change the text and resend. / TikTok rejected this post as a spam risk. | Change the text, then create a new post. General advice (not TikTok's official criteria): use fewer links, repeated hashtags, or heavy promotional words. |
| TikTok doesn't accept this file format (video MP4/MOV/WebM, photo JPEG/WebP). | Replace the media. |
| The video duration is outside TikTok's limits (at least 3 seconds, at most the duration allowed for your account). | Shorten or lengthen the video. |
| The video frame rate must be 23–60 fps. | Export the video again at 30 fps. |
| The image/video size is outside TikTok's limits (video: sides 360–4096 px; photo: max. 1080p). | Lower or raise the resolution. |
| Sending to TikTok was canceled. | TikTok canceled publishing. Resend if needed. |
| TikTok failed to publish the post (…). Check the media format and the text. | Another reason from TikTok. Check the media and the text. |
| TikTok rejected the post input: … / TikTok rejected it: … / TikTok rejected the request (HTTP N, …). | TikTok rejected the input. Read the rest of the message. |
| The TikTok options (privacy, …) aren't filled in. … Posts to TikTok can only be composed & scheduled from the AutoPost web app (New post). | The post was created without the TikTok panel. Create it again from New post on the web. |
| Media for TikTok must be uploaded to AutoPost (Upload from gallery), not linked from another site. / TikTok only accepts video or photos. Add a video (MP4/MOV) or a JPEG/WebP photo. | See 9.3. |
| The text is too long for TikTok (N of max. 2200; emoji count as two). Shorten it and resend. / The text for a TikTok photo is too long (N of max. 4000). Shorten it and resend. | Shorten the text in a new post. |
| The TikTok post content is incomplete. | Create it again from New post. |
Retrying automatically — just wait:
| Message | Meaning |
|---|---|
| TikTok had a problem processing the post. We'll try again. | A problem at TikTok. |
| TikTok failed to download the video from AutoPost. We'll try again. / TikTok failed to download the photo from AutoPost. We'll try again. | TikTok couldn't fetch the media. AutoPost retries. |
| TikTok is rate-limiting requests. We'll try again in about N seconds. | Too many requests. |
| TikTok is having trouble (HTTP N). We'll try again later. / Couldn't reach TikTok from the server. We'll try again later. / TikTok's response couldn't be read (HTTP N). | A brief disruption. |
Messages for the administrator (nothing wrong with your post — report them to the administrator):
| Message | What it means for the administrator |
|---|---|
| TikTok doesn't recognize AutoPost's media domain yet (domain verification in the TikTok dashboard isn't finished). This is for the AutoPost administrator — nothing is wrong with your post. | The domain isn't verified in the app/sandbox in use (chapter 15, section 16.5). |
| Media for TikTok must be served over https (check the server's APP_URL_PUBLIK). / APP_URL_PUBLIK isn't set on the server, so media can't be served to TikTok yet. | APP_URL_PUBLIK is wrong or empty. |
| The TikTok token has expired and the server can't renew it yet (SUPABASE_SERVICE_ROLE_KEY is empty). | The Supabase service-role key is empty on the server. |
| TikTok rejected AutoPost's app credentials on the server (TIKTOK_CLIENT_KEY/SECRET). … | The Client key/secret in Vercel is wrong (chapter 18). |
9.5 Problems that don't show an AutoPost message
| Symptom | What to check |
|---|---|
| The Connect TikTok button is grayed out | The The TikTok connection isn't open yet or Permission storage on the server isn't ready box above it. Wait for the administrator. |
| The TikTok account doesn't appear in Send to | The account isn't connected, or you opened Auto post / Link to post (TikTok really isn't there). |
| The TikTok panel doesn't appear | The TikTok account isn't ticked in Send to yet (5.2). |
| Friends can't see the post | Expected during the audit period: all posts are private. |
| The post card stays labeled processing ("retrying automatically") for a long time | TikTok is still processing. Reload the Posts page; wait up to 60 minutes (6.2) and don't send again. |
10. Frequently asked questions
Do I have to create my own TikTok app?No. The TikTok app belongs to AutoPost. You just press Connect TikTok and press Continue on the permission page.
Why are my posts visible only to me?Because AutoPost hasn't passed TikTok's audit yet. According to TikTok's documentation, until the audit passes, all posts from AutoPost are restricted to private mode. This is TikTok's rule, not an AutoPost setting.
After the audit passes, do old posts become public automatically?According to reports from other developers (not TikTok's official documentation), no. You'll need to switch the account to public and then change the privacy of each post manually in the TikTok app.
Why can't my friend's account be connected yet?In Sandbox mode, only accounts registered by the AutoPost administrator as target users can grant permission (according to TikTok's documentation, at most 10 per sandbox). Ask the administrator to register it (chapter 17).
Can I choose "Followers" or "Friends"?Yes, if they're offered, but according to TikTok's documentation the result is still private during the audit period. We haven't tested those options; our test used Only me.
How long until a post goes live?In our test, about 1 minute after Send now. According to TikTok's documentation, processing time depends on the video size and isn't guaranteed; AutoPost waits up to 60 minutes (6.2).
Does AutoPost add music or a watermark?Neither. The "Music Usage Confirmation" sentence still has to be accepted because TikTok's rule applies to every post.
Can I post several photos at once?Not to TikTok yet. AutoPost sends one video or one photo per post to TikTok. Posts with several media items can still go to Telegram, Facebook Page, Instagram, and Threads — untick the TikTok account for that post.
Can I use the AutoPost Android app?Not yet. TikTok posts are composed and scheduled from the AutoPost web app, because the TikTok panel only exists there.
Why isn't TikTok available in Auto post?Under TikTok's guidelines, content from other websites must not be posted automatically, and you must approve every post yourself (chapter 7).
Do I need to reconnect every day?No. The access token (24 hours) is renewed automatically. You only need to reconnect if the permission is revoked or the permission period (365 days, according to TikTok's documentation) runs out.
How do I delete a post that's already live?In the TikTok app. Deleting it in AutoPost only deletes the record in AutoPost.
11. Security and privacy
11.1 What AutoPost stores
| Data | Details |
|---|---|
| TikTok account ID (open_id) | Your account identifier, specific to the AutoPost app. |
| Display name, username, profile photo address | To show them in AutoPost. |
| Access token and refresh token | Encrypted (AES-256-GCM), opened only on the server when sending or renewing. Never shown on any page. |
| Permissions granted and their validity | To check that the posting permission is still there. |
| TikTok panel choices per post + consent time | Proof of your own choices for every post. |
11.2 What never happens
AutoPost never asks for or sees your TikTok password.
AutoPost doesn't post anything unless you press Send now, Schedule post, or Resend failed.
AutoPost doesn't read the videos, followers, or messages on your TikTok account — it only has two permissions.
11.3 How TikTok fetches your media
TikTok pulls the video or photo directly from AutoPost's own address (a domain the administrator verified with TikTok), through a signed link that's valid for only 2 hours and only for that post's file. Your media is never moved to another service.
11.4 Stopping using TikTok in AutoPost
Press Disconnect on the TikTok account (8.3). AutoPost's permission on TikTok is revoked too.
If the box "AutoPost's permission on TikTok couldn't be revoked automatically" appears, revoke it yourself in the TikTok app (8.4).
12. User checklist
13. Administrator A — Developer account and organization
Chapters 13–20 are only for the AutoPost administrator (PT SKK). Regular users don't need to do any of this.
13.1 Developer account
The account at developers.tiktok.com is created with a company email address, not with a TikTok sign-in. After you sign up, TikTok sends a 6-digit code to that email address.
Open developers.tiktok.com and sign up with the email address (we didn't capture the sign-up screen).
On the Verify your email page, type the 6-digit code from the email, then press Next.
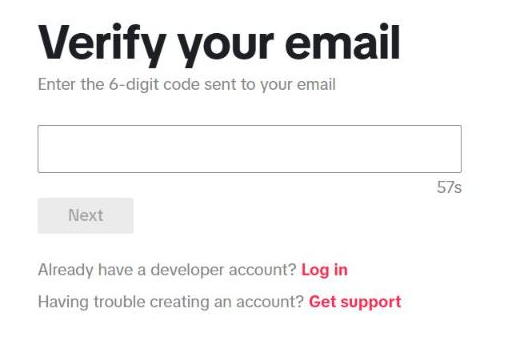
The administrator creates the account and signs in personally.
13.2 The Manage apps page
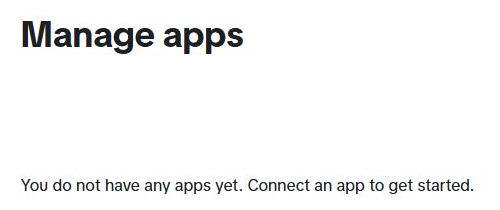
After signing in, the Manage apps page is still empty: "You do not have any apps yet. Connect an app to get started." The red Connect an app button is at the top right of the page (outside the cropped image).
13.3 Why an organization
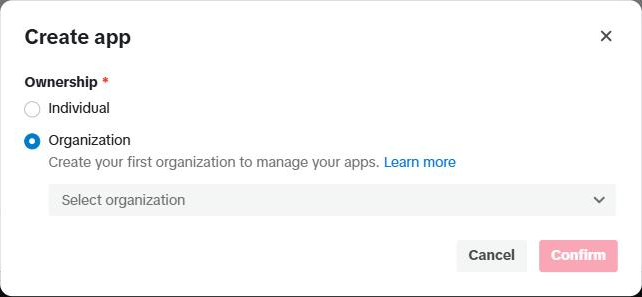
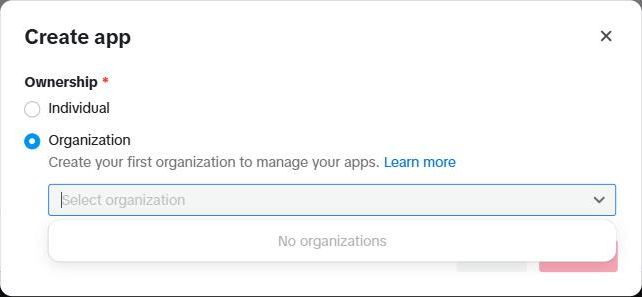
When you press Connect an app, the Create app window asks for the app owner (Ownership): Individual or Organization. Choose Organization — according to TikTok's documentation, an organization is strongly recommended and its name is shown to users.
If you don't have an organization yet, the Select organization list only contains "No organizations". Close that window and create the organization first.
13.4 Creating the organization
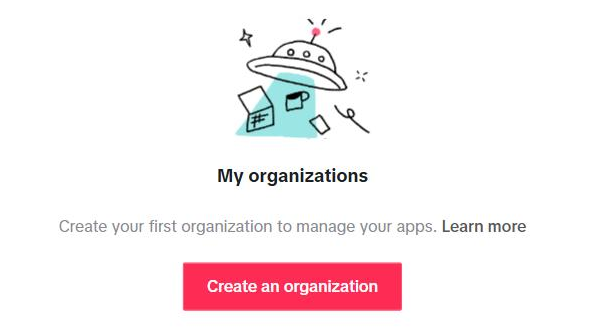
Open My organizations (from the account menu), then press Create an organization.
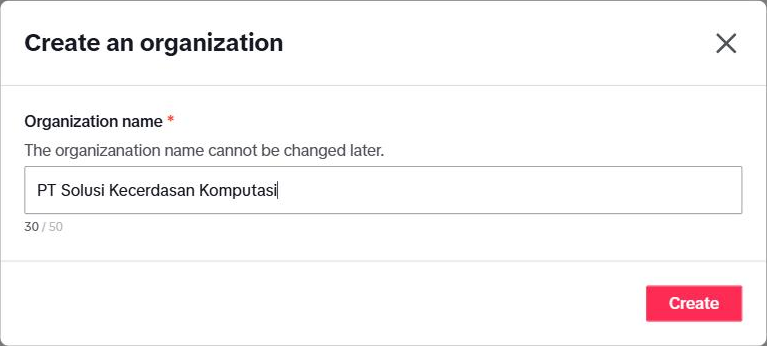
Fill in Organization name with the full legal name of the company: PT Solusi Kecerdasan Komputasi.
Press Create.
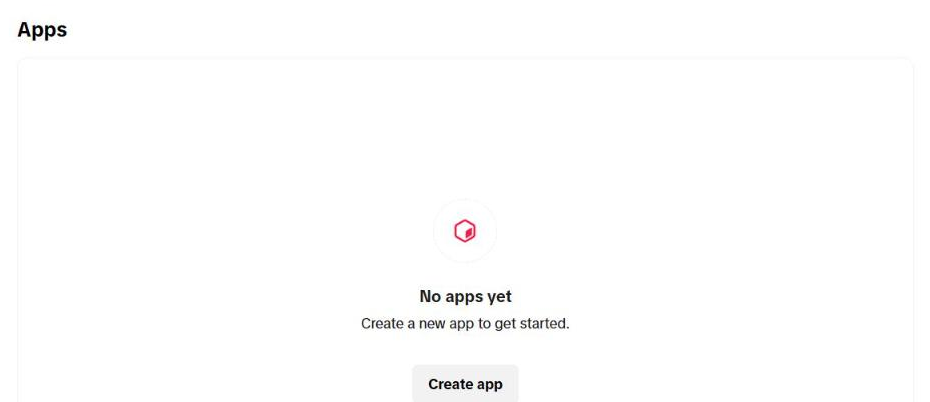
The organization page opens with the tabs Overview, Roles and access, Compliance, and Settings. The Overview section shows the Org ID and your role, Owner. Below that, the Apps box still says "No apps yet" with a Create app button — only this part appears in the image.
14. Administrator B — Creating the AutoPost PT SKK app
14.1 Create app
On the organization page, press Create app.
Fill in App name. This name is shown to TikTok users.
Under App type, choose Other ("Login with TikTok, Share Kit, Content Posting API, or others"). Don't choose Mini game or Mini drama. The app type can't be changed later.
Press Create app.
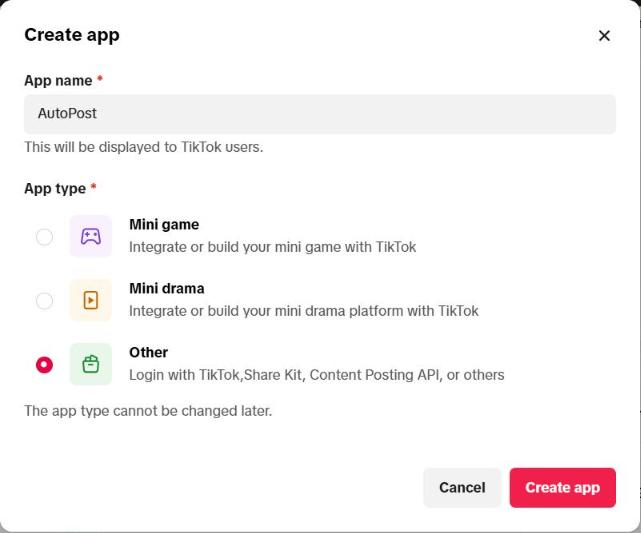
14.2 The app name must be unique
The name AutoPost is already used by another app on TikTok. When Create app is pressed, the message "App name is already taken. Try another one." appears. That's why the AutoPost app is named AutoPost PT SKK.
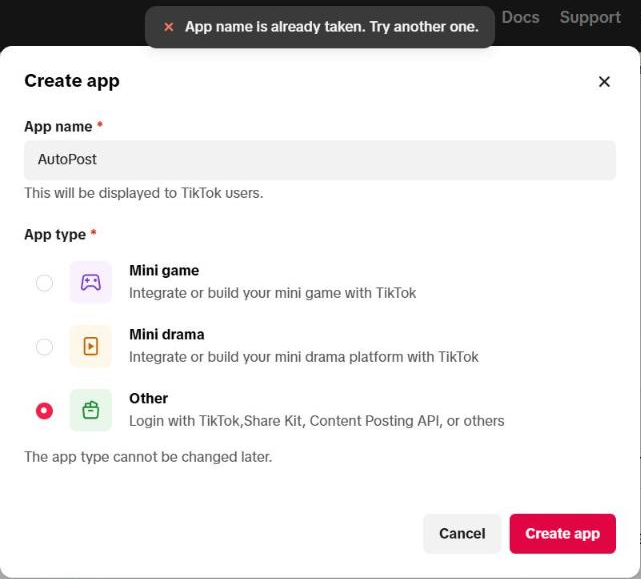
This is the name users see on the permission page, with the suffix (Sandbox) while in test mode (4.3).
14.3 The app page: Production and Sandbox
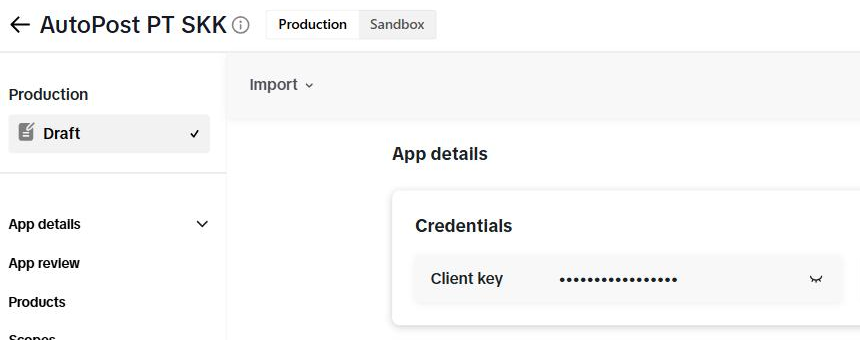
The app opens with two tabs next to its name: Production and Sandbox. On the Production tab, the status on the left is Draft; the left menu contains App details, App review, Products, Scopes, and Roles & Access. At the top right are URL properties, Save, and Submit for review. (The left side of the Production · Draft tab is shown in the image in 19.1.)
In App details, the Credentials card holds the Client key and the Client secret (hidden). Both are used in chapter 18.
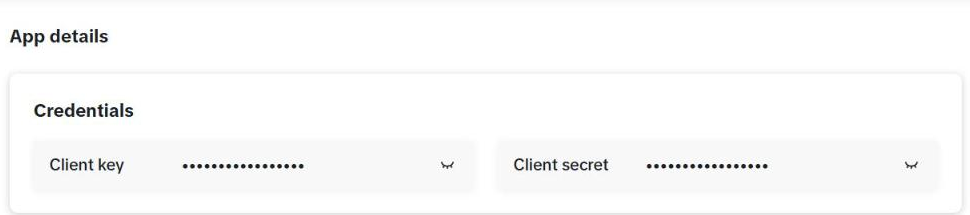
14.4 Filling in App details
| Field | Value for AutoPost | Details |
|---|---|---|
| App icon | AutoPost icon, 1024 × 1024 px | JPEG/JPG/PNG, max. 5 MB. Shown on the permission page. Already uploaded in the sandbox (shown on the permission page in 4.3); on the Production tab it's still empty (19.1). |
| App name | AutoPost PT SKK | Already filled in from 14.1. |
| Category | The most suitable category | Required (marked *). Choose from TikTok's list. |
| Description | A short description of AutoPost | According to TikTok's documentation, shown on the permission page. |
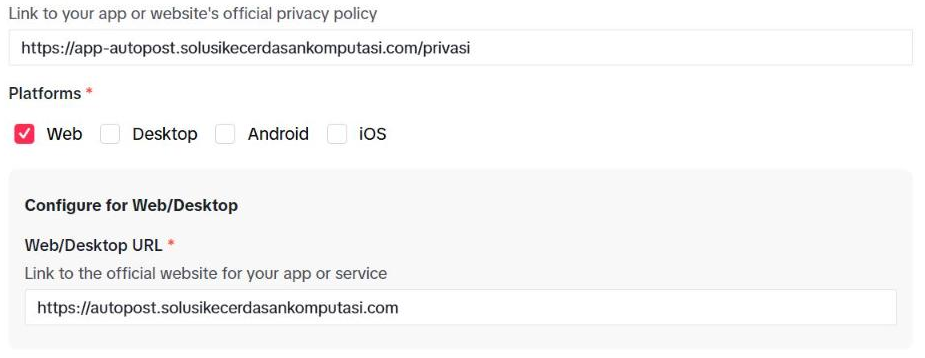
| Platforms | Web | Desktop, Android, and iOS are not ticked. |
The following three addresses must be verified (chapter 15):
| Field | Address |
|---|---|
| Terms of Service URL | https://app-autopost.solusikecerdasankomputasi.com/ketentuan |
| Privacy Policy URL | https://app-autopost.solusikecerdasankomputasi.com/privasi |
| Web/Desktop URL | https://autopost.solusikecerdasankomputasi.com (AutoPost's official site / landing page) |
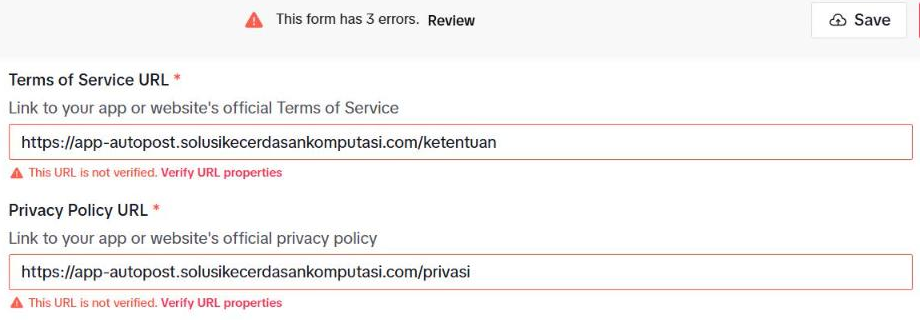
Once all three addresses are filled in, each is marked in red "This URL is not verified. Verify URL properties" and the top bar says "This form has 3 errors." (the image above shows the first two). That's expected — verification is in chapter 15.
15. Administrator C — Verifying the domain
TikTok only accepts addresses that are proven to be yours. One verification of the parent domain solusikecerdasankomputasi.com covers both app-autopost. (terms, privacy, return address, and media proxy) and autopost. (the official site).
15.1 Choosing the property type
Press Verify URL properties (or URL properties at the top right of the app page).
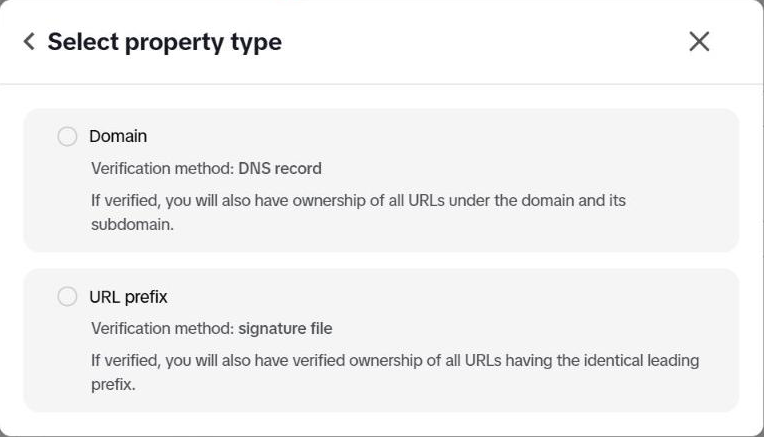
Under Select property type, choose Domain — "Verification method: DNS record". According to TikTok, a verified domain covers every URL under the domain and its subdomains.
Enter the parent domain solusikecerdasankomputasi.com (we didn't capture this input screen; the result is shown in 15.2).
15.2 Copying the TXT value from TikTok
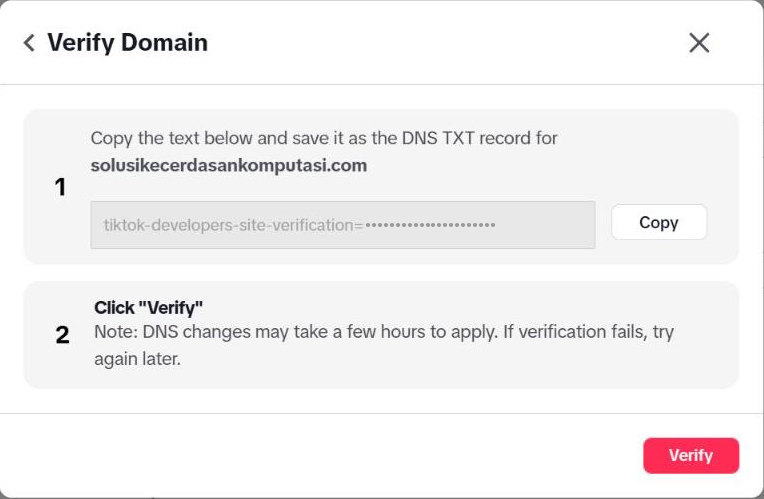
The Verify Domain window shows two steps:
"Copy the text below and save it as the DNS TXT record for solusikecerdasankomputasi.com" — press Copy. The value starts with
tiktok-developers-site-verification=."Click Verify" — with a note that DNS changes can take a few hours.
Don't press Verify yet. Add the DNS record first (15.3).
15.3 Adding the TXT record on Cloudflare
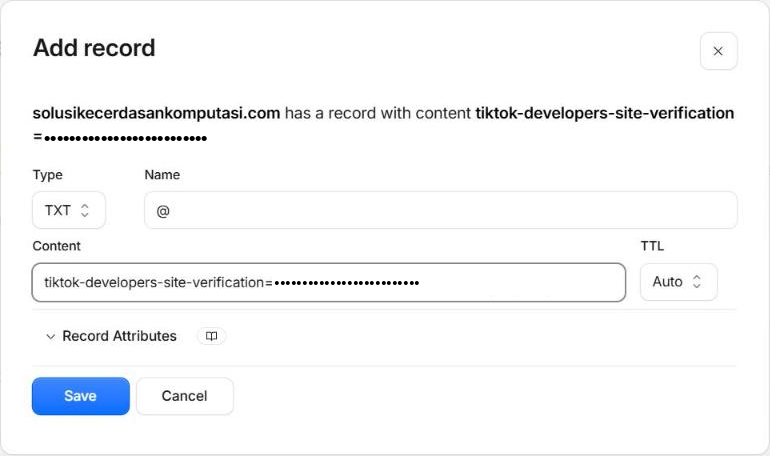
Sign in to Cloudflare, open the domain solusikecerdasankomputasi.com → DNS → Records → Add record.
Fill in:
| Field | Value |
|---|---|
| Type | TXT |
| Name | @ (parent domain) |
| Content | Paste the value copied from TikTok (tiktok-developers-site-verification=…) |
| TTL | Auto |
Above the fields, Cloudflare summarizes the record it will create ("… has a record with content …"). Press Save.
15.4 Pressing Verify
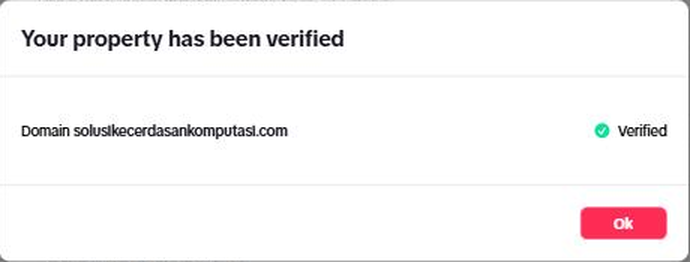
Go back to the Verify Domain window on TikTok and press Verify. If it works, "Your property has been verified" appears with the row Domain solusikecerdasankomputasi.com — Verified. Press Ok. The "This URL is not verified" messages in App details disappear.
If it fails, wait (according to TikTok, DNS changes can take a few hours), then press Verify again.
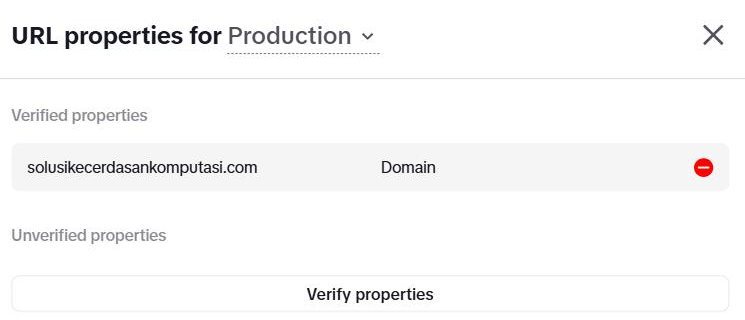
To check it at any time, press URL properties at the top right of the app page. The URL properties for Production window lists solusikecerdasankomputasi.com (type Domain) under Verified properties.
16. Administrator D — Setting up the sandbox
An app that TikTok has never approved must be tested and demoed from a sandbox. The AutoPost that currently runs in production uses this sandbox's keys (chapter 18).
16.1 Creating the sandbox
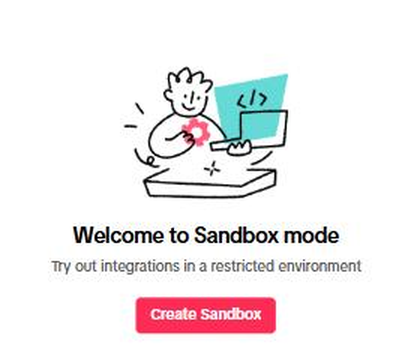
On the app page, open the Sandbox tab. It shows "Welcome to Sandbox mode — Try out integrations in a restricted environment."
Press Create Sandbox.
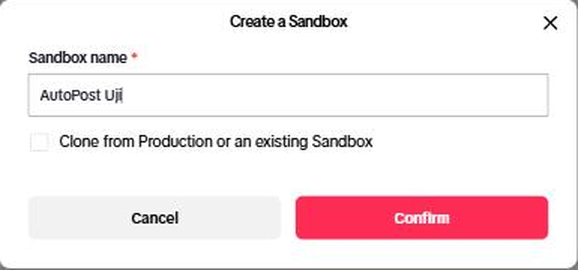
Fill in Sandbox name, for example AutoPost Uji. The "Clone from Production or an existing Sandbox" box can be left unticked.
Press Confirm.
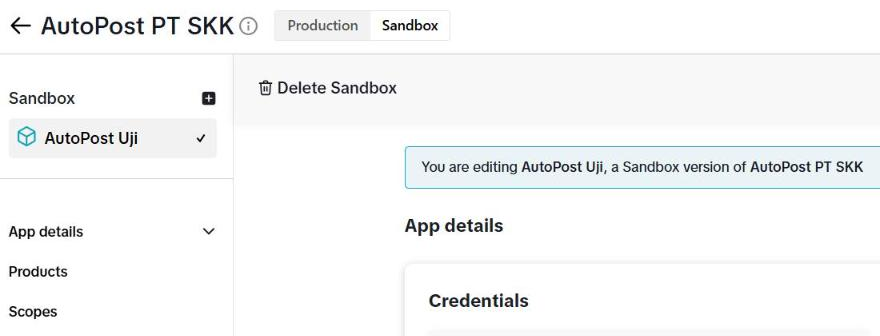
The sandbox page opens with the text "You are editing AutoPost Uji, a Sandbox version of AutoPost PT SKK". The sandbox has its own Client key and Client secret, different from Production's. Its left menu: App details, Products, Scopes, and Sandbox settings (the last one is outside the cropped image; it's used in chapter 17). Changes are saved with the red Apply changes button at the top right (16.7).
16.2 Filling in the sandbox App details
Fill in the sandbox's App details the same way as production (14.4): icon, name, terms, privacy, the Web platform, and the Web/Desktop URL. The top bar says "This form has unsaved changes" until Apply changes is pressed.
16.3 Adding Login Kit and Content Posting API
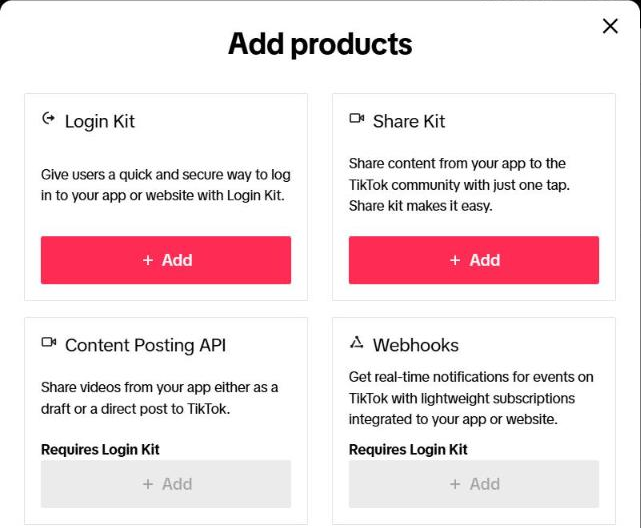
In the Products section, press + Add products.
On the Login Kit card, press + Add.
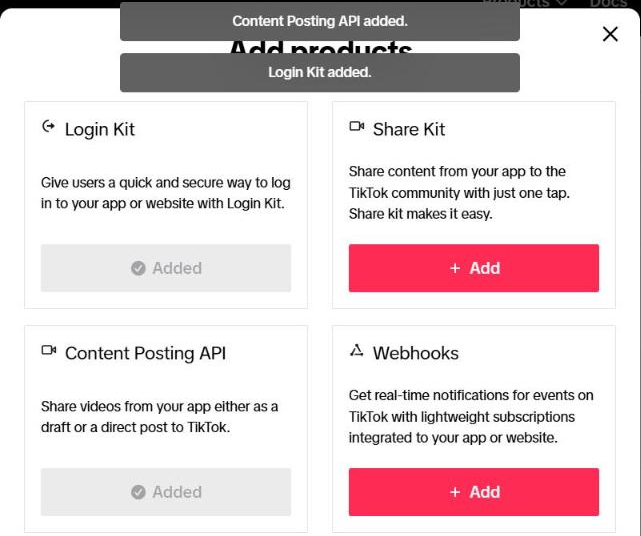
On the Content Posting API card ("Share videos from your app either as a draft or a direct post to TikTok."), press + Add. This product requires Login Kit, so its button only becomes active after step 2.
Each product you add shows a notification ("Login Kit added.", "Content Posting API added.") and its card is marked Added. Press Done at the bottom of the window (outside the cropped image).
Other products (Share Kit, Webhooks, Data Portability API, and so on) do not need to be added.
16.4 Filling in the Redirect URI
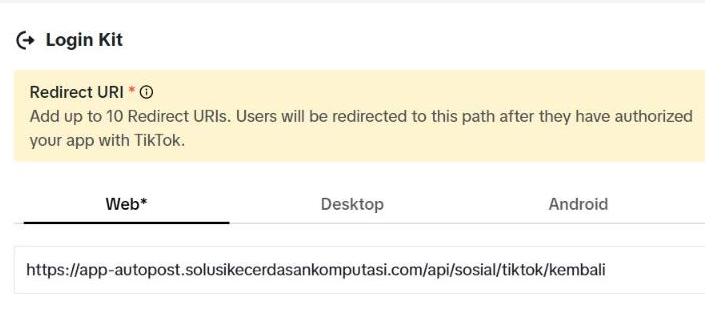
On the Login Kit card, in the Redirect URI section ("Add up to 10 Redirect URIs…"), Web tab, enter:
https://app-autopost.solusikecerdasankomputasi.com/api/sosial/tiktok/kembali
16.5 Turning on Direct Post and verifying the sandbox domain
On the Content Posting API card:
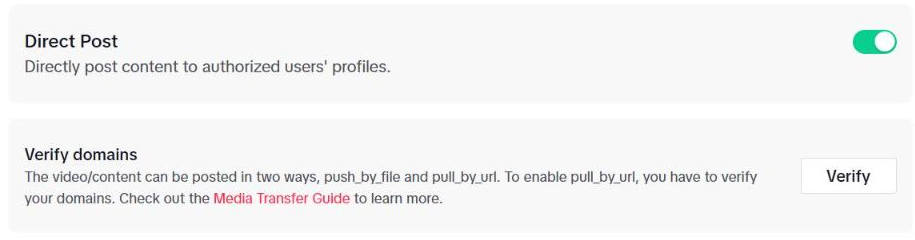
TikTok notes that Upload to TikTok (drafts the creator finishes) is enabled by default. AutoPost doesn't use it.
Turn on the Direct Post switch — "Directly post content to authorized users' profiles."
On the Verify domains row, press Verify. TikTok explains that content can be sent with
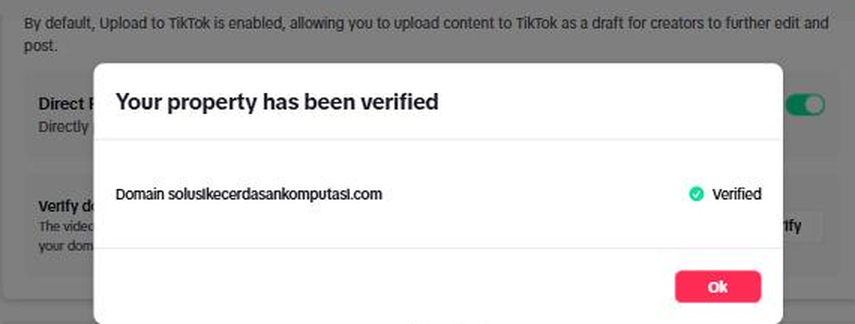
push_by_fileorpull_by_url, and thatpull_by_urlrequires a verified domain. AutoPost usespull_by_url: TikTok pulls the media from AutoPost's own address.Verify the domain solusikecerdasankomputasi.com for the sandbox the same way as in chapter 15. The production verification does not automatically apply to the sandbox.
16.6 Scopes
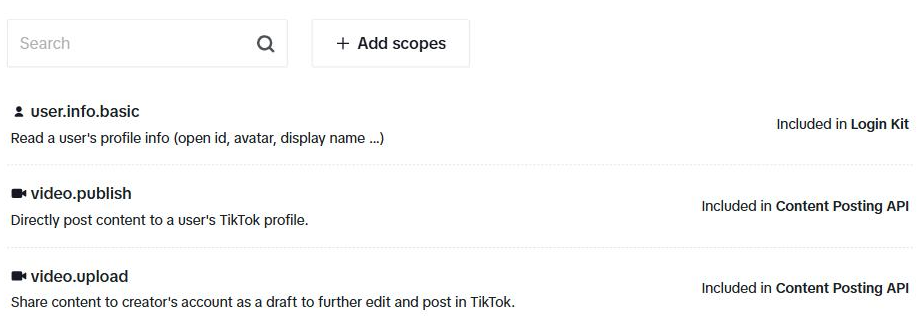
In the Scopes section, make sure these three rows are present:
| Scope | TikTok's description | Comes from |
|---|---|---|
user.info.basic | Read a user's profile info (open id, avatar, display name …) | Login Kit (automatic) |
video.publish | Directly post content to a user's TikTok profile. | Content Posting API |
video.upload | Share content to creator's account as a draft to further edit and post in TikTok. | Content Posting API (added automatically in the sandbox) |
AutoPost only requests user.info.basic and video.publish when a user connects — that's why the permission page shows only two switches (4.3). video.upload shows up in the sandbox list by itself, but it's neither requested nor used.
16.7 Apply changes
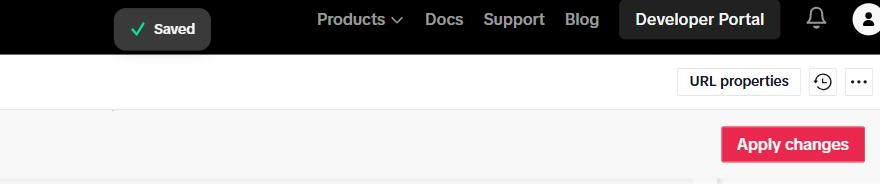
Press Apply changes. A Saved notification appears at the top.
17. Administrator E — Adding target users
While in sandbox mode, only target users can connect the app. Every AutoPost user who wants to try TikTok now must be registered here (according to TikTok's documentation: at most 10 per sandbox, and a new account can take up to 1 hour before it takes effect).
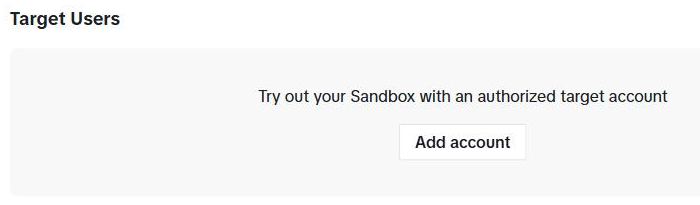
In the sandbox's left menu, open Sandbox settings → Target Users: "Try out your Sandbox with an authorized target account".
Press Add account.
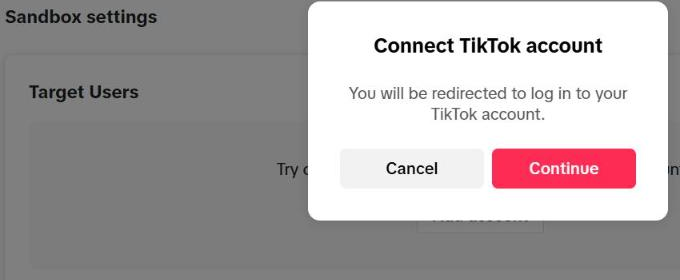
The Connect TikTok account window explains that you'll be redirected to sign in to a TikTok account. Press Continue, then sign in with the TikTok account being registered and approve (according to TikTok's documentation, this includes accepting the Developer Terms of Service; we didn't capture this screen).
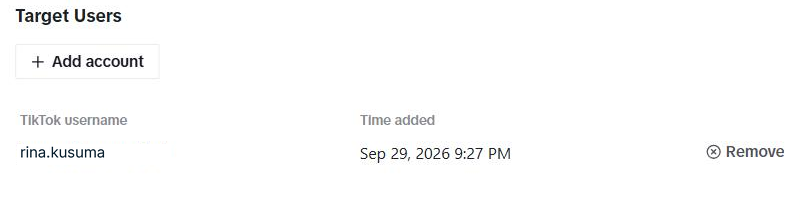
The account appears in the list with its TikTok username, Time added, and a Remove button.
18. Administrator F — Pasting the keys into Vercel
18.1 Copying the Client key and Client secret
The keys AutoPost uses now are the sandbox's (16.1), because the production app hasn't been approved yet.
Open the Sandbox tab → AutoPost Uji → App details → Credentials.
Reveal and copy the Client key, then the Client secret.
18.2 Setting the env variables in Vercel (administrator only)
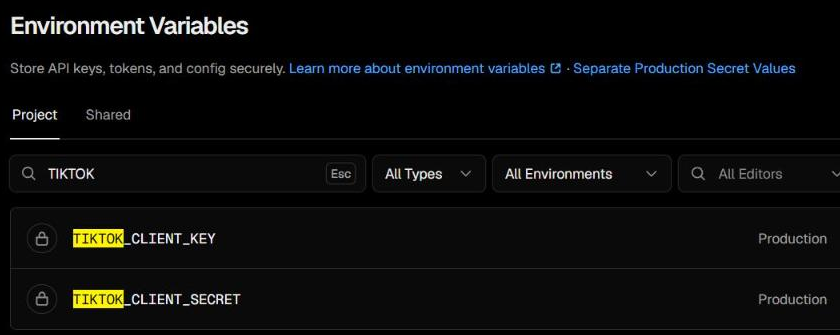
Open the Vercel project autopost-web → Settings → Environment Variables (the Production environment).
Fill in:
| Setting (env) | Value |
|---|---|
TIKTOK_CLIENT_KEY | The Client key. Required. |
TIKTOK_CLIENT_SECRET | The Client secret. Required; mark it Sensitive. |
APP_URL_PUBLIK | https://app-autopost.solusikecerdasankomputasi.com — already there. Just check it, with no trailing slash. |
Press Save, then redeploy so the new settings are picked up.
18.3 Checking the result
Open /akun/tiktok in AutoPost (while signed in):
The The TikTok connection isn't open yet box is gone, and the Connect TikTok button is active.
If the box is still there, open the Note for the AutoPost administrator fold. It lists the names of the env variables that are still empty (without their values).
Then test the user flow yourself (chapters 3–6) with a target-user account. On 29 September 2026 this test succeeded: the account connected, and the photo and video went live as private.
19. Administrator G — The road to audit
Up to chapter 18, AutoPost can be used by target users with private results. For every user to be able to post publicly, two more stages with TikTok remain. Neither has been done yet.
| Stage | Result | Status |
|---|---|---|
| App review (production app) | The AutoPost PT SKK app becomes Live; users no longer need to be registered as target users. | Not submitted yet |
| Direct Post audit | Posts can be public, accounts don't have to be Private, and the 5-users-per-day limit is replaced by a quota from TikTok. | Not submitted yet (after the app is Live) |
19.1 Preparing the production app
On the Production tab, fill in App details (chapter 14) and verify the domain (chapter 15) — already done for the terms, privacy, and site URLs.
Add the same products and settings as the sandbox: Login Kit + Redirect URI, Content Posting API + Direct Post + domain verification, the scopes
user.info.basicandvideo.publish. According to TikTok's documentation, the sandbox configuration can be imported into the production Draft with Import.Upload the App icon on the Production tab — as of 29 September 2026 its box is still empty — and make sure Category and the other required fields are filled in.
Only request scopes that are shown in the demo video. AutoPost doesn't use
video.upload.
19.2 Recording the demo video (from the sandbox)
An app that has never been approved must use the sandbox for its demo. A suggested order (record with the AutoPost interface in English so the reviewers can follow every label):
Sign in to AutoPost at app-autopost.solusikecerdasankomputasi.com. According to TikTok's documentation, the domain in the video must match the app's Website URL — and AutoPost's Web/Desktop URL is autopost.solusikecerdasankomputasi.com (14.4), a different subdomain. Start the recording on that site and then sign in to the app, so both addresses are visible. We don't know yet whether reviewers accept this approach.
Social accounts → TikTok → Connect TikTok → TikTok's permission page shown in full (app name, two permissions) → Continue.
Back in AutoPost: the account is connected.
New post: upload a video → tick the TikTok account → the TikTok panel shows the creator name, privacy with no default, comment/duet/stitch permissions (unticked), commercial content disclosure (two options and the Only me restriction for branded content), AI-generated content, and the preview.
The consent sentence above the button → Send now.
The Posts page: the status goes from processing to sent.
The post appears on the TikTok profile.
Never show the Vercel pages, the Client secret, or tokens. Don't speed the video up.
19.3 Submitting the app review
On the Production tab, open App review. The first field asks how each product and scope works in AutoPost (at most 1,000 characters): how AutoPost uses Login Kit and Content Posting API, and why it needs
user.info.basicandvideo.publish.Press Upload and upload at least one demo video showing the end-to-end flow.
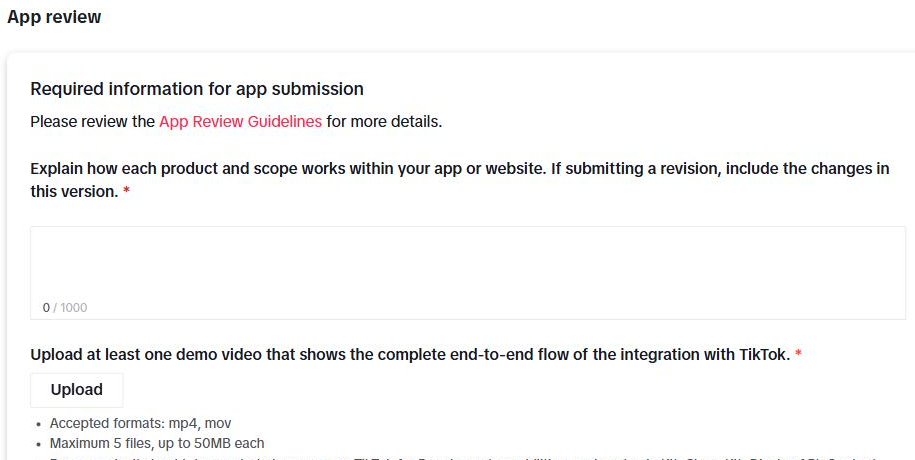
| Demo video requirement (from the App review page; the image shows only the first two) | What it means for AutoPost |
|---|---|
| mp4 or mov format, at most 5 files, each up to 50 MB | Record at 1080p, compress if needed. |
| An app that has never been approved must use the sandbox | Record with a target-user account on production AutoPost (sandbox keys). |
| Show the website where the features are used | app-autopost.solusikecerdasankomputasi.com, with the address bar visible. |
| Every selected product and scope must appear | Login Kit (permission) and Content Posting API (panel + sending). Remove unused products or scopes before submitting. |
| The interface and user interactions are clearly visible | Don't speed it up; add English captions. |
Press Submit for review. The status changes from Draft to In review; the result is Live or Not approved (with the reason in the history).
According to TikTok's documentation, the app review takes a few days to two weeks. Submitting this form is an action on behalf of the company — the administrator presses Submit for review personally.
19.4 Submitting the Direct Post audit
Once the app is Live, the Direct Post audit is submitted separately from the developer portal. According to reports from other developers (unofficial), the form includes: a description of the product and the integration, the estimated number of posts per day (the basis for TikTok's daily user quota), the UX steps, the reason for each scope, and a demo video. TikTok doesn't give a timeline for the audit.
19.5 After the app is Live and the audit passes
Copy the Client key and Client secret from the Production tab, paste them into Vercel replacing the sandbox keys (18.2), then redeploy.
Ask users who connected during the sandbox period to reconnect (8.2) — tokens from the sandbox app most likely don't work with the production app (we haven't tried this).
Test it yourself: send a post with the Everyone privacy from a public account, then open the profile from an incognito window.
Update the "awaiting audit" status text in the app (TikTok page, TikTok panel, landing page) and this guide.
20. Administrator checklist
Need help? Open the Help menu in AutoPost, or the New here? How to use this page box on the TikTok page.