AutoPostUser guide
Connecting Instagram to AutoPost
The complete guide: from a professional account and a Meta app to your first photo, design card, and Reels published on your Instagram
Save this guide
PDF version to read offline or print · 6.8 MB · 38 pages
Contents
1. Overview
What you'll achieve
After following this guide, AutoPost can send photos and Reels to your Instagram account: right away when you press Send now, or automatically at the time you schedule.
It works with the official Instagram sign-in and your own Meta app. You never give your Instagram password to AutoPost. For an Instagram account you own, this flow works without submitting App Review to Meta — it was tried for real on 29 September 2026.
- 1An Instagram Business or Creator account
- 2A Meta app + the Instagram use case
- 3Two permissions + the AutoPost redirect URL
- 4Your account becomes an Instagram tester
- 5App ID + App Secret in AutoPost, then Allow
- 6Photos, design cards, and Reels go live
Estimated time
| Your situation | Estimate |
|---|---|
| You already have a Meta app (for example from the Facebook Page guide) | About 30 minutes |
| You don't have a Meta app yet | About 45 minutes |
One time only. Most of the time is spent on Meta's site and instagram.com.
What you need
| What you need | Details |
|---|---|
| An Instagram Business or Creator account | Personal accounts are rejected. Step A explains how to switch. |
| A personal Facebook account | Used to sign in to developers.facebook.com. |
| A Meta app | You can use an app you already have. Don't have one yet? Step B. |
| A laptop or computer | Meta's developer dashboard and the instagram.com settings are easiest to use on a wide screen. |
| An AutoPost account | Already signed in to the AutoPost app. |
What AutoPost sends to Instagram
| Post content in AutoPost | Result on Instagram |
|---|---|
| A JPEG photo (with or without text) | A photo post in the feed. The text becomes the caption. |
| A design card from Image studio | A photo post in the feed (Image studio always saves a JPEG). |
| An MP4 or MOV video | Reels. The text becomes the caption. |
| Text only (no photo/video) | Rejected. The composer holds it back before sending. |
| PNG, WebP, GIF photos, and similar | Rejected. Instagram only accepts JPEG. |
| A link | Added at the end of the caption as plain text (not clickable). |
| Hashtags | At most 5 hashtags per post. |
| Text length | At most 2,200 characters. |
One post can hold one photo/video, or a carousel (a swipeable post) of 2–10 photos/videos. In a carousel, every photo must still be a JPEG, alt text is filled in per photo, the caption is written only once, and Instagram crops all media to the ratio of the first item (the cover) — keep the ratios the same, for example 4:5.
2. Understanding the terms
| Term | What it means |
|---|---|
| Professional account | An Instagram account of the Business or Creator type. Only these types can post through the official API. |
| Meta app | The app you register at developers.facebook.com. Free. This app is what asks your Instagram account for permission. |
| Use case | The "what is this app for" choice. For Instagram: Manage messaging & content on Instagram. |
| Permission | A right AutoPost asks for. Only two: instagram_business_basic (reading the profile) and instagram_business_content_publish (publishing posts). |
| Redirect URL | The AutoPost address Instagram sends you back to after you press Allow. Meta's dashboard field has the same name: Redirect URL. |
| Instagram Tester | A role in the Meta app for an Instagram account. With this role, your account can use the app without App Review. |
| Instagram app ID | The app number used only for the Instagram sign-in. It's different from the Facebook app ID at the top of the dashboard. |
| Instagram app secret | The app's secret key of 32 letters/digits. Treat it like a password. |
| Token | The access key Instagram gives after you press Allow. AutoPost stores it encrypted and renews it on its own. |
| Reels | Instagram's short videos. Every video from AutoPost is published as Reels. |
3. Step A — Setting up a professional account
Checking the account type
Open instagram.com in your browser and sign in with the account you want to connect.
Open Settings.
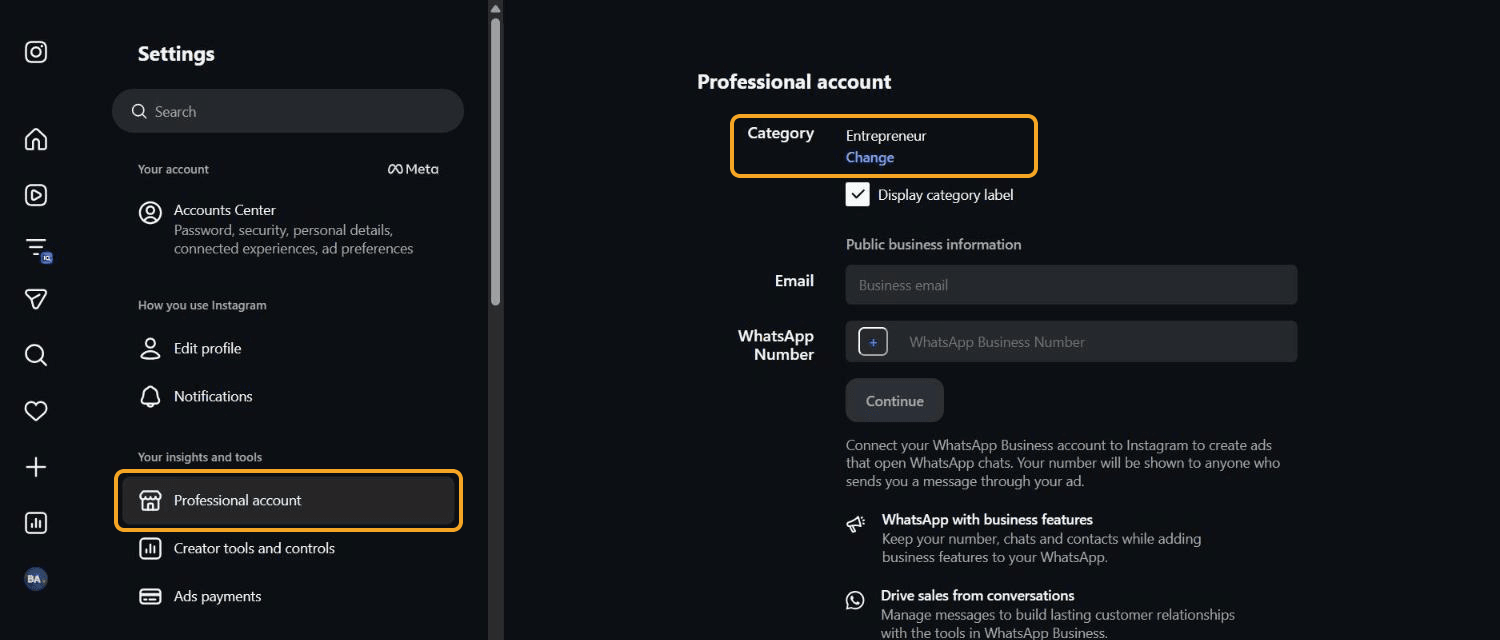
Under Your insights and tools, look for the Professional account menu.
If that menu is there and shows a Category (for example Entrepreneur), your account is already professional. Go on to Step B.
If the account is still personal
Switch it to a professional account first. It's free, and you can switch back at any time.
In the Instagram app, open Settings, then look for the Account type and tools menu.
Choose Switch to professional account.
Follow the prompts: choose Creator or Business, then pick the category that fits best.
The menu names can differ slightly depending on the version and language of your Instagram app.
4. Step B — Setting up a Meta app
If you already have a Meta app
For example the app you created while following the Facebook Page guide (/panduan/facebook/en). Just use that app. This guide was tested with the same app: one app can serve a Facebook Page and Instagram at once. Go on to Step C.
If you don't have a Meta app yet
Follow Step B in the Facebook Page guide (/panduan/facebook/en) to create an app at developers.facebook.com. There's only one difference: at the Use cases step, tick Manage messaging & content on Instagram (with or without Manage everything on your Page). If you tick it there, you can skip Step C.
5. Step C — Adding the Instagram use case
At developers.facebook.com, open your app.
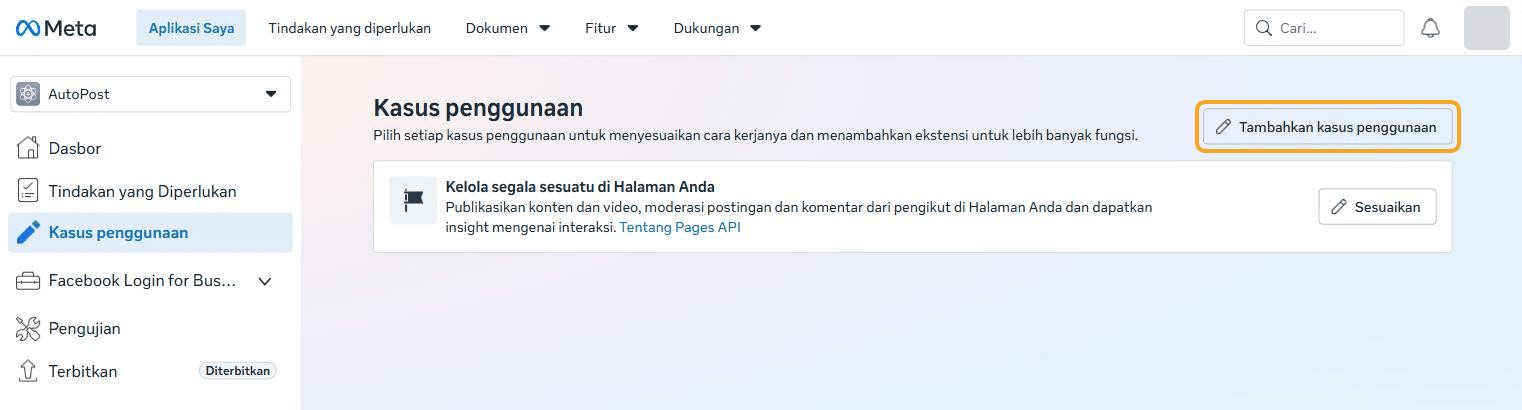
In the left menu, choose Use cases.
Press Add use case at the top right.
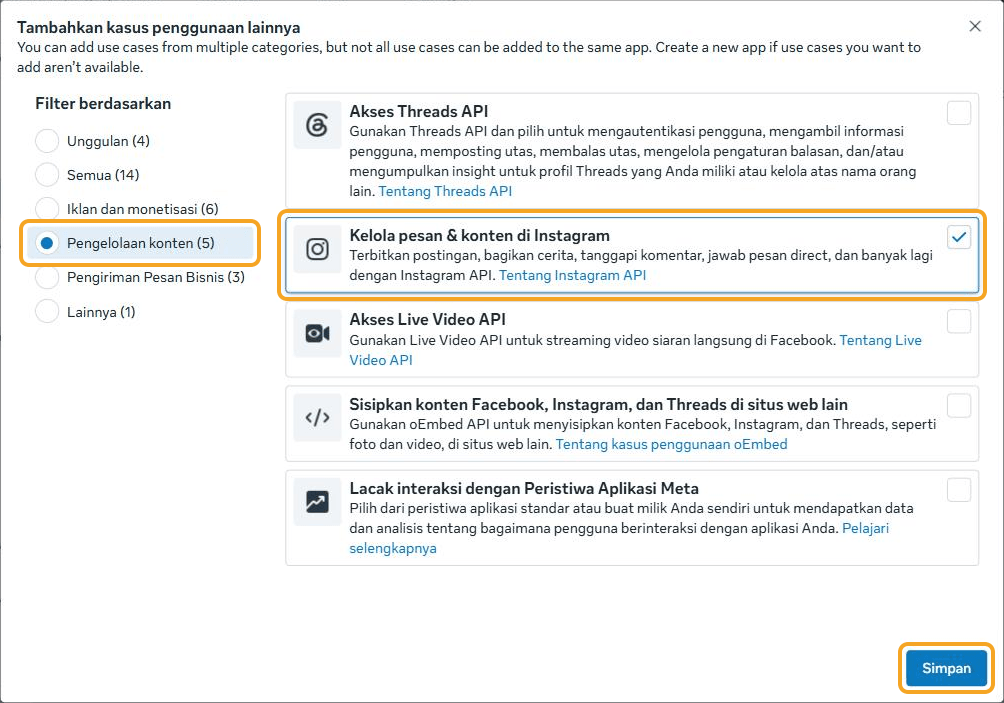
A window for adding more use cases opens. Under Filter by, choose Content management.
Tick the Manage messaging & content on Instagram card.
Press Save.
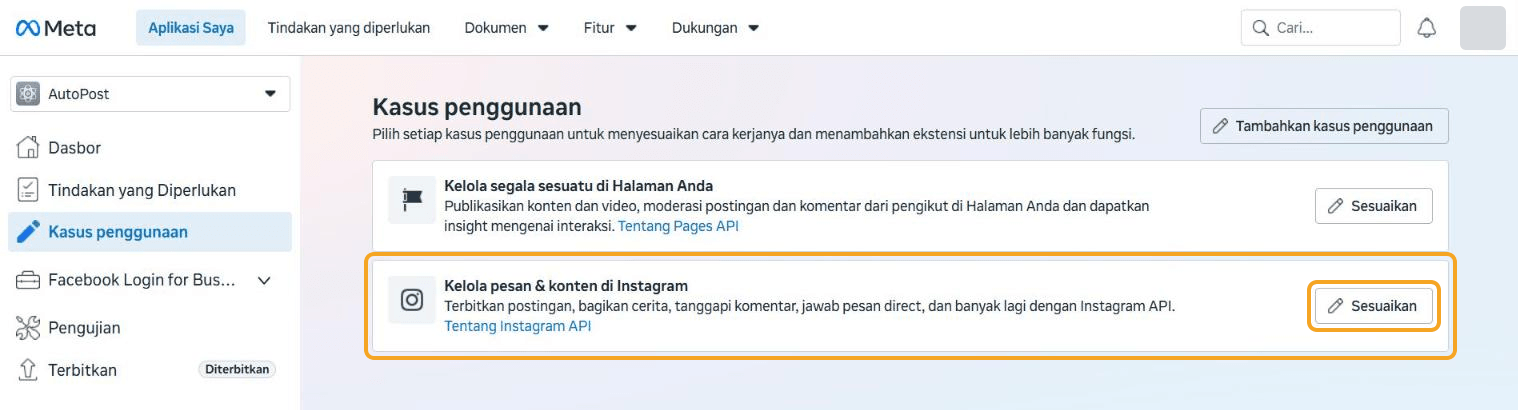
Your app now has two use cases (or one, if it's a new app just for Instagram). Each has a Customize button.
6. Step D — Adding two permissions
6.1 Opening the setup page
On the Manage messaging & content on Instagram card, press Customize.
The Customize use case page opens. At the top left there's an Instagram API selector. Below it are the menus Permissions and features, API setup with Instagram sign-in, an API integration helper, and API setup with Facebook sign-in.
The one AutoPost uses is API setup with Instagram sign-in. The API setup with Facebook sign-in menu isn't used.
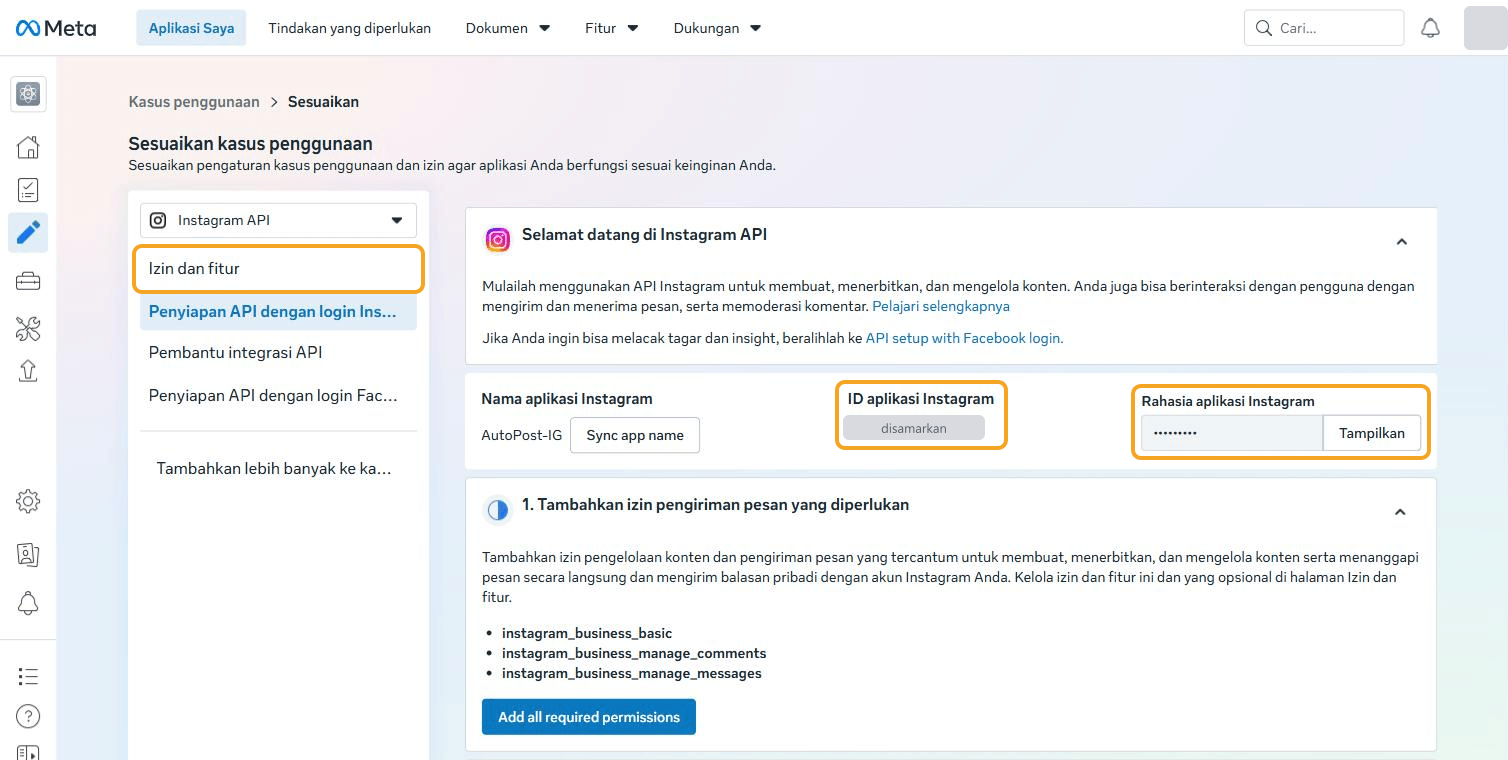
The API setup with Instagram sign-in page has three cards at the top — Instagram app name (for example AutoPost-IG), Instagram app ID, and Instagram app secret — followed by five numbered steps. Here's what you do and don't need to do:
| Step on Meta's page | Needed? |
|---|---|
| 1. Add required messaging permissions | Don't press Add all required permissions. Add the two permissions through Permissions and features (6.2). |
| 2. The access token step | Not needed. AutoPost gets its own token when you press Allow. |
| 3. The webhook step (Callback URL, Verify token) | Not needed. Leave it empty. |
| 4. Set up Instagram business sign-in | Needed — Step E. |
| 5. Complete app review | Not needed for your own account that is an Instagram Tester (Step F). |
6.2 Adding the permissions in Permissions and features
In the left menu, choose Permissions and features.
Find the
instagram_business_basicrow, then press + Add.Find the
instagram_business_content_publishrow, then press + Add.Both are now marked Ready for testing, and their button changes to Actions.
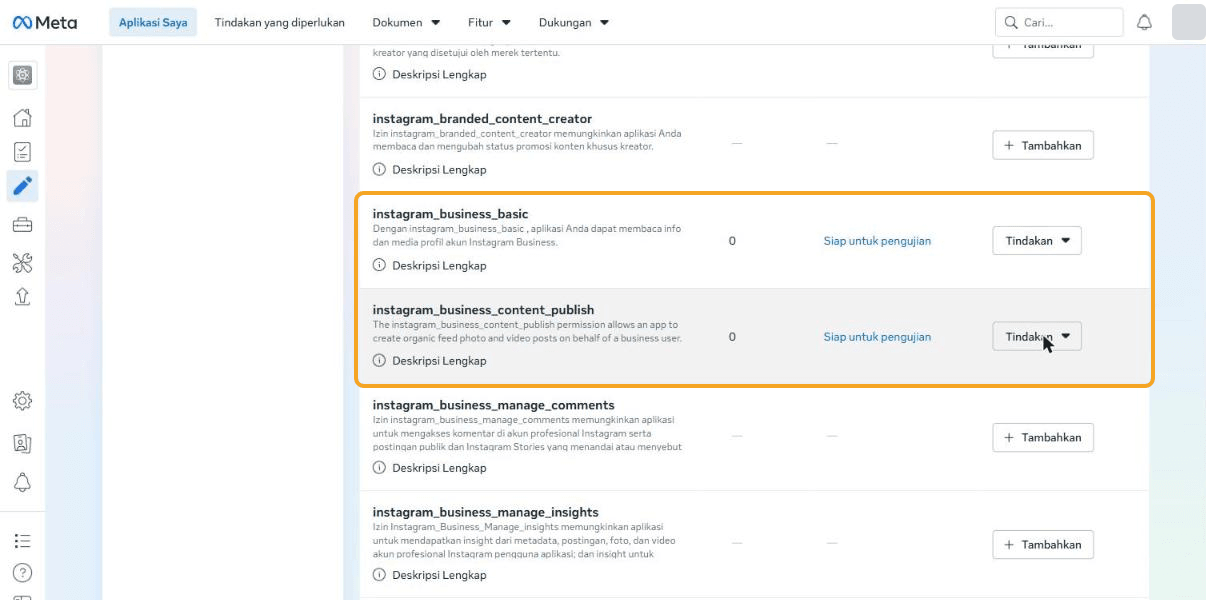
| Permission | What it's for |
|---|---|
instagram_business_basic | Reading your Instagram username, account type, and account ID. |
instagram_business_content_publish | Publishing photos and Reels. |
You don't need to add any other permission.
7. Step E — Registering the redirect URL
7.1 Copying the address from AutoPost
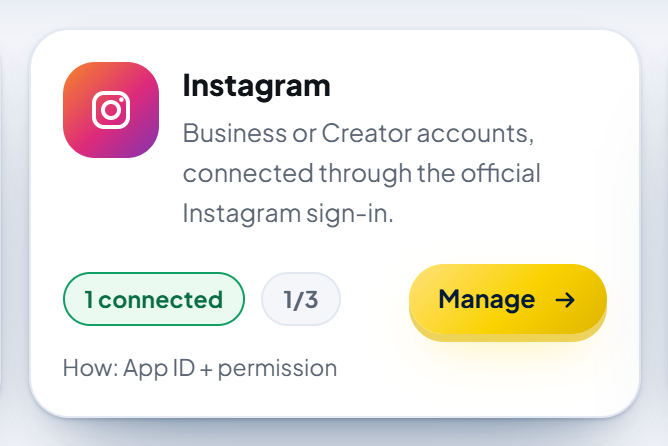
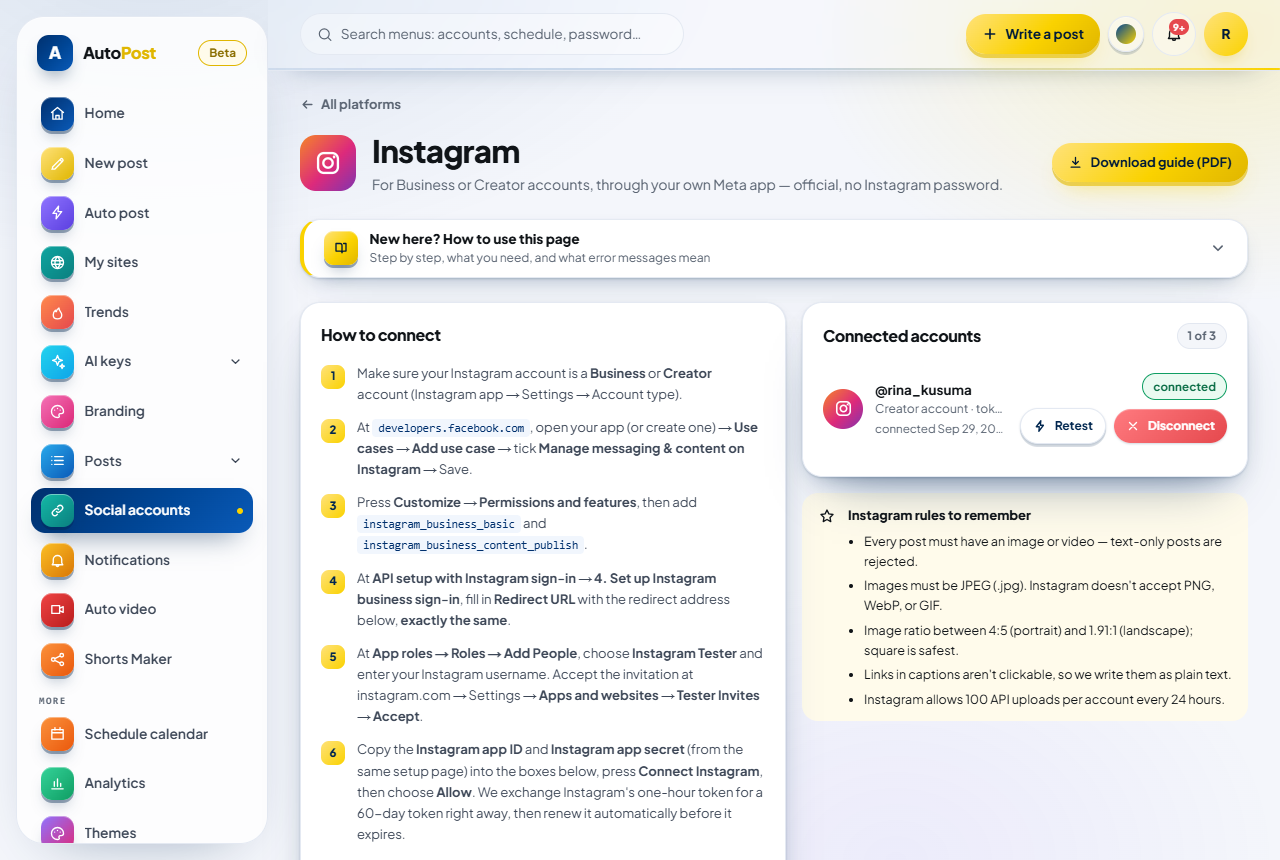
In AutoPost, open the Social accounts menu, then on the Instagram card press Connect (it says Manage if an account is already connected).
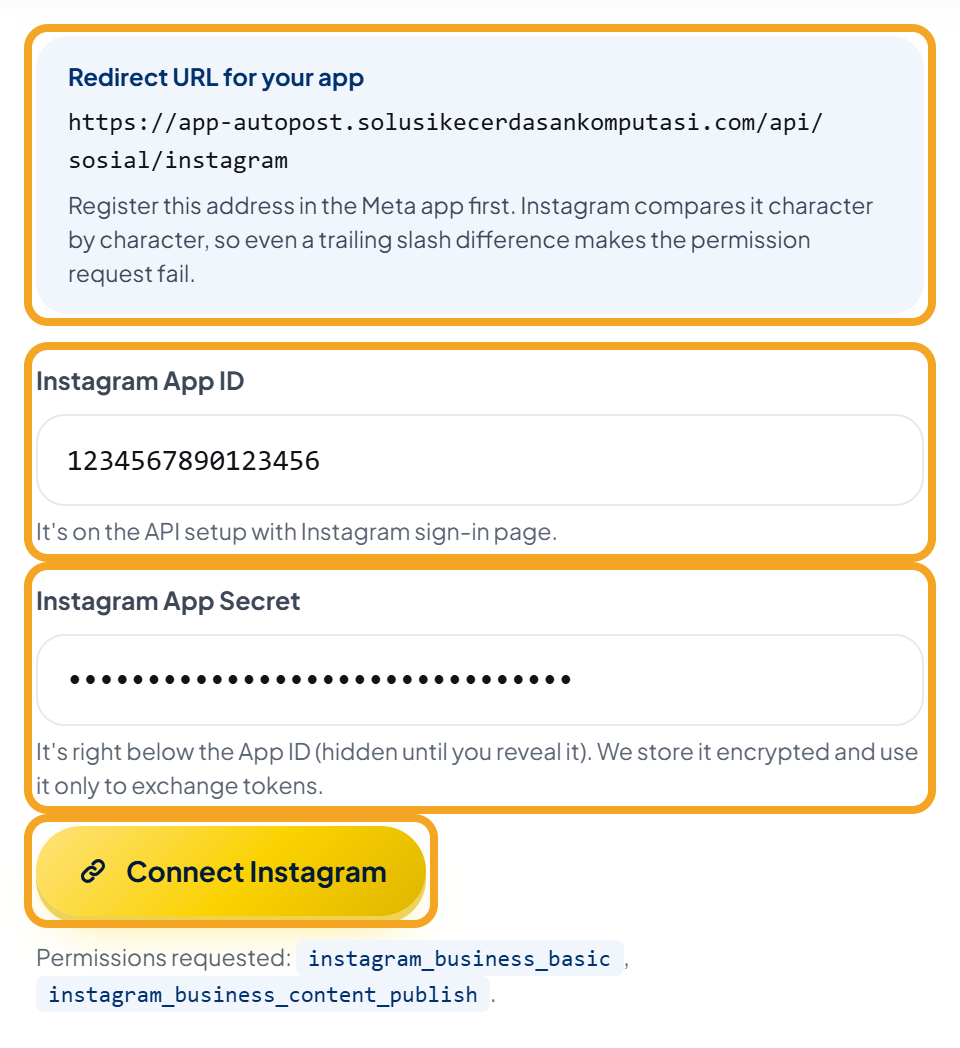
In the How to connect card, find the blue box Redirect URL for your app.
Click the address in that box. The whole address is selected at once. Copy it (Ctrl+C).
For AutoPost at app-autopost.solusikecerdasankomputasi.com, the address is:
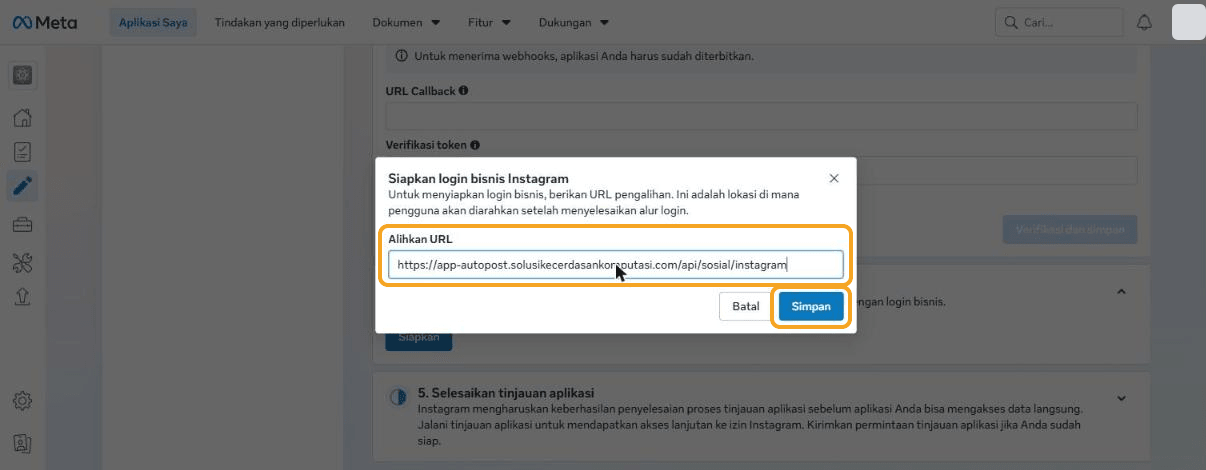
https://app-autopost.solusikecerdasankomputasi.com/api/sosial/instagram
7.2 Pasting it into Meta's dashboard
Go back to API setup with Instagram sign-in in Meta's dashboard.
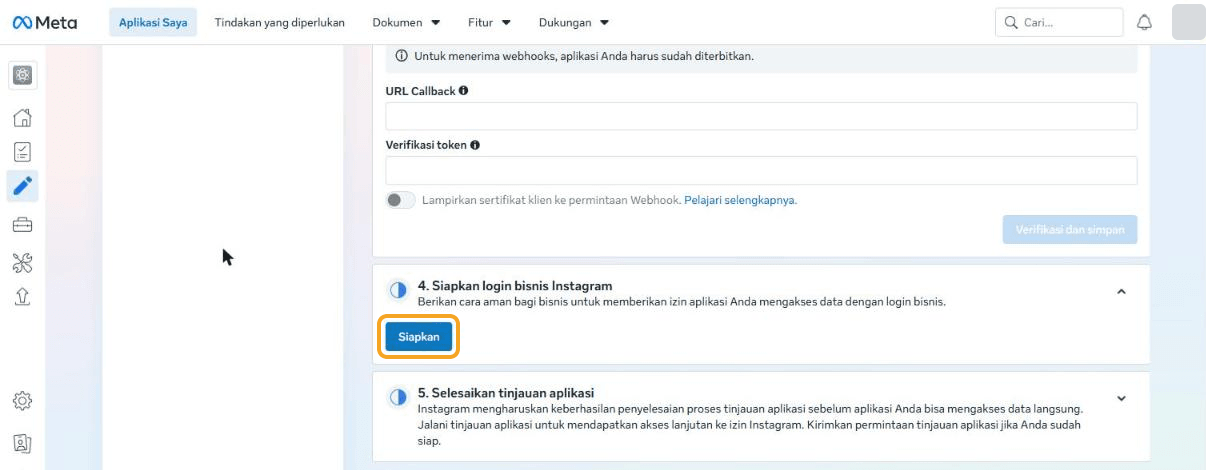
Scroll to 4. Set up Instagram business sign-in, then press Set up.
The Set up Instagram business sign-in window opens. Paste the address into the Redirect URL field.
Press Save.
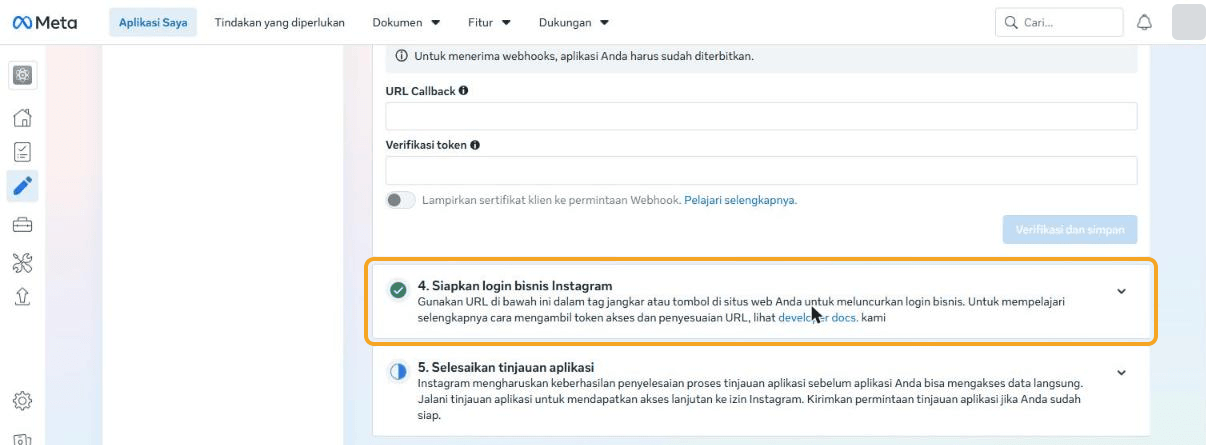
The step 4 card now has a green check mark and a sentence like "Use the URL below in an anchor tag or button…". That sentence is meant for developers; you don't need to do anything else here.
8. Step F — Making your account an Instagram tester
As long as the app hasn't passed App Review, Instagram permission can only be given by accounts that have a role in the app. That's why your Instagram account needs to become an Instagram Tester, and the invitation must be accepted.
8.1 Adding the tester in Meta's dashboard
In the app dashboard's left menu, choose App roles → Roles.
Press Add People.
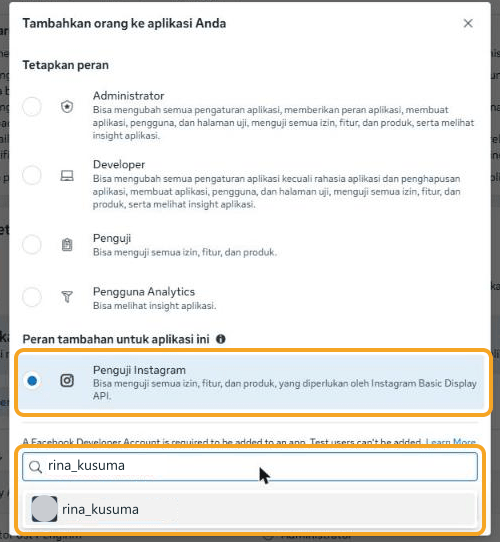
A window for adding people to your app opens. At the top are Administrator, Developer, Tester, and Analytics User. Don't choose any of them.
In the section for additional roles for this app, choose Instagram Tester.
In the search field, type your Instagram username (without @). Choose your account from the suggestions.
Press Add.
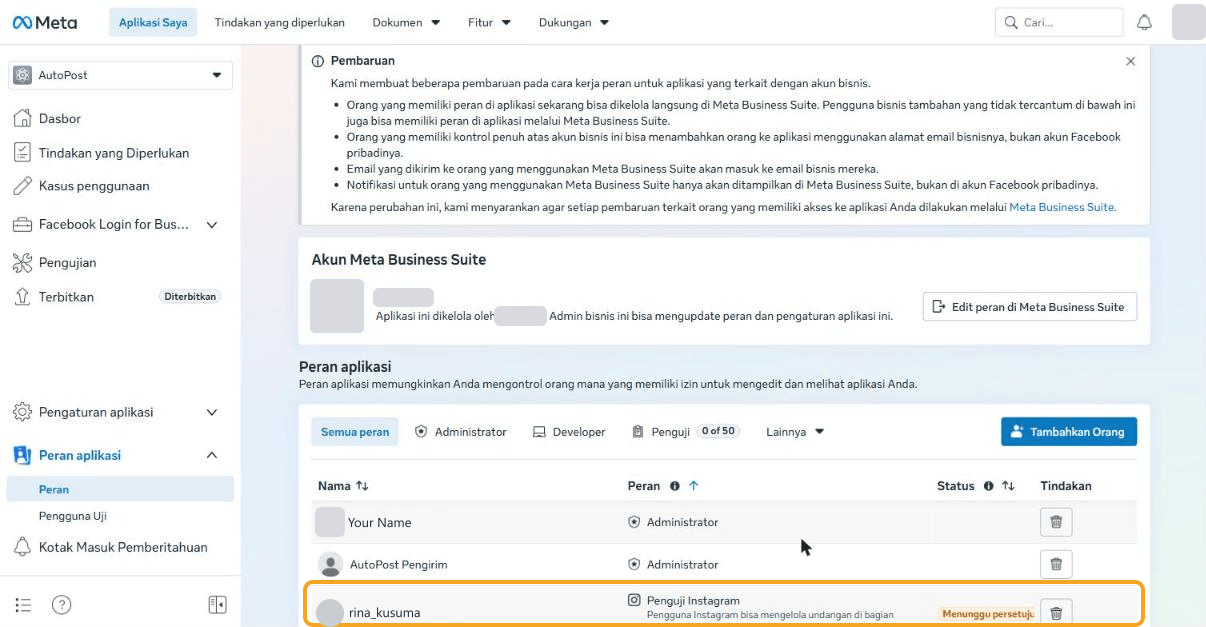
Your account now appears in the App roles list with the Instagram Tester role and the status Waiting for approval (or Pending).
8.2 Accepting the invitation on Instagram
The invitation is accepted from that Instagram account itself, in a browser.
Open instagram.com and sign in with the Instagram account you just invited.
Open Settings → Apps and websites. The direct address is instagram.com/accounts/manage_access/.
Choose the Tester Invites tab.
On the invitation from your app (for example AutoPost-IG), press Accept.
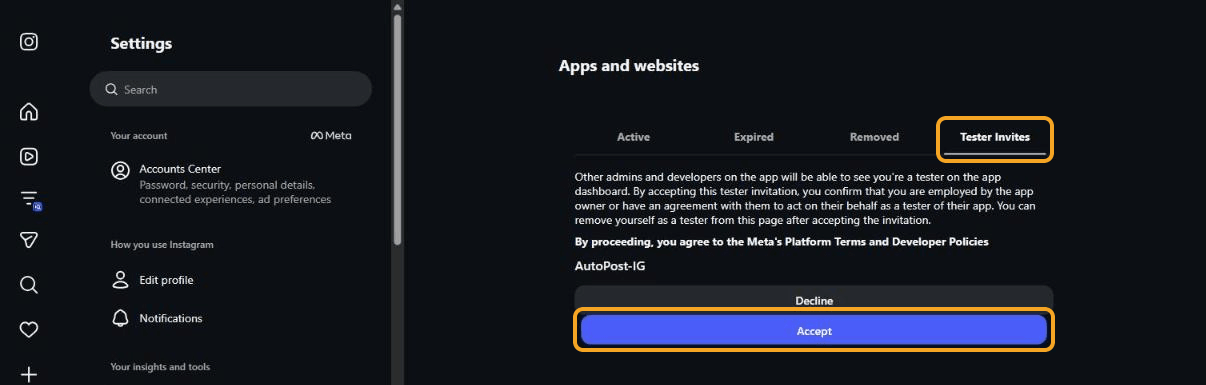
By pressing Accept, you state that you act on behalf of the app owner and agree to Meta's Platform Terms and Developer Policies. Since the app is your own, that's expected.
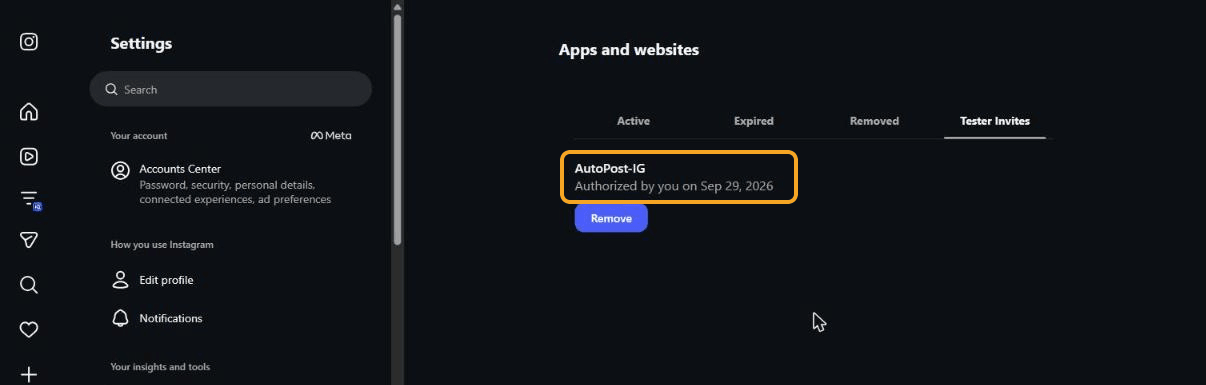
Once accepted, the invitation changes to AutoPost-IG — Authorized by you on … with a Remove button. Don't press Remove here: that button takes your account off the tester list.
9. Step G — Connecting in AutoPost
9.1 Copying the Instagram app ID and secret
Both are on API setup with Instagram sign-in (Step D, 6.1), in the top cards.
Instagram app ID — copy the number.
Instagram app secret — press Show, then copy all 32 characters. If Meta asks for your Facebook password first, enter it yourself — never give it to anyone else.
This secret is only pasted into AutoPost — don't share it.
9.2 Filling in the form
Go back to the Instagram page in AutoPost. Below the redirect URL box there's a form:
Instagram App ID — paste the Instagram app ID. It's 10–20 digits.
Instagram App Secret — paste the Instagram app secret. It's shown as dots on purpose.
Press Connect Instagram.
9.3 Giving permission on Instagram
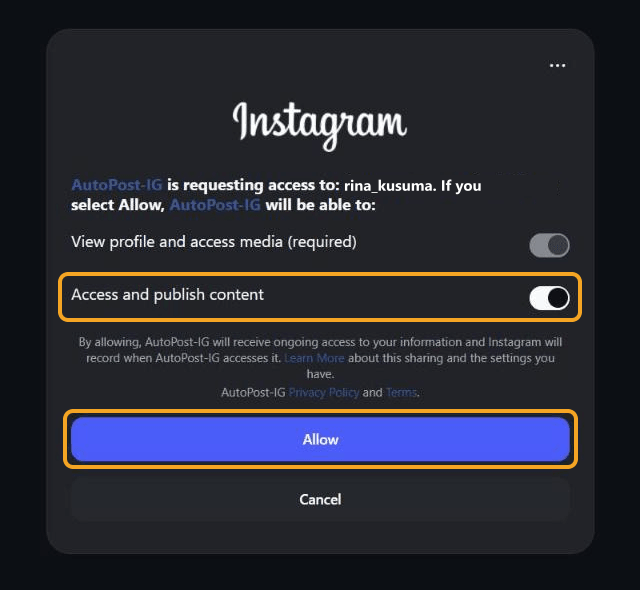
AutoPost takes you to Instagram's permission page. It says roughly: "AutoPost-IG is requesting access to: (your account name). If you select Allow, AutoPost-IG will be able to:".
Check the account name in that sentence. Make sure it's the account you want to connect. If it's the wrong account, press Cancel, sign out of Instagram, sign in with the right account, then start again from 9.2.
View profile and access media (required) — required, already on.
Access and publish content — leave it on. Without this permission AutoPost can't post.
Press Allow. The steps on AutoPost's Instagram page use the same button name.
9.4 What AutoPost does behind the scenes
When you press Connect Instagram, AutoPost checks the format of the App ID and App Secret, then creates a random security code (state). That code, the App ID, and the App Secret are stored encrypted in a browser cookie that lasts 10 minutes.
After you press Allow, Instagram sends you back to the redirect URL. AutoPost makes sure the security code matches and that you're still signed in with the same AutoPost account.
AutoPost exchanges the authorization code for a 1-hour token, then immediately exchanges that for a 60-day token.
AutoPost reads your profile. Personal accounts are rejected.
The token, App ID, and App Secret are stored encrypted (AES-256-GCM) in the database. The temporary cookie is deleted.
Tokens are renewed automatically when 15 days or less of their validity remain. The AutoPost worker runs this check regularly (about once an hour), so you don't need to reconnect every 60 days.
9.5 Signs of success
You're back on the Instagram page in AutoPost. A green box appears at the top:
“@your_account” was connected after testing it with Instagram. Its token is stored encrypted.
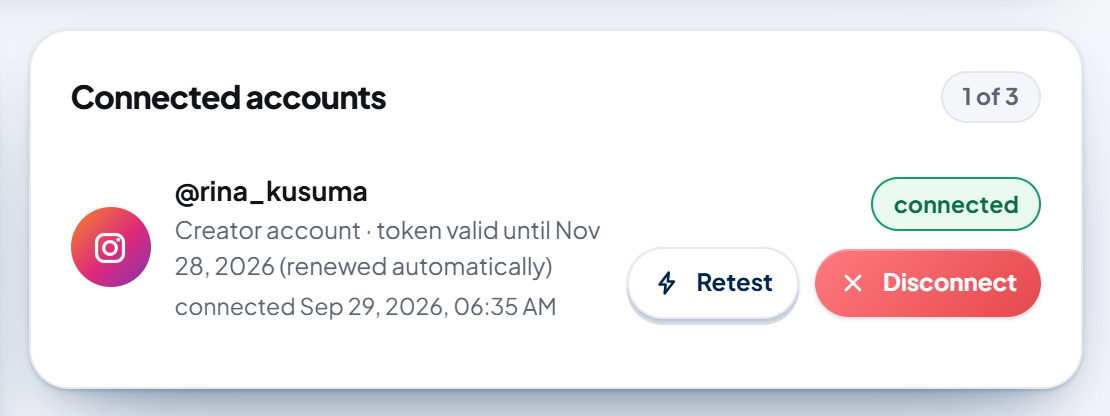
Your account appears in the Connected accounts card with the connected label. A small line below it shows the account type and how long the token is valid, for example "Creator account · token valid until Nov 28, 2026 (renewed automatically)".

9.6 What "1 of 3" means
Each AutoPost account can connect at most 3 Instagram accounts. This limit is enforced in the database. Once you have 3, the form can still be used to reconnect the same account; a fourth account is rejected with the message "There are already 3 Instagram accounts. Disconnect one first if you want to replace it."
10. Step H — Your first post
10.1 Quick rules before sending
Every Instagram post must have a photo or video.
Photos must be JPEG (.jpg), at most 8 MB. The ratio must be between 4:5 (portrait) and 1.91:1 (landscape). Square (1:1) is safest.
Videos are published as Reels (requirements in 10.5).
At most 5 hashtags and 2,200 characters.
Links become plain text in the caption.
The Limits per platform card in New post counts two rows for Instagram: Instagram (x/2200) and Instagram · hashtags (x/5).
10.2 If you only write text (no image)
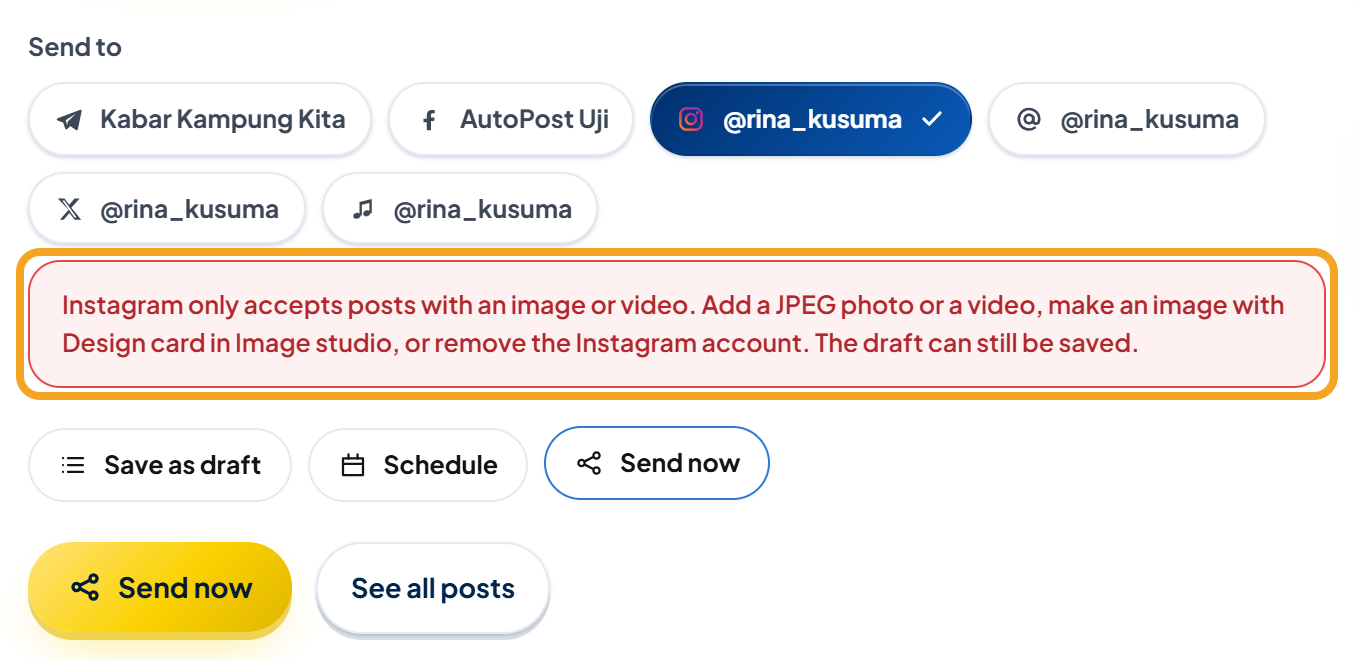
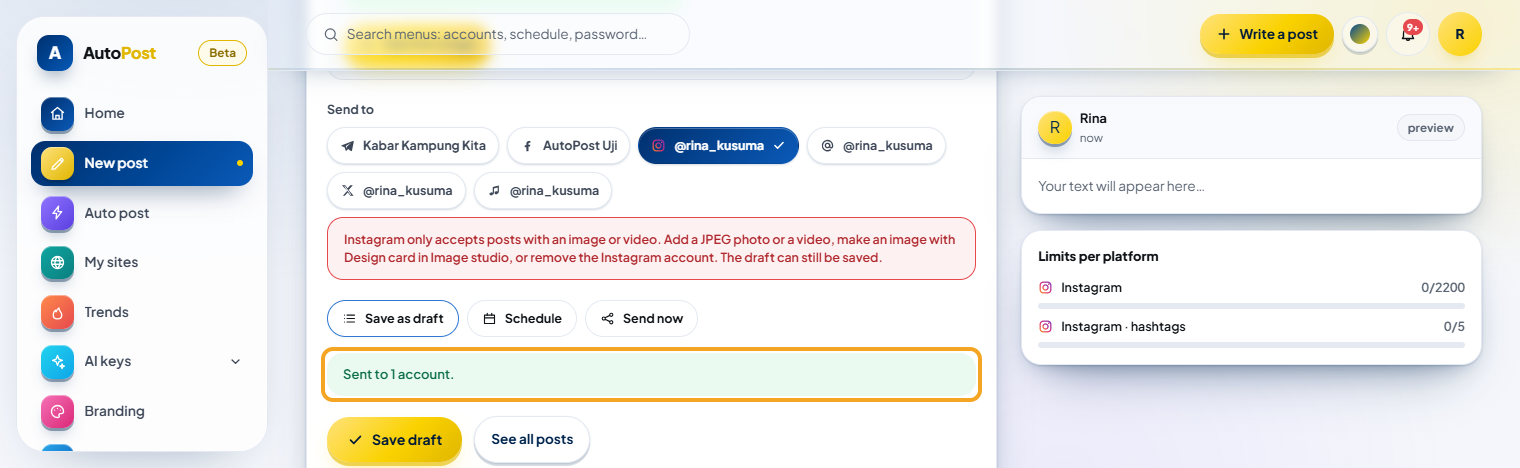
Choose the Instagram account under Send to without a photo or video, and the composer immediately shows a red warning:
Instagram only accepts posts with an image or video. Add a JPEG photo or a video, make an image with Design card in Image studio, or remove the Instagram account. The draft can still be saved.
While that warning is there, Send now and Schedule are on hold: pressing the gold button only shows the same message, and nothing is sent. Save as draft still works. The easiest way to add an image: a Design card (10.3).
10.3 A design card from your text
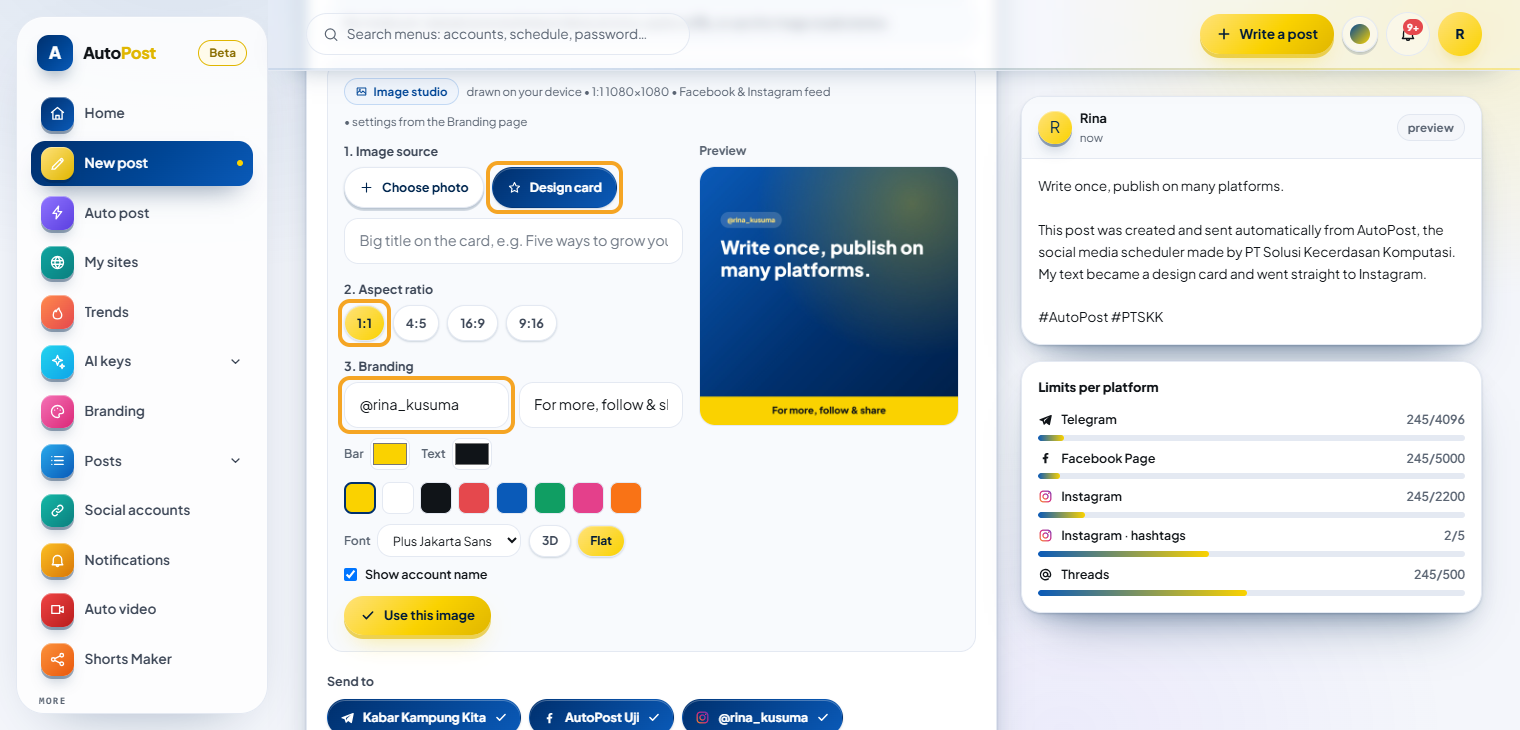
Image studio below the composer can turn your text into a branded image.
Open New post and write the post caption.
In Image studio, section 1. Image source, choose Design card. Fill in a large title for the card. If you leave it empty, the first line of your text is used.
In 2. Aspect ratio, choose 1:1 (or 4:5).
In 3. Branding, fill in the Account name on the image field, for example @your_account. Tick Show account name if you want the name to appear.
Check the Preview, then press Use this image. The message "The image is ready to use for this post." appears.
Under Send to, choose your Instagram account. Deselect other accounts if you only want to test Instagram.
Choose Send now, then press the gold Send now button.
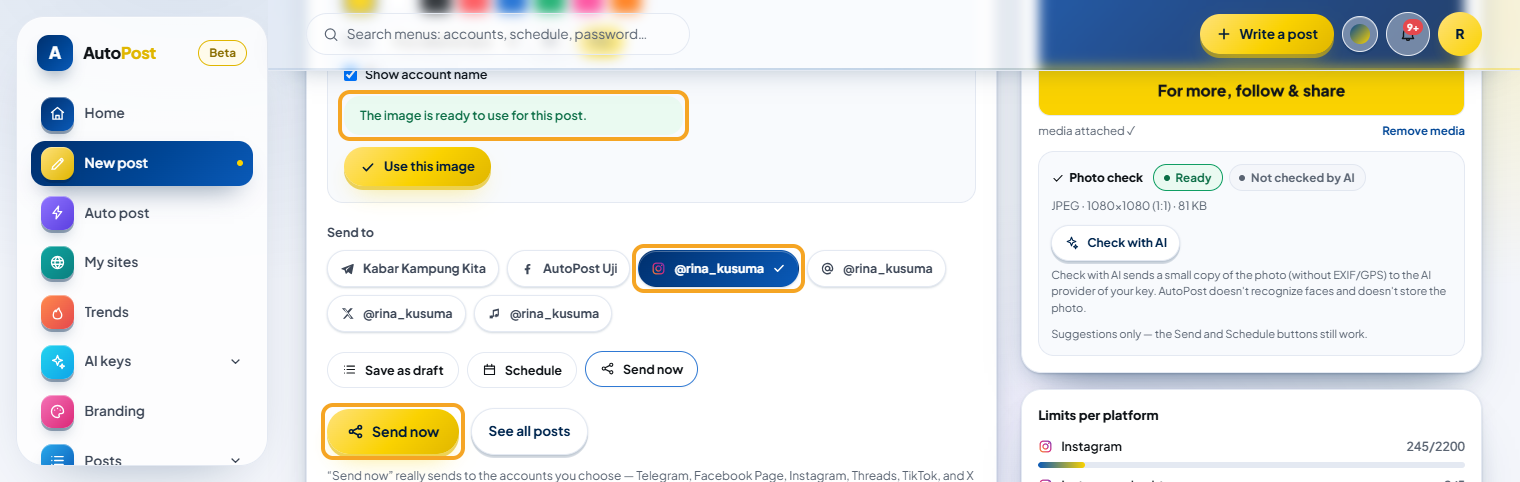
After about 20 seconds, the green message "Sent to 1 account." appears.
10.4 A JPEG photo from your gallery
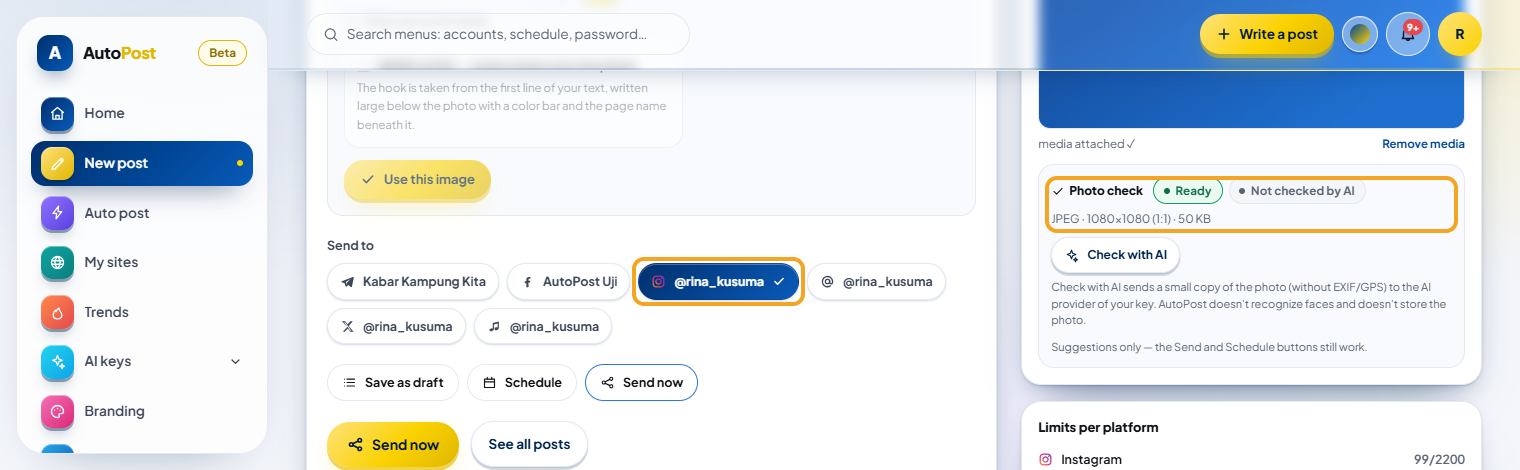
In New post, press Upload from gallery and choose a .jpg photo. The message "Media uploaded & ready to send with this post." appears.
Look at the Photo check card on the right. A photo that fits Instagram is marked Ready, with its format, size, and ratio (for example JPEG · 1080×1080 (1:1)).
Choose the Instagram account under Send to, then Send now. The result is the same: "Sent to 1 account." within about 20 seconds.
10.5 A video becomes Reels
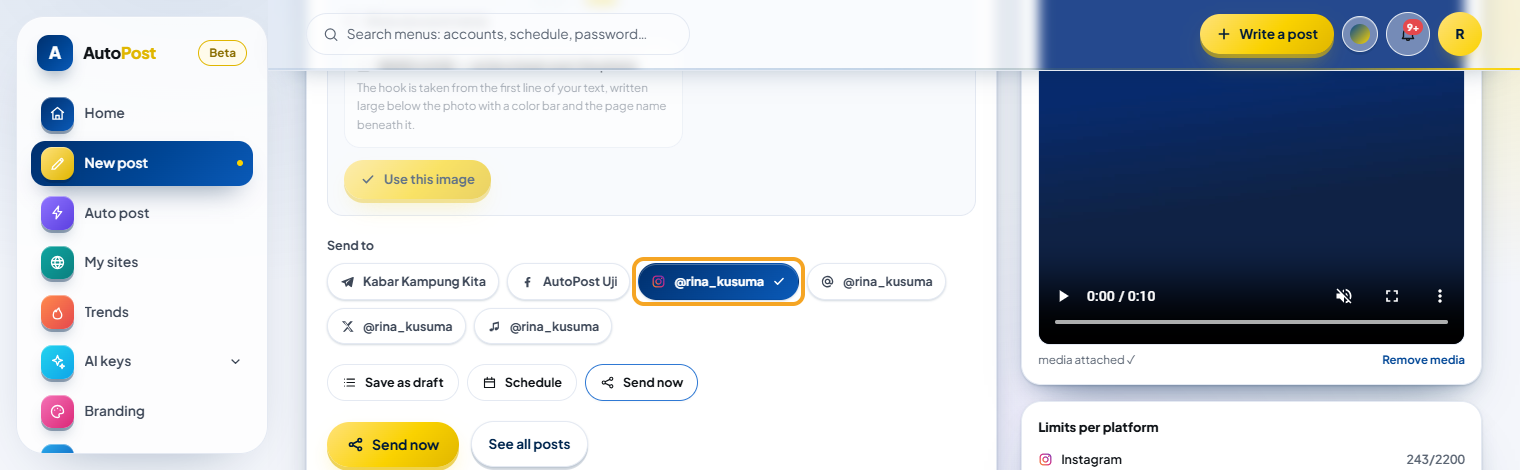
Press Upload from gallery and choose an MP4 or MOV video.
Choose the Instagram account under Send to, then Send now.
First you see "Saved — sending to the selected accounts…". Instagram needs time to process the video. Wait until "Sent to 1 account." appears — in the 29 September test, a 10-second video took about 40–60 seconds.
| Reels video requirement | Value |
|---|---|
| Format | MP4 or MOV, H.264 (or HEVC) video, AAC audio |
| Length | 3 seconds to 15 minutes |
| File size | Instagram: max. 300 MB. AutoPost's Upload from gallery: max. 50 MB |
| Shape | Portrait 9:16 (for example 1080×1920) fits best |
Every video from AutoPost is published as Reels, not as a regular feed video. Alt text doesn't apply to Reels.
10.6 Checking the result
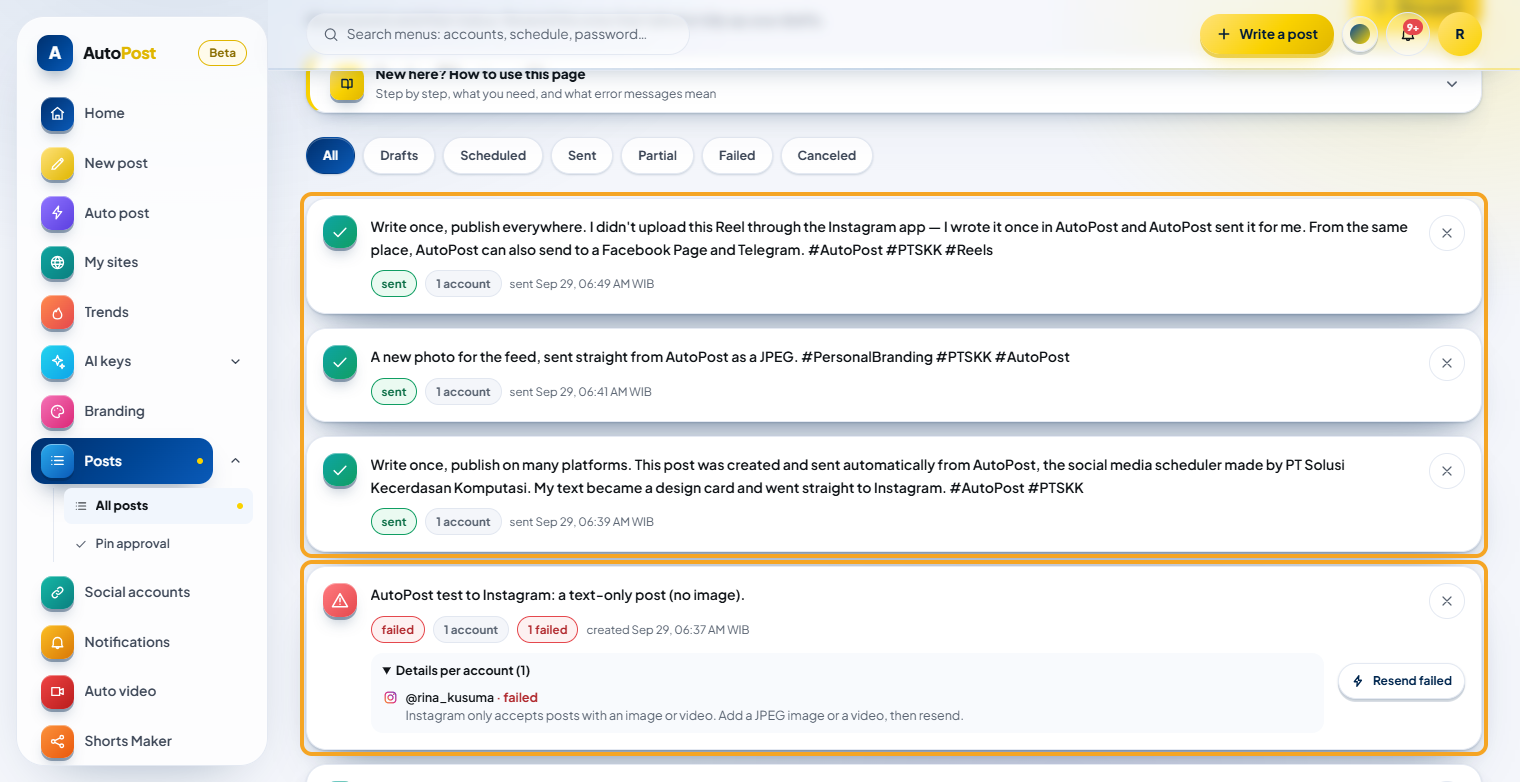
In AutoPost, open the Posts menu. Successful sends have the status sent. Failed sends have the status failed; the reason is in Details per account, and the Resend failed button is available.
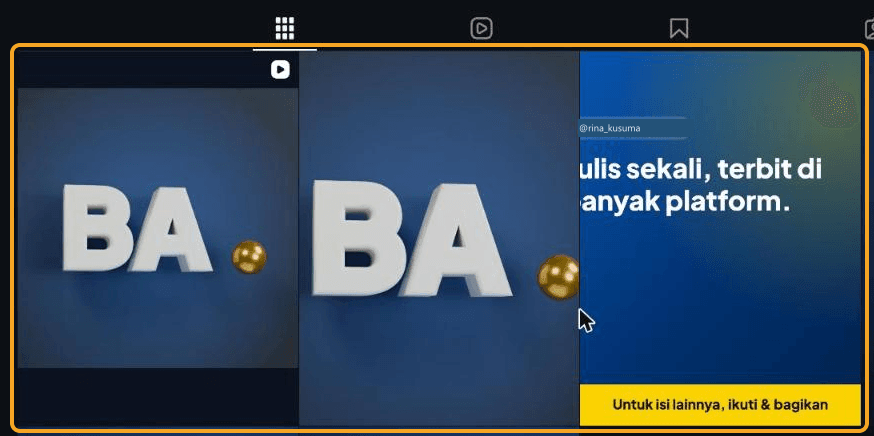
On Instagram, open your profile. Reels have a video icon in the corner of their tile; photos and design cards appear as regular tiles.
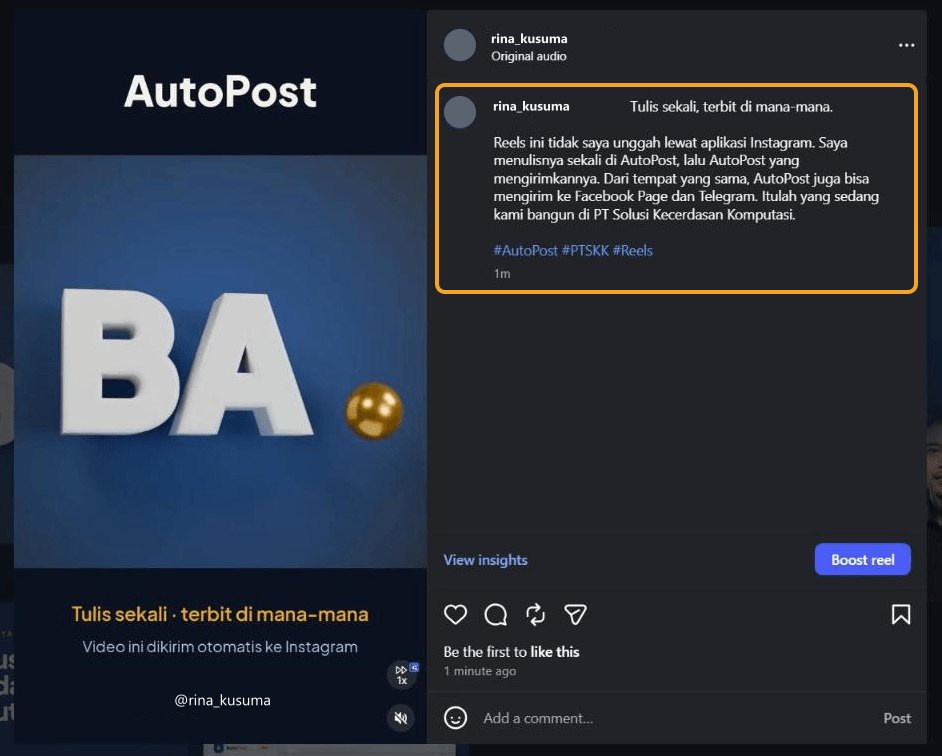
Open the Reels: the caption and hashtags appear in full, just as you wrote them in AutoPost.
10.7 Scheduling and Auto post
Schedule: choose Schedule, fill in the date and time in the Date & time (WIB, UTC+7) field, then press Schedule post. The AutoPost worker sends it on its own at the right time — your laptop can be off. Once it's saved, the message "Post scheduled." appears. The same rules apply: with no photo/video or more than 5 hashtags, the composer holds the schedule back.
Auto post: an Instagram account can be chosen as a target. If there's no suitable image, Auto post makes a design card itself so the Instagram send isn't rejected.
The full composer guide is the New post guide (the Download guide (PDF) button in the header of the New post page).
11. Managing connected accounts
11.1 Retest
The Retest button in the Connected accounts card opens the token, makes sure it hasn't expired, reads your profile on Instagram again, and renews the token if it's close to expiring. If the account is healthy, one of these messages appears:
"Retest finished — the account is still healthy and ready to send."
"Retest finished — the account is healthy and we extended its token too."

If Instagram is busy (rate limits, network, a momentary outage), the account status is not changed; the message ends with "We didn't change the account status — try testing again shortly." If the token has expired or been revoked, the account gets the needs reconnecting label. Other errors give it the has a problem label. The reason is shown in red below the account name.
11.2 Reconnecting or changing the App Secret
Fill in the Instagram App ID and Instagram App Secret again, press Connect Instagram, then Allow with the same Instagram account. AutoPost refreshes the token (it doesn't create a new account), and scheduled posts keep running.
Reconnect when:
the account has the needs reconnecting label;
you change (reset) the Instagram app secret at Meta;
you move the account to a different Meta app.
11.3 Disconnect
The Disconnect button removes that account from AutoPost together with its token and App Secret. AutoPost asks "Disconnect this account? Its token is deleted too."; press Yes, disconnect to continue. The result: "Account disconnected — its row and token are gone from the database."
Disconnecting also removes that account from scheduled posts and auto posts that target it. If you only want to refresh the token, don't disconnect — reconnect instead (11.2).
Disconnecting in AutoPost does not revoke the permission on Instagram's side. To revoke it too, open instagram.com → Settings → Apps and websites, choose the Active tab, then press Remove on your app (for example AutoPost-IG).
11.4 Deleting posts
Deleting a post in AutoPost's Posts menu only removes it from AutoPost. A post already published on Instagram stays there — delete it on Instagram if needed.
11.5 Adding a 2nd and 3rd account
Make the next Instagram account an Instagram Tester in the same app (8.1), then accept the invitation from that account (8.2).
In your browser, sign out of the first Instagram account and sign in with the next one.
Repeat 9.2 and 9.3 with the same App ID and App Secret. On the permission page, check that the account name shown is the next account, not the first one.
At most 3 Instagram accounts. We haven't tried this with a second account yet; the flow is the same as for the first account.
12. Troubleshooting
All AutoPost messages below are written exactly as they appear on screen. On the Instagram page they start with "Failed:"; in Details per account, messages that will be retried end with "(retrying automatically, attempt N of 4)". Variable parts are marked "…".
12.1 When you press "Connect Instagram" or come back from Instagram
| Message | Cause & fix |
|---|---|
| The Instagram App ID is a number (10–20 digits). Copy it from the API setup with Instagram sign-in section. | What you pasted isn't the Instagram app ID (for example the app name, or it has spaces). Copy the number again from the Instagram app ID card. |
| The Instagram App Secret is 32 hexadecimal letters/digits. Press Show in the dashboard and copy it in full. | The secret is cut off or still dots. Press Show, then copy all 32 characters. |
| The App ID or App Secret doesn't match. Copy them again from your Meta app dashboard. | The format is right, but Instagram rejected it while exchanging the authorization code. Usually the secret you pasted isn't the Instagram app secret (for example the Facebook app's secret key), or the ID and secret come from different apps. Copy both from the API setup with Instagram sign-in page of the same app. |
| The Instagram connection session has expired (more than 10 minutes) or the browser blocked the cookie. Start again. | More than 10 minutes passed since you pressed the button, or the browser blocks cookies. Repeat 9.2 and finish the permission within 10 minutes, in the same browser. |
| The security code (state) doesn't match — this request was rejected. Start again from the Instagram page. | You opened two attempts at once, or came back through another tab. Start again from the Instagram page in AutoPost. |
| The Instagram permission was canceled. Press Connect again and choose Allow if you want to continue. | You pressed Cancel. Repeat, then press Allow. |
| Instagram rejected it: … | Instagram sent another error. Read the rest of the message; usually the redirect URL or the tester role isn't right yet. |
| This is still a personal account. Switch it to a Business or Creator account in the Instagram app first, then connect again. | Do Step A, then connect again. |
| Your AutoPost session differs from when you started. Sign in again, then connect again. | You switched AutoPost accounts midway. Sign in with the right AutoPost account, then repeat. |
| There are already 3 Instagram accounts. Disconnect one first if you want to replace it. | The 3-account limit. Disconnect one account first. |
| Instagram didn't send an authorization code. / Instagram didn't provide a token. Try connecting once more. / Instagram didn't provide a 60-day token. / Instagram didn't return the account ID. | A problem on Instagram's side. Repeat from 9.2. |
| Instagram: … / Couldn't reach Instagram from the server. / Instagram didn't answer in time. We'll try again later. | Another answer from Instagram, or the server's network has a problem. Wait a moment, then repeat from 9.2. |
| The form input couldn't be read. | Reload the Instagram page in AutoPost, fill in the form again, then press the button again. |
| Request rejected because it didn't come from an AutoPost page. | The form was sent from outside the AutoPost page. Open the Instagram page in AutoPost and press the button from there. |
| APP_URL_PUBLIK isn't set on the server, so the Instagram redirect address can't be built yet. / KUNCI_ENKRIPSI_AI isn't set on the server, so the token can't be stored encrypted yet. | The AutoPost server isn't set up yet. Report it to the AutoPost administrator. |
These messages appear as a red banner starting with "Failed:" at the top of the Instagram page, for example:




12.2 Problems that don't show an AutoPost message
| Symptom | Cause & fix |
|---|---|
| The Connect Instagram button does nothing when pressed. | An old problem: the browser blocked the redirect to instagram.com. Fixed on 29 September 2026. If it still happens, reload the page (Ctrl+F5, or Ctrl+Shift+R), fill in the form again, then press the button again. |
| The Connect Instagram button can't be pressed and there's a red box above it. | The server isn't set up yet ("The app's public address isn't set" or "The server encryption key isn't set up yet"). Report it to the AutoPost administrator. |
| After you press the button, Instagram shows an error page instead of the permission page with the Allow button. | Check two things. (1) The Redirect URL in Step E must match the box on the AutoPost page exactly — copy it again, paste it again, Save, and check for a trailing slash. (2) What you pasted into the Instagram App ID field must be the Instagram app ID, not the Facebook app ID. |
| Instagram still refuses to give permission even though every field is right. | Most likely the account isn't an Instagram Tester yet, or the invitation hasn't been accepted (the status is still Waiting for approval / Pending). Do Step F. |
| The Manage messaging & content on Instagram card isn't there when you add a use case. | Choose the Content management or All filter. If you still can't tick it, create a new app just for Instagram. |
| The tester invitation isn't in Tester Invites. | Sign in to instagram.com with the invited account, in a browser. Check the spelling of the username you invited (8.1). |
12.3 A text-only post fails
Before 29 September 2026, the composer didn't hold back posts to Instagram that had no image. Such posts were still sent, and then failed. The screenshots below show that old behavior. Now the composer holds them back first with a red warning (10.2).
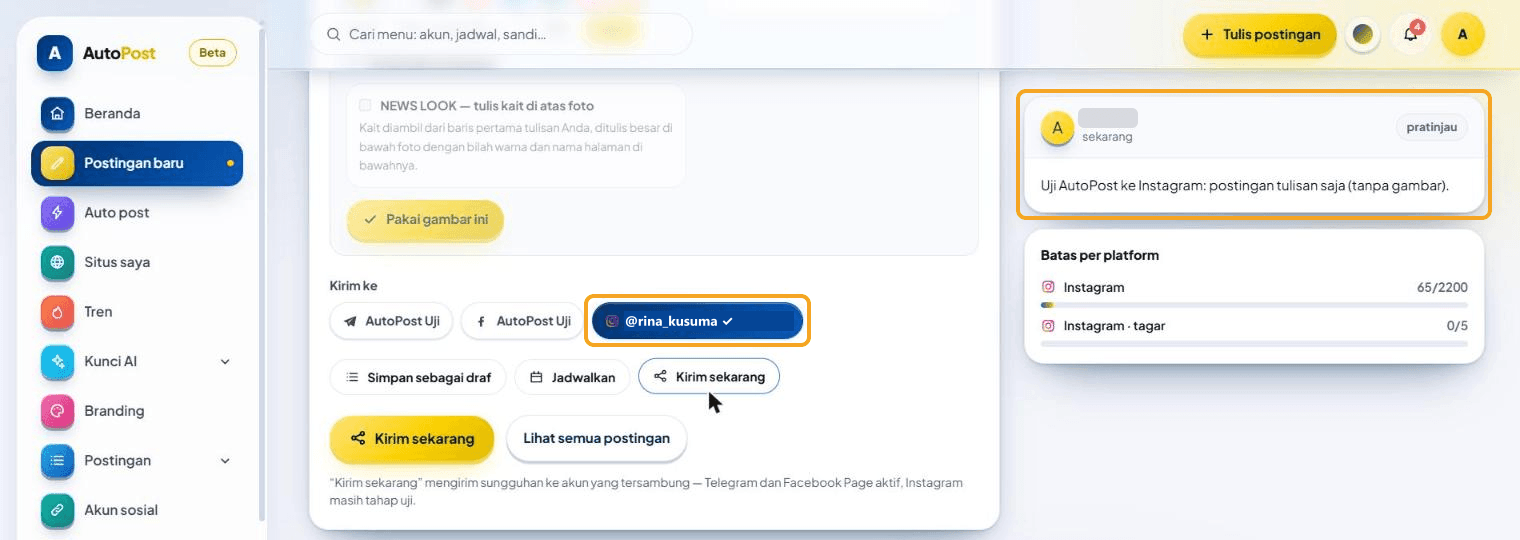
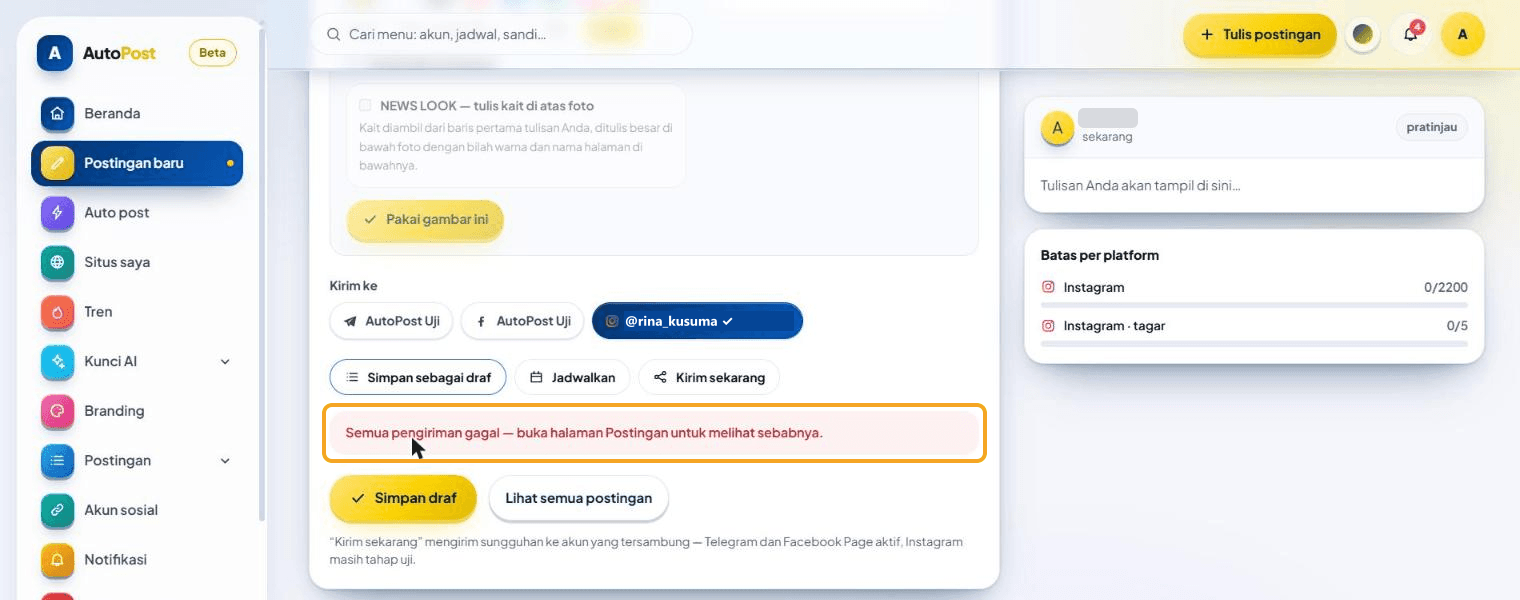
If you still have an old post like that (for example a schedule created before the fix), the reason appears in Details per account:
Instagram only accepts posts with an image or video. Add a JPEG image or a video, then resend.
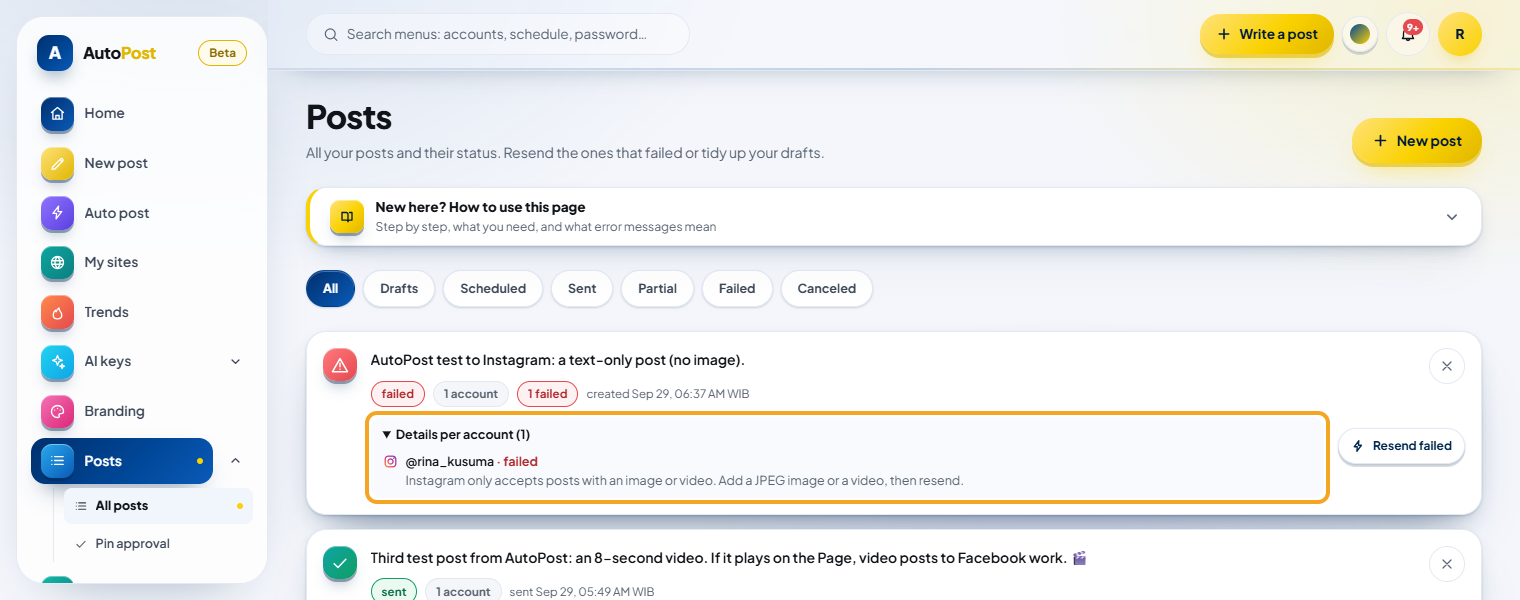
Resend failed won't work as long as that post still has no image. Create a new post with a photo, video, or design card. If every send fails, the composer fields are now not cleared, so you can add an image right away and send again.
12.4 When sending or after scheduling
The reason for a failure appears in the Posts menu, in the Details per account section of the post card.
| Message | Cause & fix |
|---|---|
| Instagram only accepts JPEG images. Save the image again as .jpg and resend. | A PNG, WebP, GIF, HEIC photo, or similar. Save it again as .jpg, or use Image studio. |
| Instagram doesn't accept this image ratio (it must be between 4:5 and 1.91:1). Crop the image and resend. | The image is too tall (for example 9:16 or 3:4) or too wide. Use 1:1 or 4:5. |
| Instagram doesn't accept this video format (use MP4/MOV H.264, 3 seconds–15 minutes, max. 300 MB). | The video doesn't meet the Reels requirements (10.5). Export it again as an H.264 MP4. |
| Instagram failed to process the image/video (…). Check its format and size. | Instagram received the file but couldn't process it. Check the format, ratio, and size, then resend. |
| Instagram is still processing the image/video. We'll check again shortly. — or — Instagram is still processing the media. We'll try again shortly. | Normal for videos. AutoPost checks again on its own. Wait. |
| The Instagram media container expired before it was published. We'll try again. | Instagram discarded media that wasn't published. AutoPost tries again on its own. |
| Instagram couldn't fetch the media file. Make sure the media address is publicly accessible and its size is reasonable. | Instagram couldn't download the file. Upload it with Upload from gallery or use a public address. Photos max. 8 MB. |
| The daily Instagram API publishing quota (100 per 24 hours) is used up. We'll try again later. | Instagram's per-account limit. AutoPost tries again about an hour later. Send fewer posts per day. |
| Instagram is rate-limiting requests. We'll try again later. | Temporary. AutoPost tries again on its own. If it shows up often, cut down on repeated, similar posts — Instagram also uses this message for posts it suspects are spam. |
| Instagram is temporarily holding posts from this account (flagged as spam or a rule violation). Try again later or check the notifications on your account. | Open Instagram and read the notification. Don't resend manually over and over. |
| The exact same post was just sent — Instagram rejects duplicates. | Change the text a little before resending. |
| The Instagram token has expired. Reconnect this account. | The token passed 60 days without being renewed. Reconnect (11.2). |
| The Instagram token … Reconnect this account. (… = has expired, is no longer valid because the account password was changed, was revoked because the app was removed from the account, or is no longer valid) | The token is dead — for example the permission was revoked on Instagram or the password was changed. Reconnect (11.2). |
| The Instagram token doesn't have the permission needed for this action. Create a new token with all permissions, then reconnect. | Access and publish content was turned off when giving permission, or the permission wasn't added (Step D). Fix it, then reconnect with that switch on. |
| The Instagram token is empty or damaged. Reconnect this account. / This Instagram account ID is empty or invalid. Reconnect. | The account data is damaged. Reconnect (11.2). |
| The account token can't be opened — the server encryption key differs from when the token was saved. Disconnect and reconnect this account. | The server encryption key changed. Disconnect, then connect again. |
| The AutoPost server is having trouble opening account tokens. We'll try again later. | A problem on the AutoPost server, not with your account. AutoPost tries again on its own; if it continues, report it to the AutoPost administrator. |
| Instagram …, so the result is uncertain. Check the Instagram profile before resending so it isn't posted twice. | The connection dropped in the middle of publishing. Open the Instagram profile first: if the post is already there, don't resend. |
| Instagram rejected the input: … | Instagram rejected one of the inputs. Read the rest of the message, fix the post, then resend. |
| Instagram is having a momentary problem. We'll try again shortly. — or — Instagram didn't answer in time. We'll try again later. | A problem on Instagram's side or with the network. AutoPost tries again on its own. |
12.5 More than 5 hashtags
If the Instagram account is selected and the text has more than 5 hashtags, a red box appears right below the text field, and the composer holds back Send now and Schedule. The message:
Instagram allows 5 hashtags per post — this text has N. Remove the extra hashtags (#…, #…) or deselect the Instagram account.
In the box below the text field, that message continues with "Send now and Schedule are on hold until there are 5 hashtags or fewer; the draft can still be saved."
Save as draft still works. What counts as a hashtag: # followed by letters, digits, or underscores, with at least one letter. So #2026 isn't a hashtag, and a # inside a link address is ignored.
For old posts that got through with more than 5 hashtags, AutoPost drops the 6th hashtag onward when sending. The post is still sent, with a note in Details per account: "Instagram allows 5 hashtags per post, so N hashtags were not sent: #…".
13. Security and privacy
13.1 Protecting the Instagram app secret
The Instagram app secret (App Secret) is pasted in one place only: the Instagram App Secret field in AutoPost.
Never paste it anywhere else: group chats, email, shared notes, screenshots, or other sites that ask for it.
AutoPost never asks for your Instagram or Facebook password.
Turn on two-factor authentication on your Instagram account and your Facebook account.
13.2 What AutoPost stores
The token, App ID, and App Secret are stored encrypted (AES-256-GCM) in the database and are only opened on the AutoPost server: when exchanging and renewing the token, when sending, and during Retest. AutoPost pages never show your token.
While connecting, the App ID and App Secret are briefly stored encrypted in a browser cookie for at most 10 minutes, then deleted.
AutoPost only asks for two permissions:
instagram_business_basicandinstagram_business_content_publish. AutoPost can't read your direct messages (DMs) or comments.
13.3 If the App Secret leaks
In Meta's dashboard, reset your app's secret.
Open API setup with Instagram sign-in again, press Show, and make sure the Instagram app secret has changed. Copy the new value.
In AutoPost, reconnect every Instagram account with the new secret (11.2).
Press Retest on every account to make sure they're all healthy.
We haven't photographed where the reset button is yet, so step 2 matters: make sure the value you paste really is the new one.
13.4 Stopping AutoPost for this account
Press Disconnect in AutoPost (11.3).
Revoke the app's permission at instagram.com → Settings → Apps and websites → Active (press Remove on your app).
If you also want to leave the tester list, open the Tester Invites tab on the same page and press Remove.
If the app isn't used for anything else (including a Facebook Page), you can delete the app at developers.facebook.com. Use cases that have been added can't be removed on their own.
14. Checklist
Need help? Open the Help menu in AutoPost, or the New here? How to use this page box on the Instagram page.