AutoPostUser guide
Connecting a Facebook Page to AutoPost
The complete guide: from setting up your Page and Meta app to your first post published on your Page
Save this guide
PDF version to read offline or print · 4.9 MB · 33 pages
Contents
1. Overview
What you'll achieve
After following this guide, AutoPost can send posts to your Facebook Page: right away when you press Send now, or automatically at the time you schedule. Posts appear in the Page's name, not in the name of your personal profile.
It works with your own Meta app and a System User token. For a Page owned by your own business portfolio, the flow in this guide works without submitting App Review to Meta — it was tried for real on 28 September 2026.
- 1Your Page is in a Meta business portfolio
- 2A Meta app with four Page permissions
- 3A system user holds the Page and the app (Full control)
- 4A ‘Never’ token is pasted into AutoPost
- 5The app is published (Live): posts are visible to the public
Estimated time
About 30–45 minutes, one time only. Most of the time is spent on Meta's sites. If Meta asks you to confirm your account by SMS, add a few minutes to wait for the code.
What you need
| What you need | Details |
|---|---|
| A personal Facebook account | Used to sign in to Meta. Posts still appear in the Page's name, not yours. |
| A Meta business portfolio | Created for free at business.facebook.com. The Page and the app must be in the same portfolio. |
| A Facebook Page | You must be an admin of that Page. Don't have one yet? Step A explains how to create it. |
| A phone number | Meta may send an SMS code to confirm your account before you're allowed to create an app. |
| A laptop or computer | Meta's developer dashboard and Business Suite are easiest to use on a wide screen. |
| An AutoPost account | Already signed in to the AutoPost app. |
What AutoPost sends to the Page
| Post content in AutoPost | Appears on the Page as |
|---|---|
| Text only | A regular status. |
| Text + link (no photo/video) | A status with a link. Facebook builds the link preview card automatically, and the link isn't repeated in the text. |
| Photo (with or without text) | A photo with a caption. The link, if any, is added at the end of the caption (unless it's already in the text). |
| Video (with or without text) | A Page video with a description. The link, if any, is added at the end of the description (unless it's already in the text). |
| Several photos (2–10) | One Page post with several photos and the text above them. Photos only — a video can't be combined with photos in one post; send the video as a separate post. |
2. Understanding the terms
| Term | What it means |
|---|---|
| Facebook Page | A page for a business, organization, or public figure — different from a personal profile. In Meta's interface it's simply called a "Page". |
| Business portfolio | Your business's "container" in Meta Business Suite (formerly Business Manager). Pages, apps, and system users are gathered here. |
| Meta app | An app you register at developers.facebook.com. This app is what gives the token permission to manage the Page. Free. |
| Use case | The "what is this app for" choice when you create an app. For AutoPost: Manage everything on your Page. |
| Permission | A right granted to the token. AutoPost needs four: pages_show_list, pages_read_engagement, pages_manage_posts, pages_manage_engagement. |
| System user | A "robot" account in the business portfolio, not a person's account. Its token doesn't stop working when you change your Facebook password. |
| Token | A long string of characters (starting with EA, for example EAA… or EAI…) that lets AutoPost post in the Page's name. Treat it like a house key. |
| Live mode (published) | The status of an app that has been published. Until it's published (Development), posts are only visible to people with a role in the app — for example, you. |
| Page ID | The Page's number. Usually you don't need to enter it in AutoPost. See 9.5. |
3. Step A — Setting up a Facebook Page
If you already have a Page
Make sure of two things:
You're an admin of that Page (not just an editor or moderator).
The Page is already in your business portfolio. Check at business.facebook.com → Settings → Accounts → Pages. If it's not there, add the Page to the portfolio with the add button on that screen.
If you don't have a Page yet
Open facebook.com/pages/create (or create a new Page from business.facebook.com → Settings → Accounts → Pages).
Fill in the Page name and Category. The Bio can be filled in later.
Press Create Page. The extra steps (profile picture, cover, inviting friends) can be skipped for now.
If the Page is created inside a business portfolio, Meta asks you to accept the Meta Commercial Terms. Read them, then accept if you agree.
4. Step B — Creating a Meta app
Open developers.facebook.com and sign in with your Facebook account. If this is your first time, Meta asks you to register as a developer first.
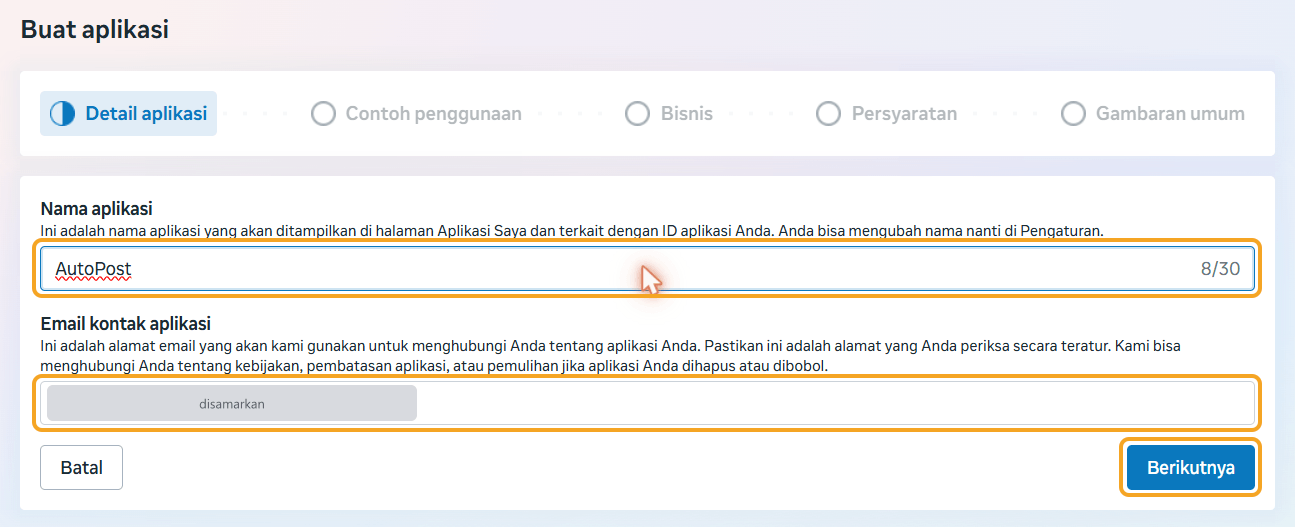
Press My Apps, then Create app. The Create app window has five steps: App details, Use cases, Business, Requirements, and Overview.
B1 App details
Fill in the App name (for example "AutoPost" or your business name, up to 30 characters) and the App contact email, then press Next. The app name can be changed later in the settings.
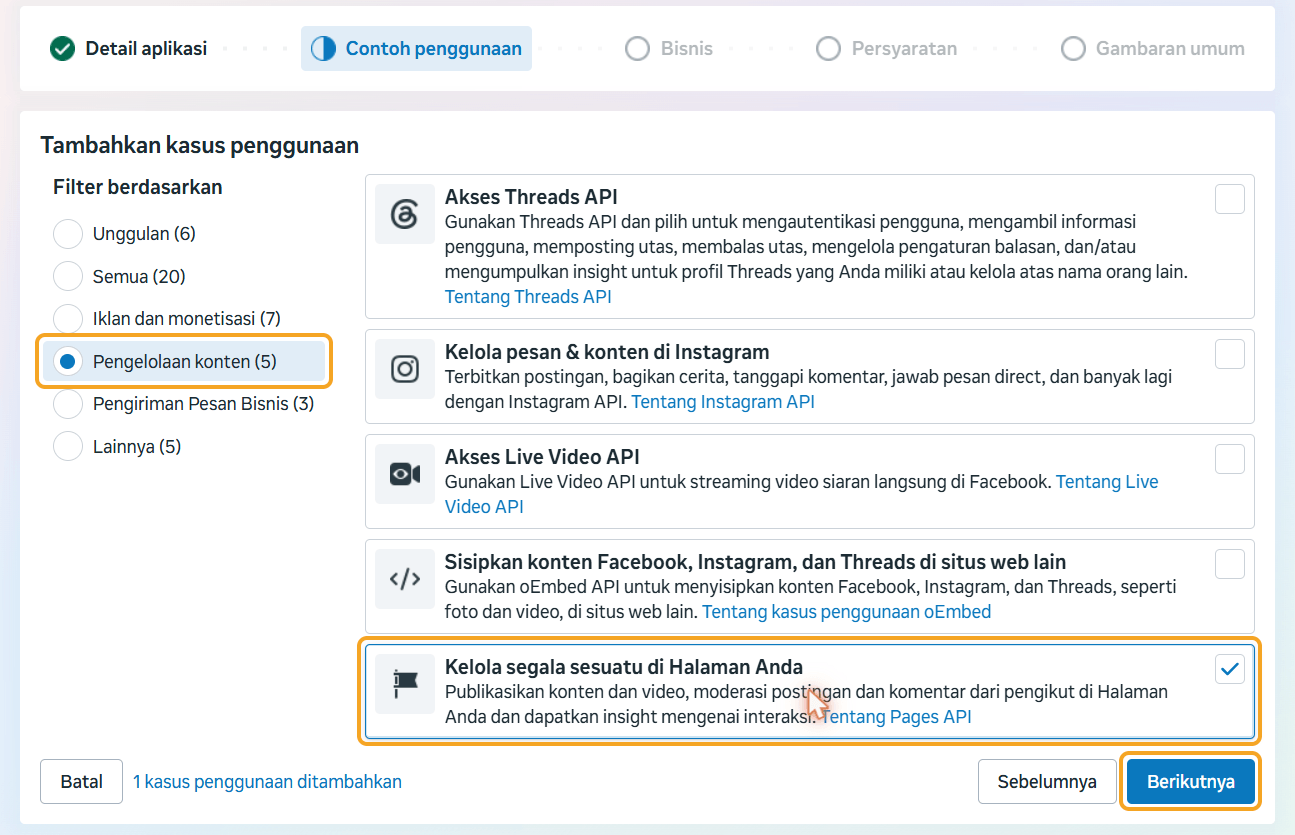
B2 Use cases
Under Filter by, choose Content management.
Tick the Manage everything on your Page card.
Press Next.
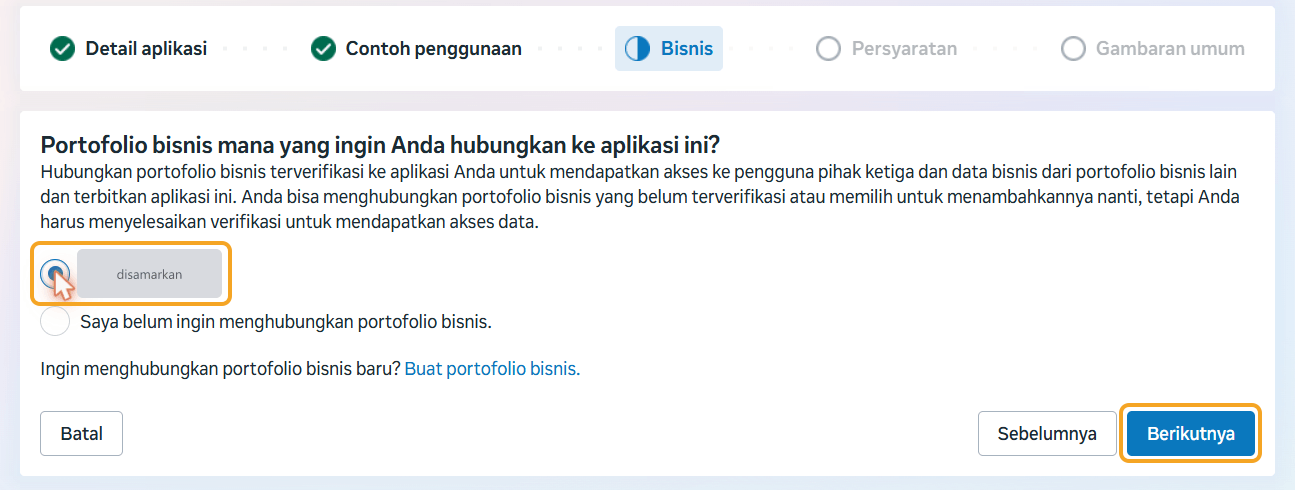
B3 Business
Choose the business portfolio your Page belongs to, then press Next. It's best not to choose the option for not connecting a business portfolio yet: the app needs to be in the same portfolio as the Page so it can be assigned to the system user in Step E.
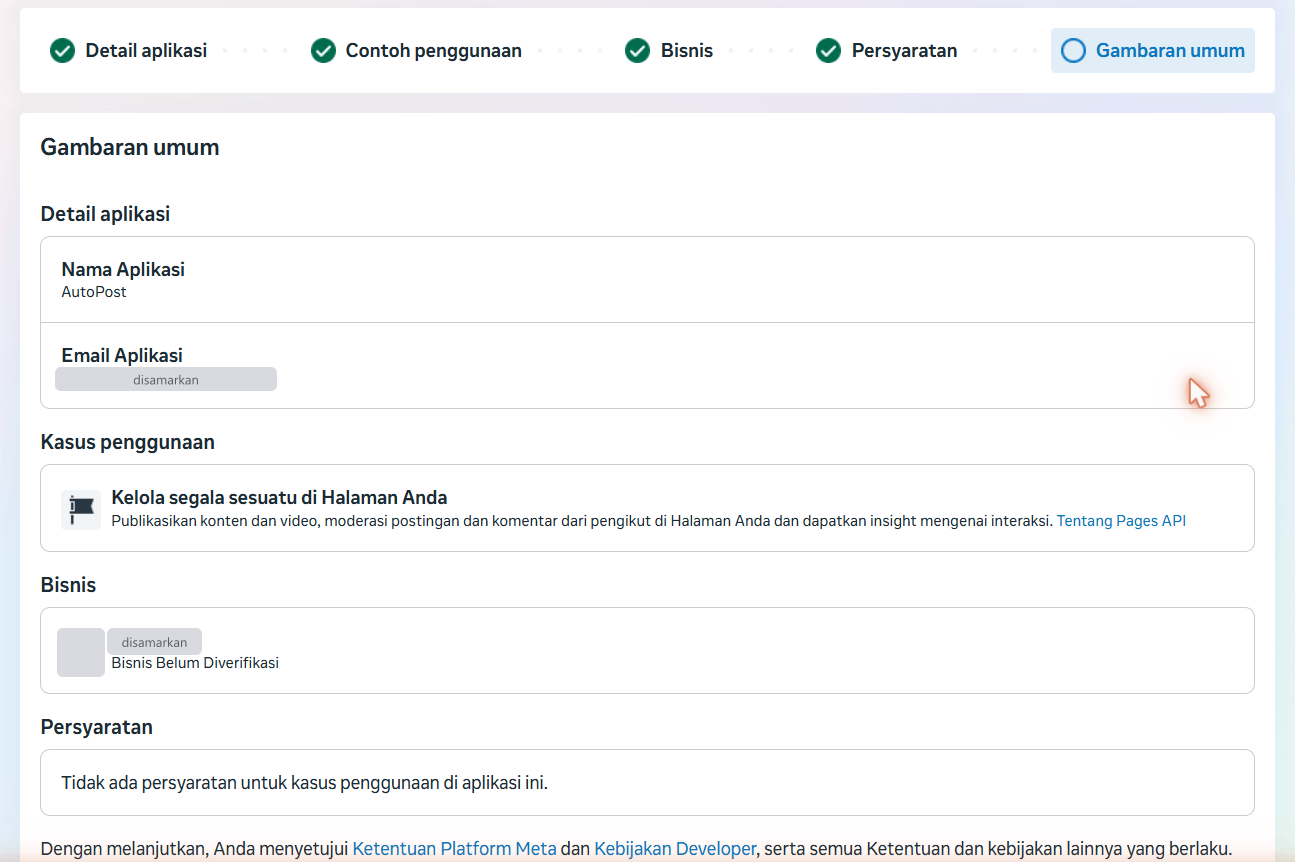
B4 Requirements and Overview
The Requirements step is empty for this use case (it says there are no requirements). In Overview, check the summary: the app name, the use case Manage everything on your Page, and the business portfolio. An unverified business status doesn't block you — business verification isn't needed for the steps in this guide. (Meta's note about verification in the Business step applies to accessing data outside the assets you own.) Press the button at the bottom to create the app (by pressing it you agree to the Meta Platform Terms and Developer Policies).
B5 App dashboard
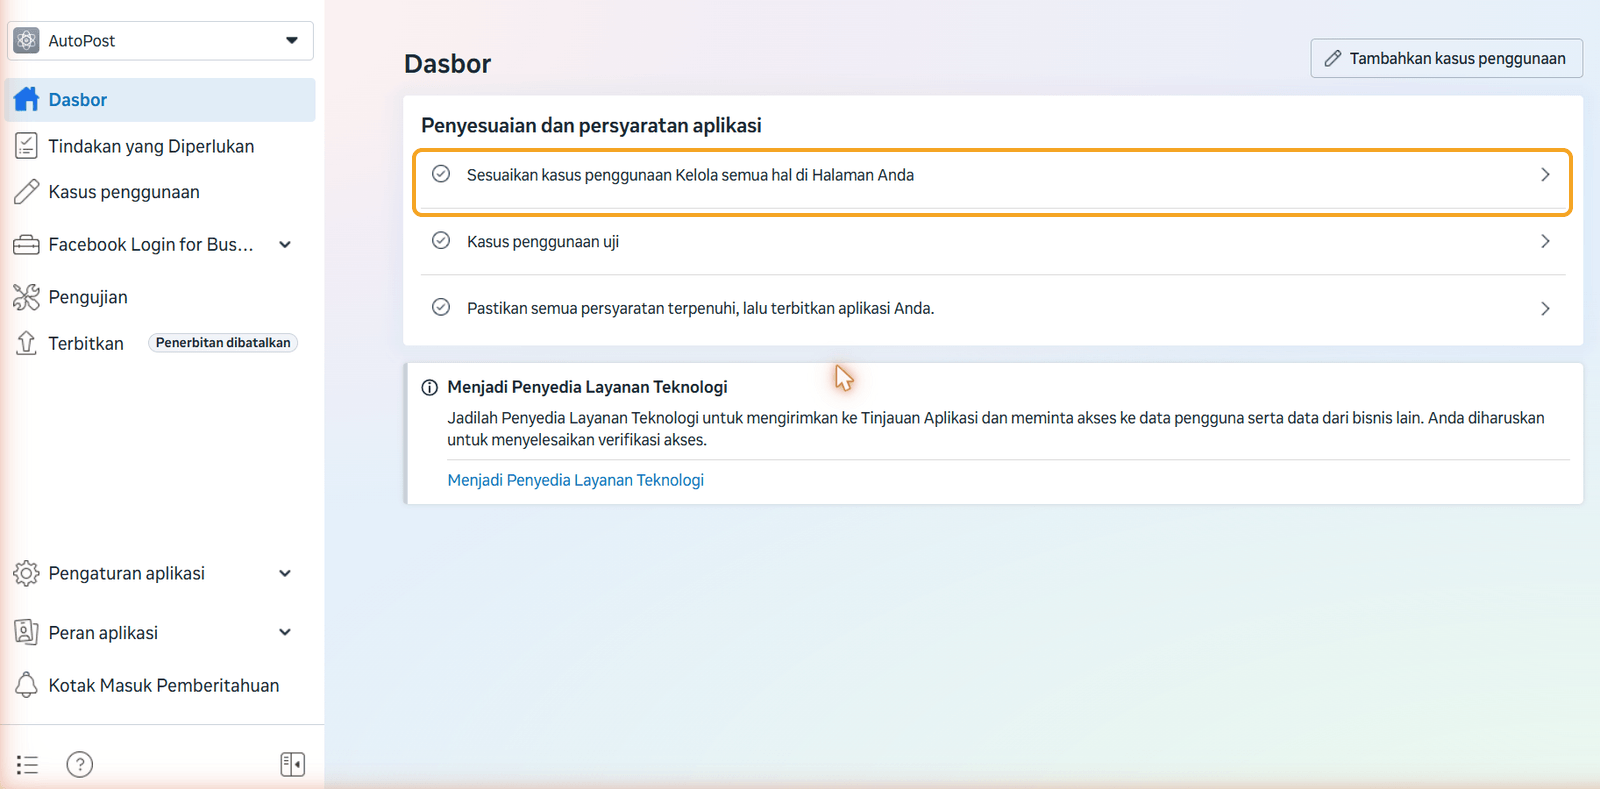
Once the app is created, you land on the app Dashboard. The menu on the left includes Dashboard, Use cases, Publish, and App settings — all four are used again later. Next to the Publish menu, a badge says the app is unpublished (in English it may read Unpublished or similar): the app hasn't been published yet (it's still in Development). That's normal for a new app — you publish it in Step H.
5. Step C — Checking the four permissions
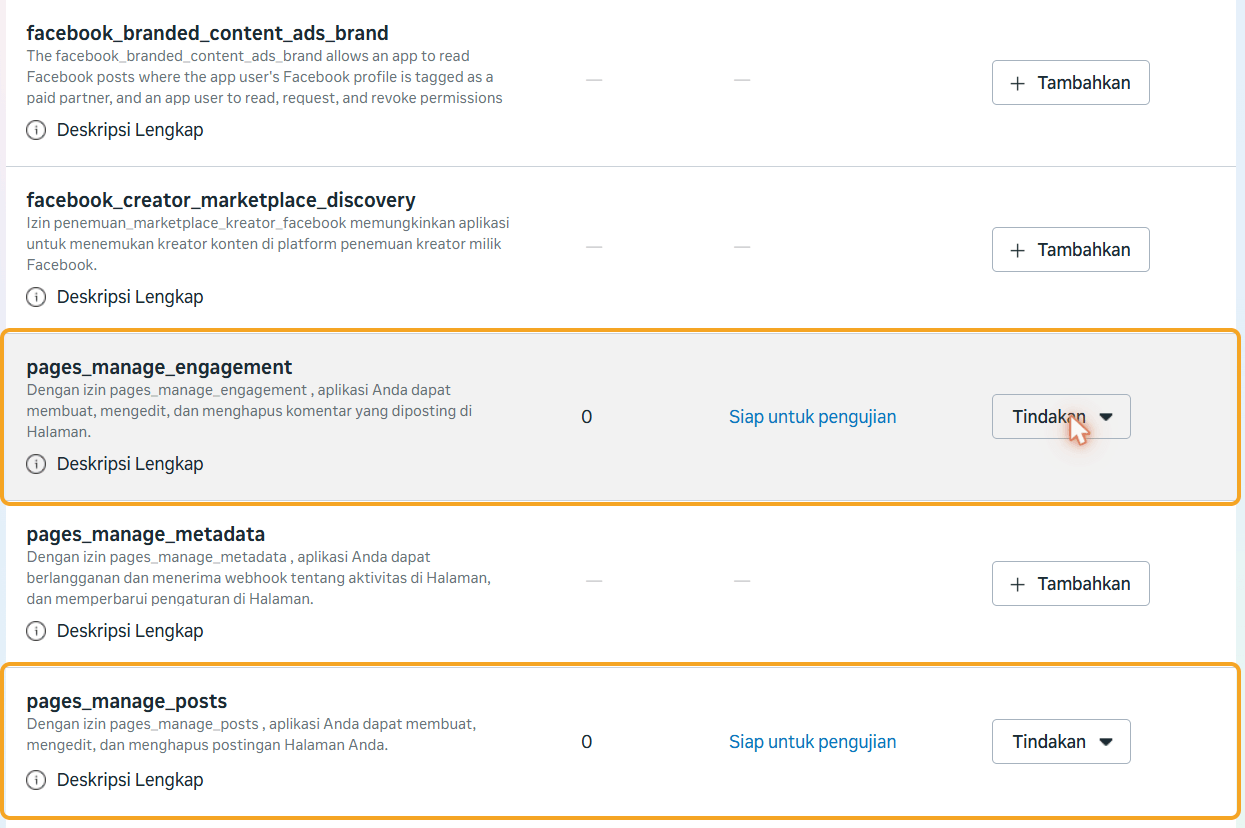
To make sure all four permissions are available and take effect when the token is generated (Step F), check that all four have been added to the app's use case:
| Permission | What it's for |
|---|---|
pages_show_list | Seeing the list of Pages the token may manage — AutoPost uses it to find your Page. |
pages_read_engagement | Reading basic Page data. Required — without it, AutoPost refuses to connect. |
pages_manage_posts | Creating posts on the Page. Required — without it, AutoPost refuses to connect. |
pages_manage_engagement | Adding comments. Used by the First comment feature in Auto post. |
How:
On the Dashboard, press the Customize use case row (or open the Use cases menu and choose your Page use case).
Open its list of permissions. Permissions that haven't been added have a + Add button. Permissions that have been added are marked Ready for testing.
For each permission in the table above that still has a + Add button, press that button.
Other permissions (for example
pages_manage_metadataorfacebook_branded_content_ads_brand) aren't needed.
6. Step D — Creating a system user
The system user is created in Meta Business Suite, not in the developer dashboard.
Open business.facebook.com, choose your business portfolio, then open Settings (the gear icon).
In the left menu, choose Users → System users, then press + Add.
Meta may ask you to accept a policy first (for example, the non-discrimination policy). Read it, then accept if you agree.
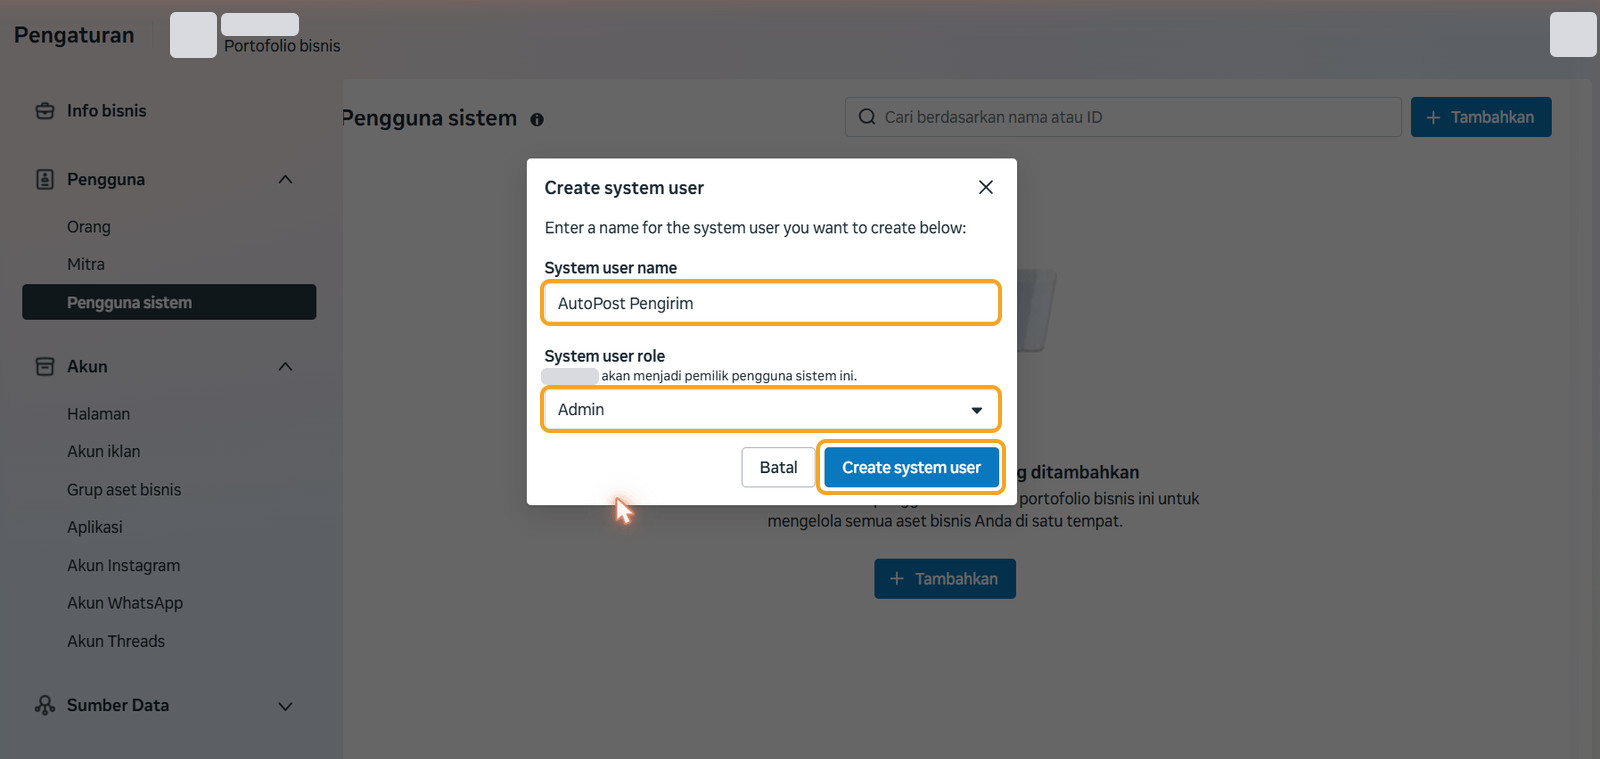
In the Create system user window:
System user name: enter a name that's easy to recognize, for example AutoPost Pengirim;
System user role: choose Admin;
press Create system user.
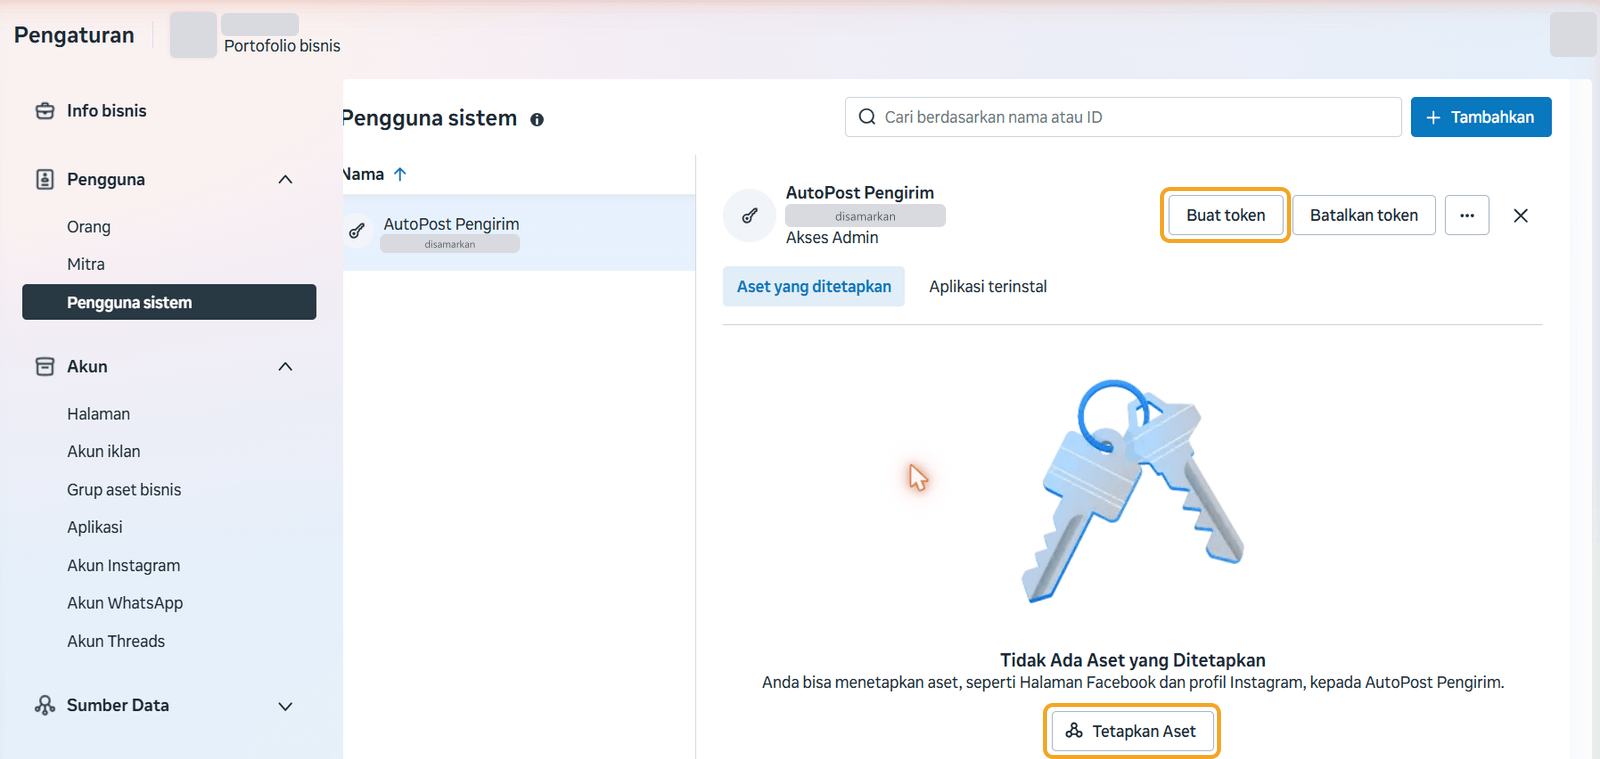
The new system user appears in the list right away; its detail panel on the right says Admin access. Under Assigned assets it still says no assets have been assigned — you'll fill that in the next step.
7. Step E — Assigning the Page and app
The system user needs access to the Page and to the app. Both with Full control.
E1 Page
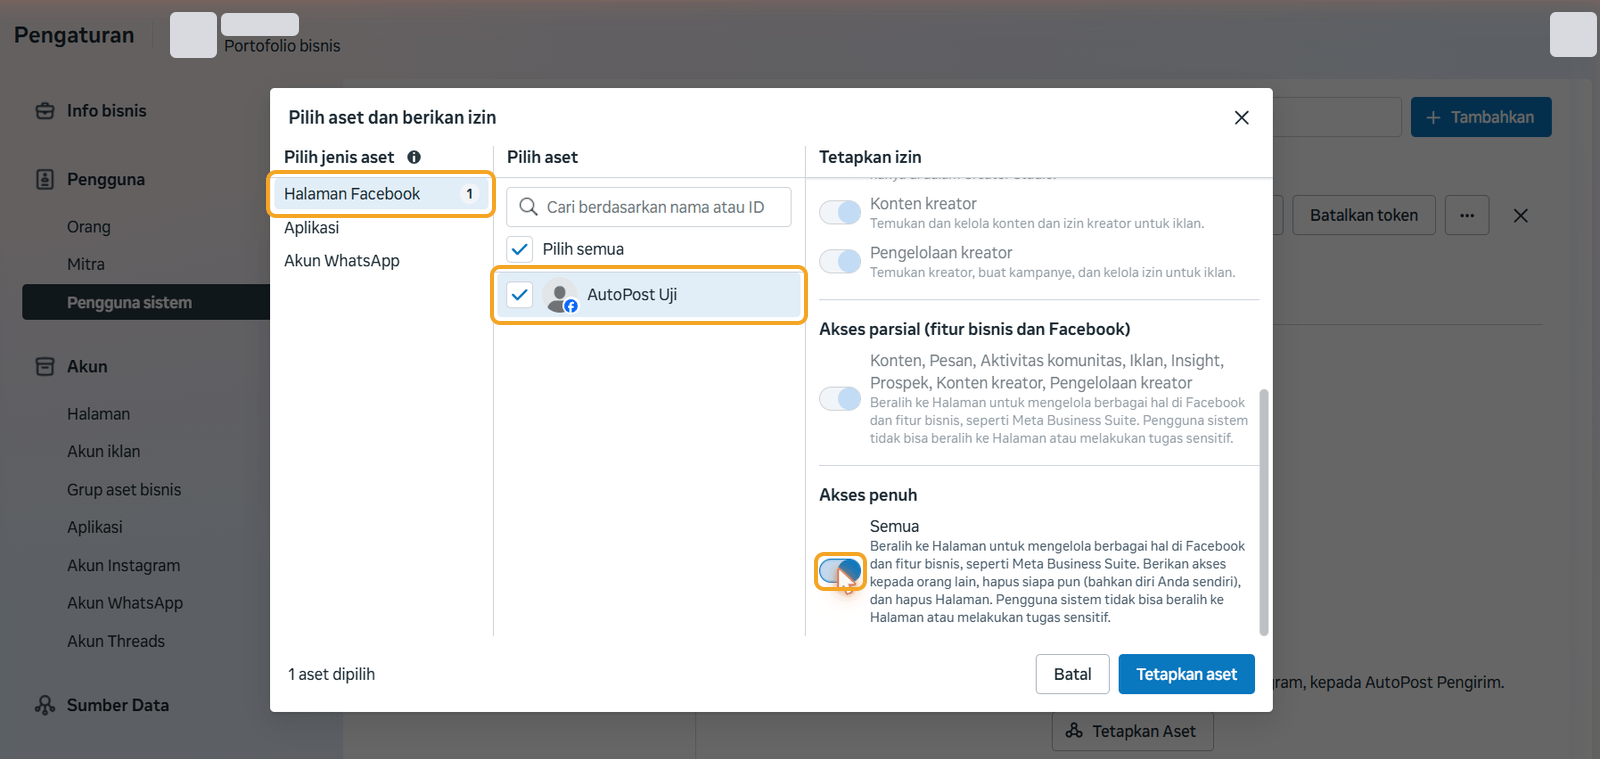
On that system user, press Assign assets.
In the Select asset type column, choose Pages.
In the Select assets column, tick your Page.
In the Assign permissions column, turn on the Everything switch in the Full control section.
E2 App
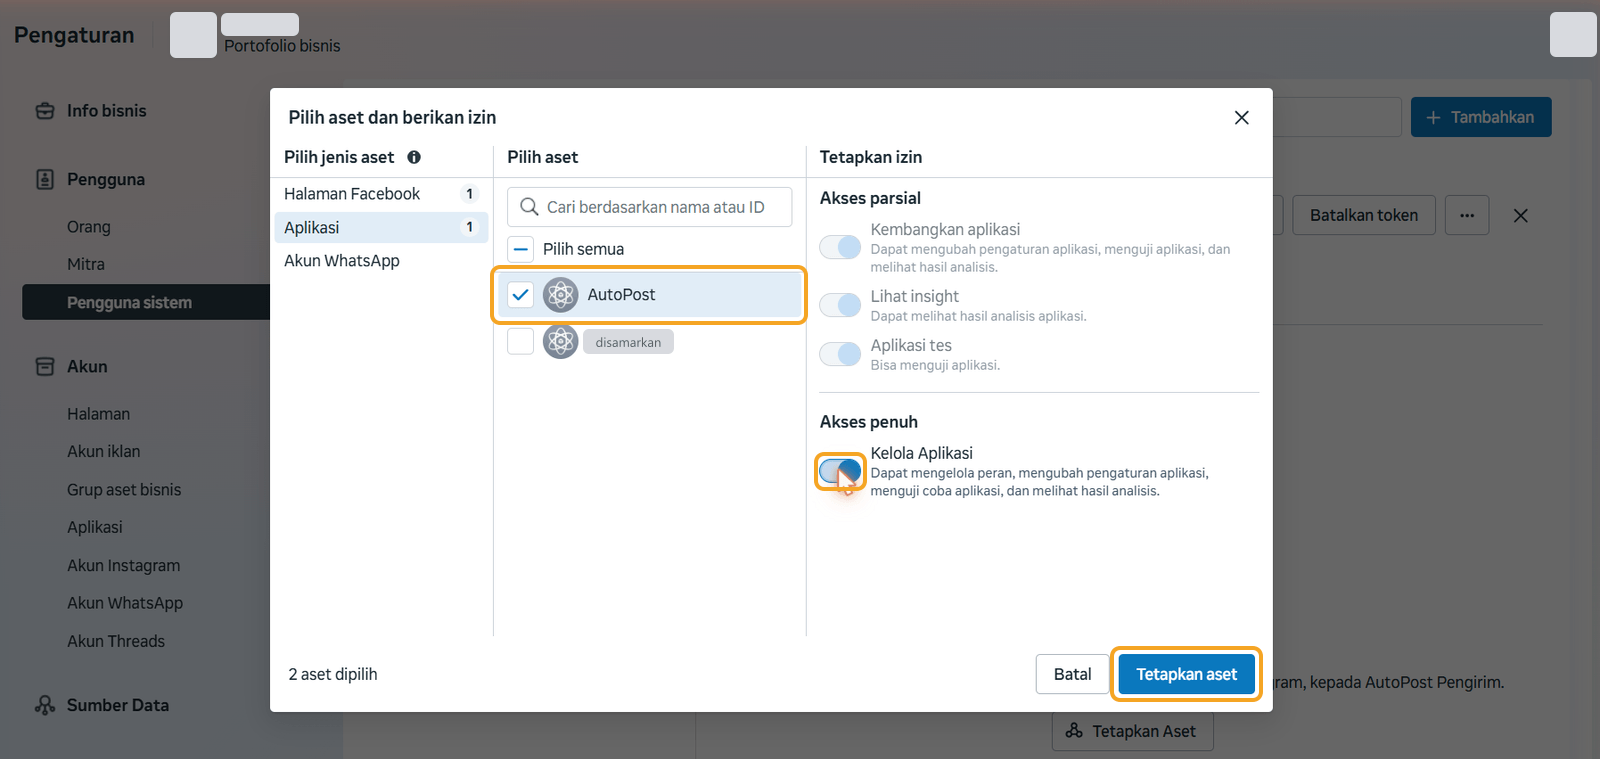
Still in the same window (no need to press Assign assets yet):
In Select asset type, choose Apps.
Tick the app you created in Step B (for example AutoPost). Don't tick other apps.
Under Full control, turn on the Manage app switch.
The window footer now says 2 assets selected. Press Assign assets.
You can also do this in two separate rounds — once for the Page, once for the app. The result is the same.
E3 Check the result
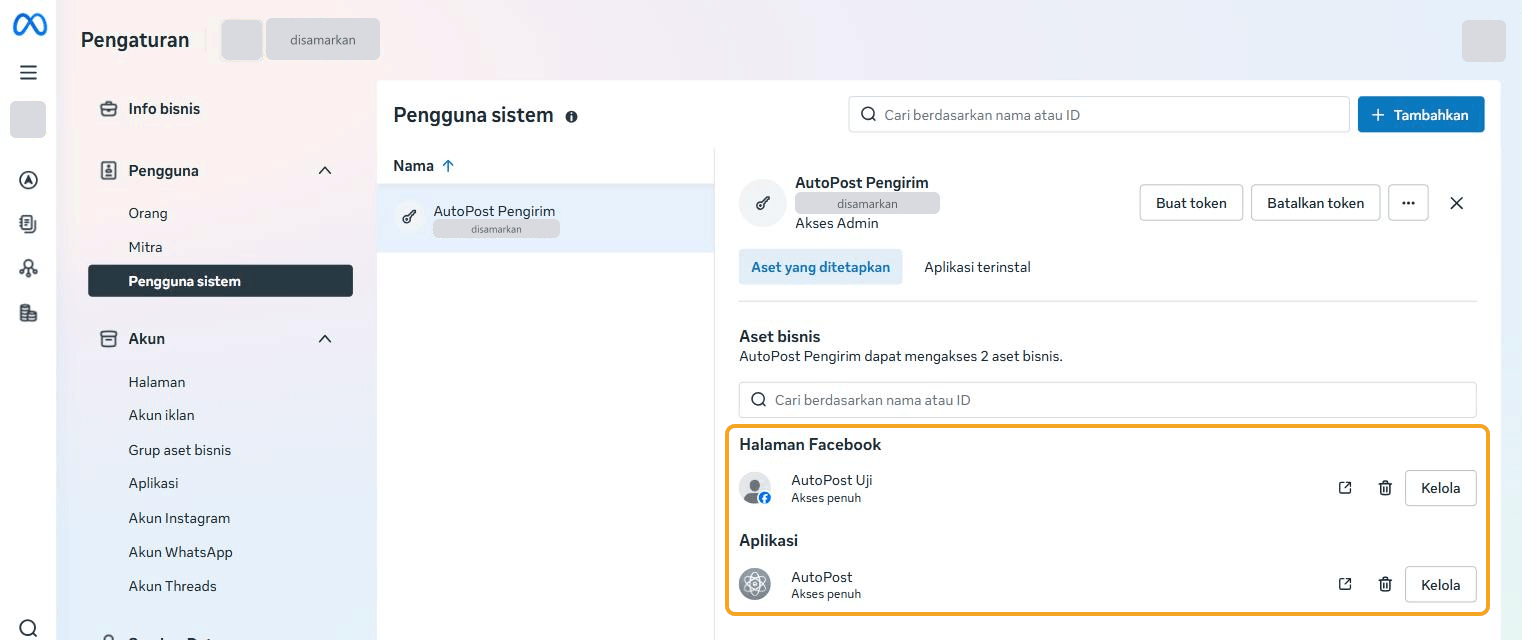
The Assigned assets tab now lists two assets: your Page under Pages and your app under Apps, each marked Full control.
8. Step F — Generating the token
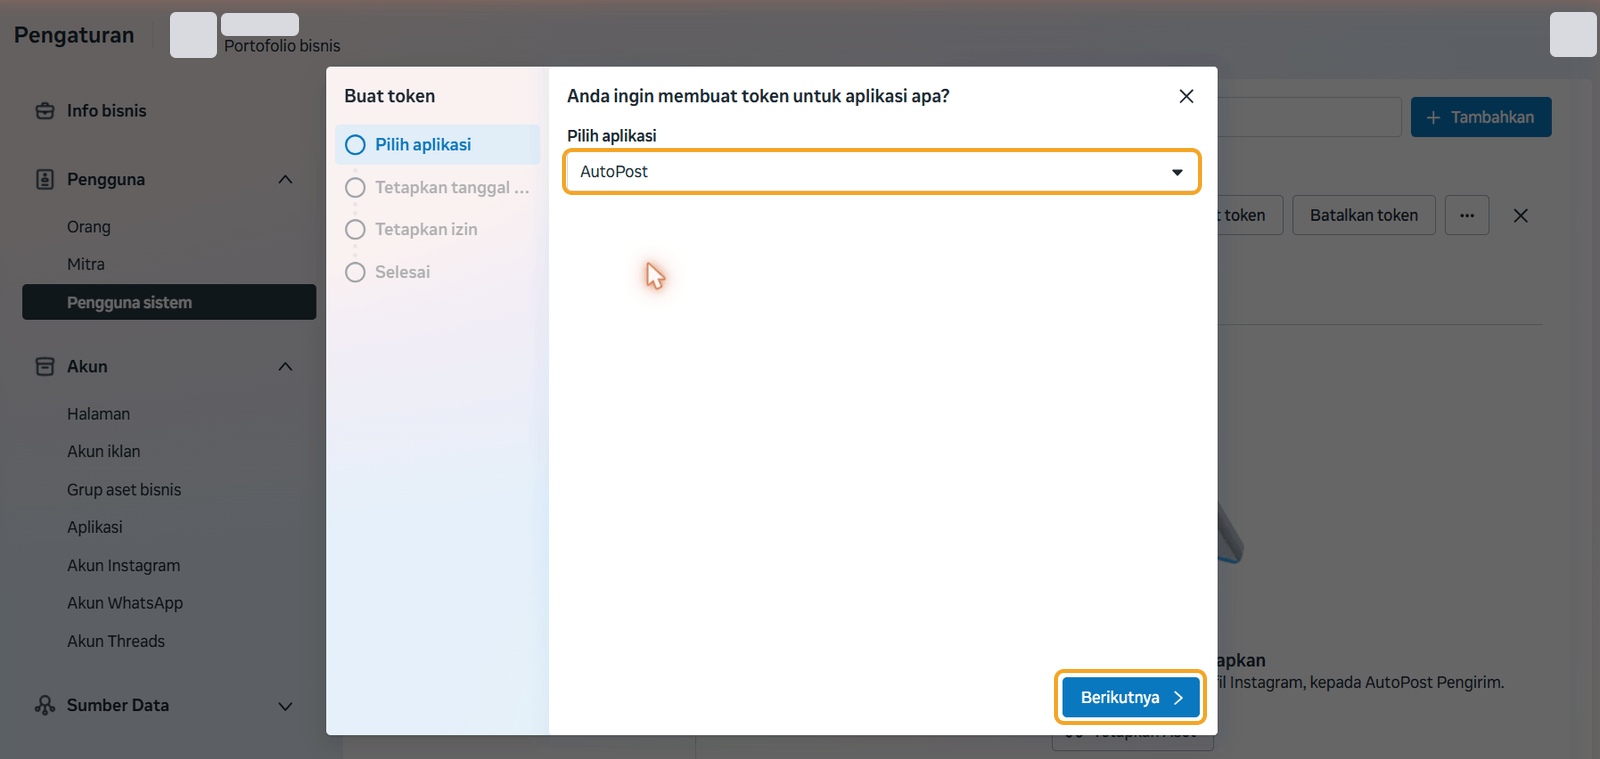
On the system user, press Generate token. The Generate token window has four steps: Select app, the expiration date, Assign permissions, and Done.
Select app: choose your app (for example AutoPost), then Next.
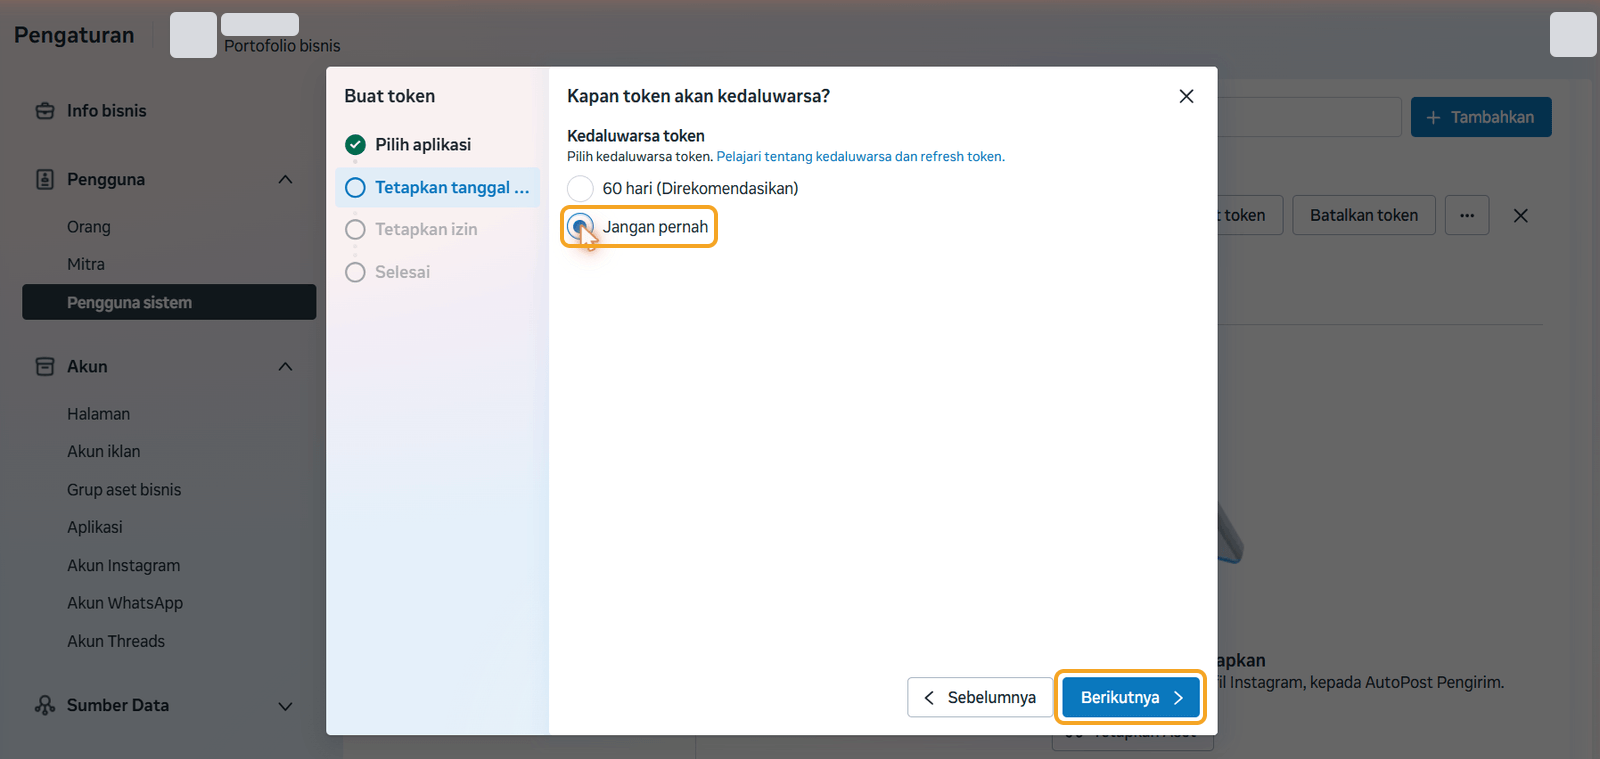
When will the token expire? (or similar): choose Never (not "60 days (Recommended)"), then Next. A 60-day token quietly stops working after two months, and your Page has to be connected again.
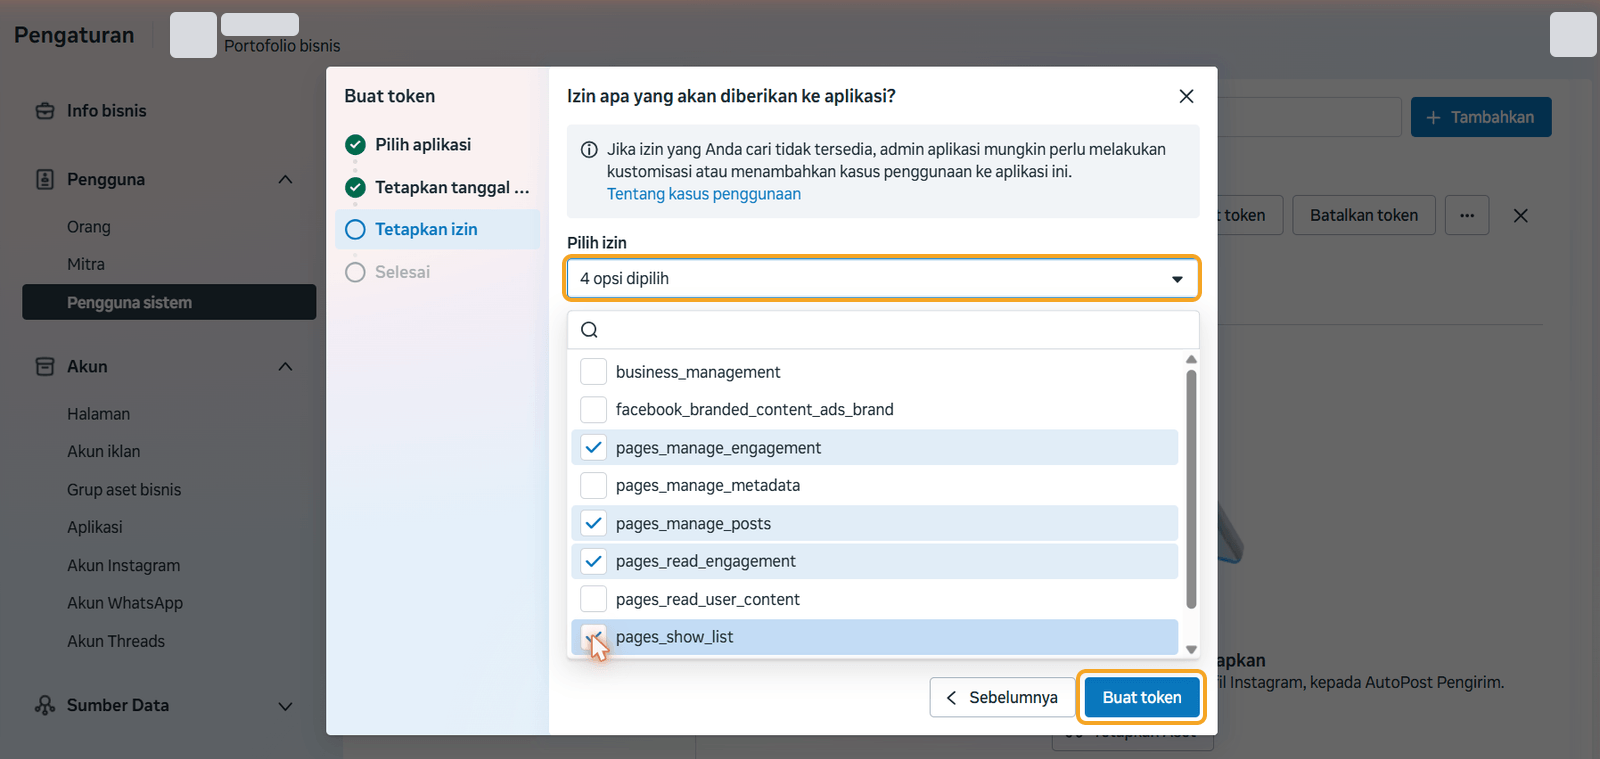
Which permissions will be assigned to the app? (or similar): open Select permissions and tick all four permissions —
pages_show_list,pages_read_engagement,pages_manage_posts,pages_manage_engagement— until the box shows that 4 options are selected. Don't tick other permissions. Then press Generate token.
Done: the token appears. Press the copy button, then paste it into AutoPost right away (Step G).
The token is shown only once. Copy it now, paste it into AutoPost, and don't share it with anyone.
9. Step G — Connecting in AutoPost
9.1 Opening the Facebook Page page
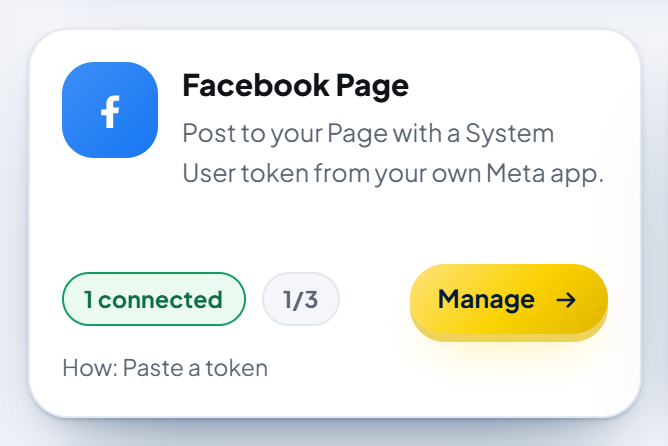
In AutoPost, open the Social accounts menu, then on the Facebook Page card press Connect (it says Manage if a Page is already connected).
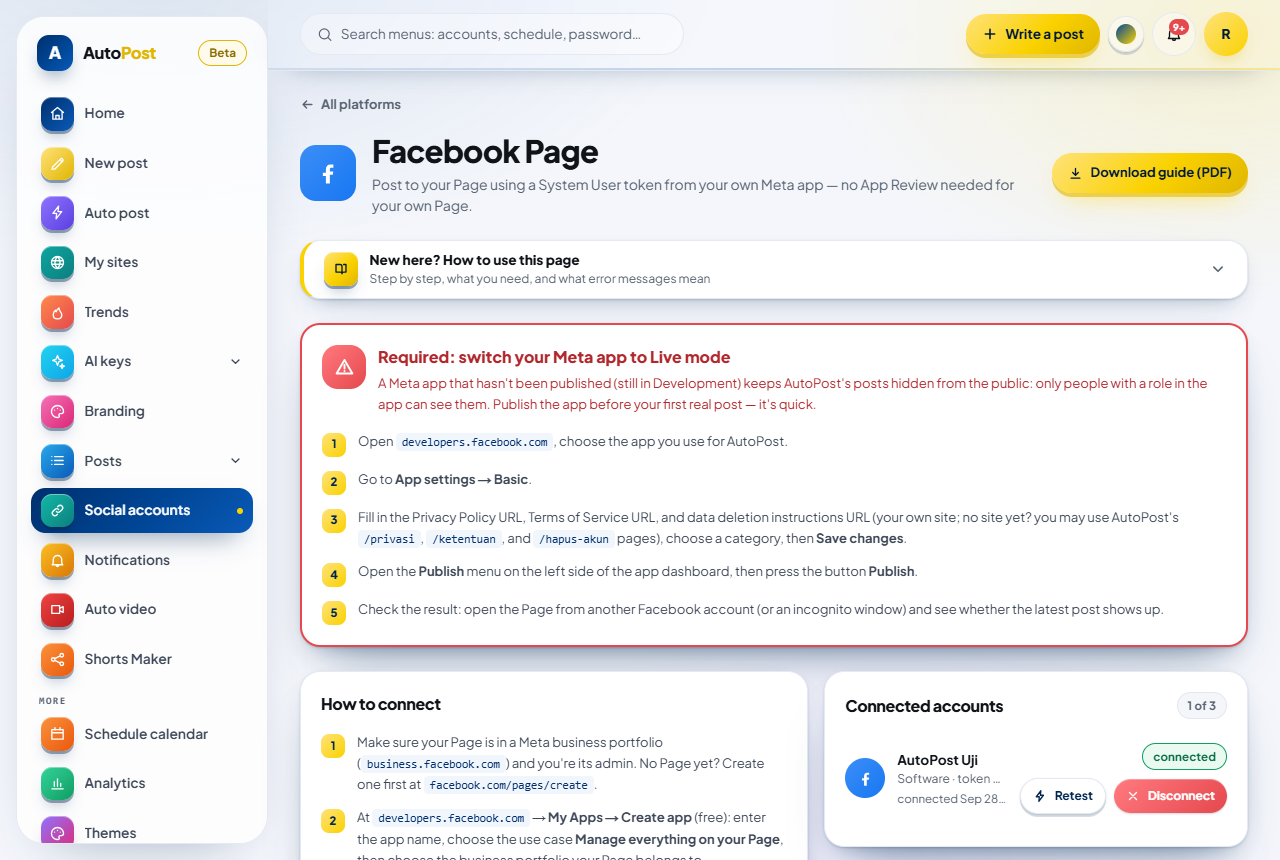
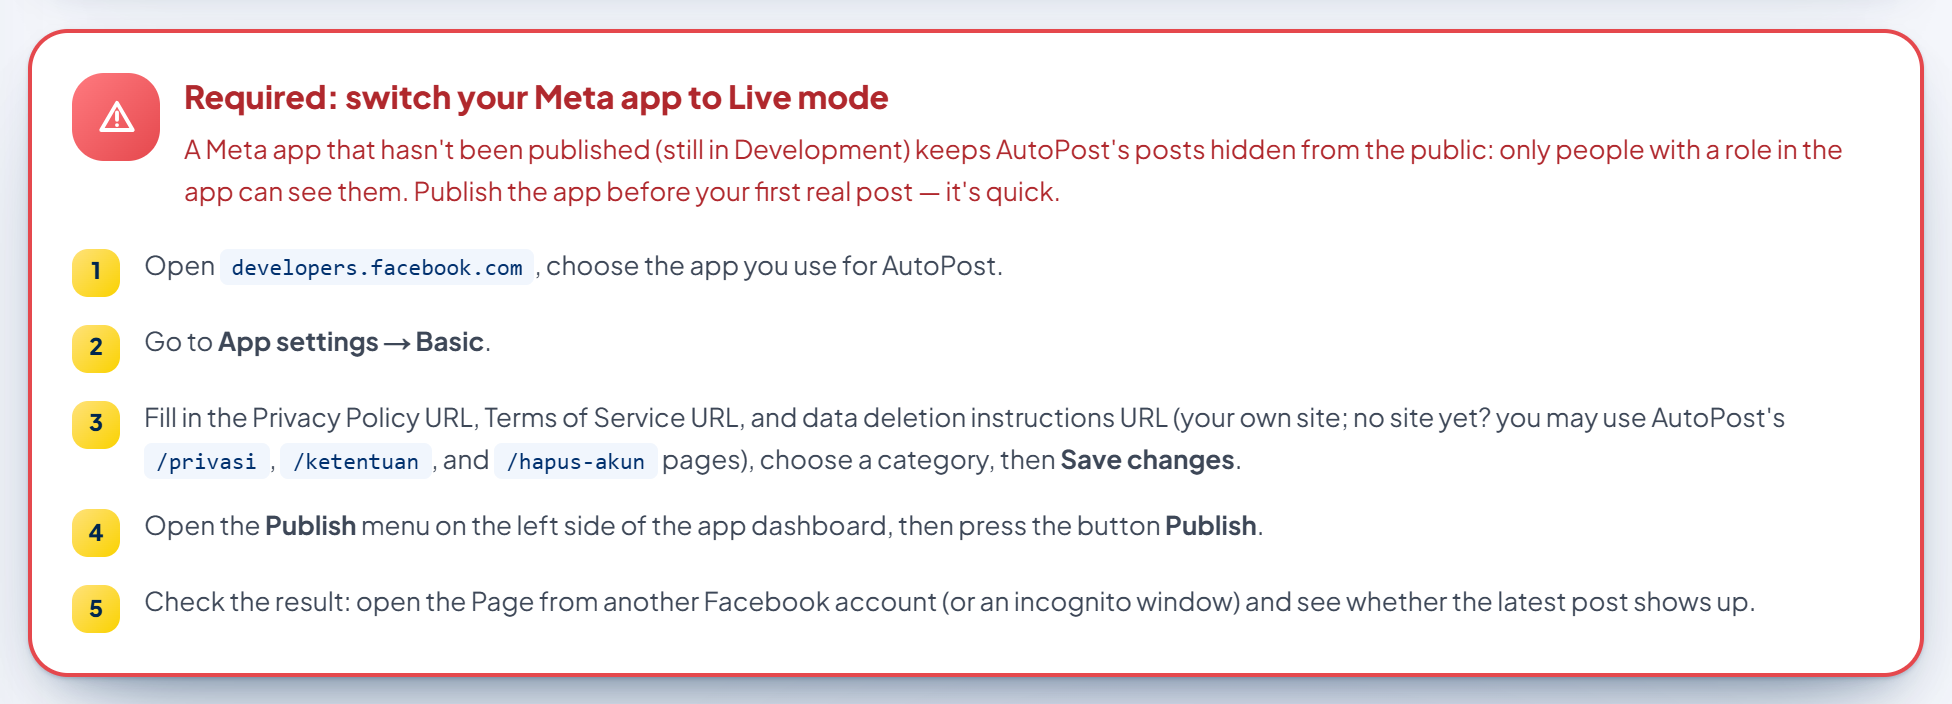
The Facebook Page page has a red box Required: switch your Meta app to Live mode, the How to connect card with its form on the left, and the Connected accounts card on the right. The Download guide (PDF) button at the top right downloads the guide you're reading.
9.2 Filling in the form
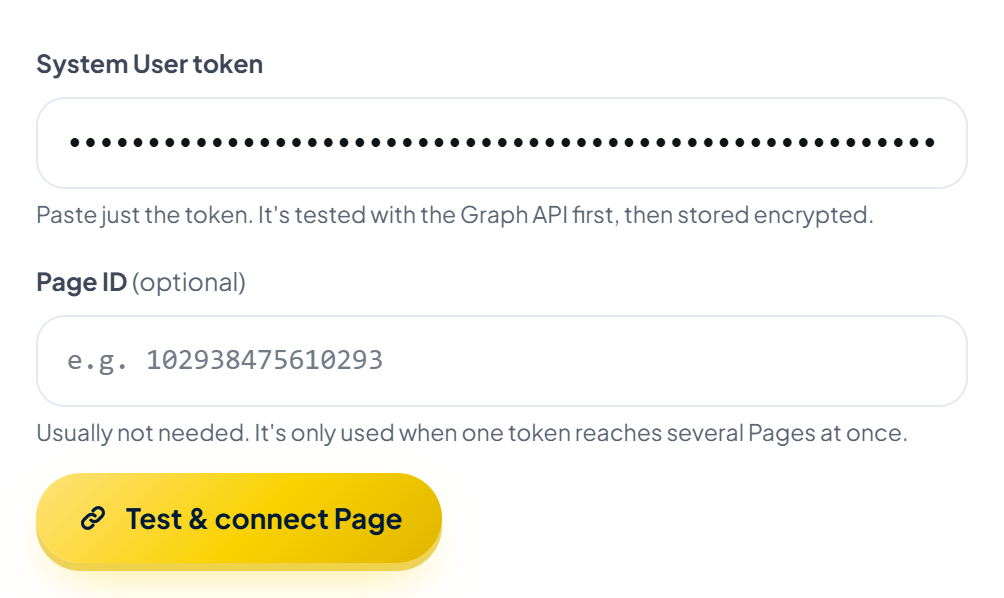
System User token — paste the token from Step F. Its content is deliberately shown as dots. Spaces at the start or end don't matter; AutoPost removes them.
Page ID (optional) — leave it empty. This field is only used when one token sees several Pages (see 9.5).
Press Test & connect Page.
9.3 What happens when you press the button
AutoPost tests first, then saves:
The token's format is checked: it must start with EA and contain only letters/digits. A wrong paste (for example the App secret, or a very short piece of a token) is rejected right away. A partly cut-off token is only caught when it's tested with Meta.
AutoPost asks Meta's Graph API which permissions this token has and which Pages it can see.
If
pages_manage_postsorpages_read_engagementis missing, the connection is refused.If the token sees exactly one Page, that Page is the one connected.
The token is stored encrypted (AES-256-GCM) and only opened on the AutoPost server: when sending, on Retest, and to show a fragment of it. Its full value is never sent to the browser.
9.4 Signs of success
A green box appears at the top of the page, and your Page shows up in the Connected accounts card labeled connected.

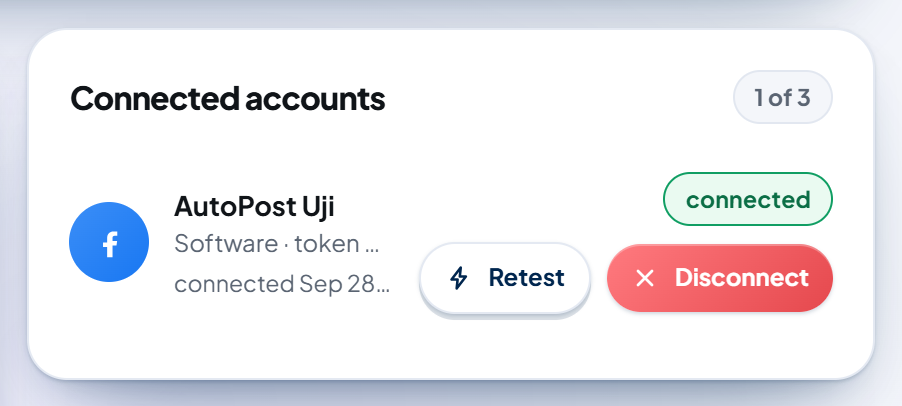
The small line under the Page name shows the Page category (for example "Software") and a token fragment: only the first 4 and last 4 characters, with dots in between. The full token is never shown again. (In this guide's images, we've masked the token fragment too.)
9.5 When to fill in the Page ID
Almost never. A Page ID is only needed when one token sees several Pages — for example, when you assign two Pages to the same system user. AutoPost then replies:
This token sees 2 Pages: Page Name A (number), Page Name B (number). Enter a Page ID to choose one.
Copy the number in parentheses for the Page you want, enter it in the Page ID field, then press Test & connect Page again (paste the same token again). Repeat with another Page ID to connect the next Page.
9.6 What "1 of 3" means
Each AutoPost account can connect at most 3 Facebook Pages. This limit is enforced in the database, so it can't be bypassed from the page. Once you have 3 Pages, the form can still be used to refresh the token of the same Page; a fourth Page is rejected with the message "There are already 3 Facebook Pages. Disconnect one first if you want to replace it."
10. Step H — Publishing the app (Live mode)
AutoPost reminds you of this in the red box at the very top of the Facebook Page page:
10.1 Filling in App settings → Basic
At developers.facebook.com, open your app, then choose App settings → Basic in the left menu.
Fill in:
Privacy Policy URL;
Terms of Service URL;
User data deletion: choose Data deletion instructions URL, then enter the address;
Category: for example Business and pages.
Scroll down, then press Save changes.
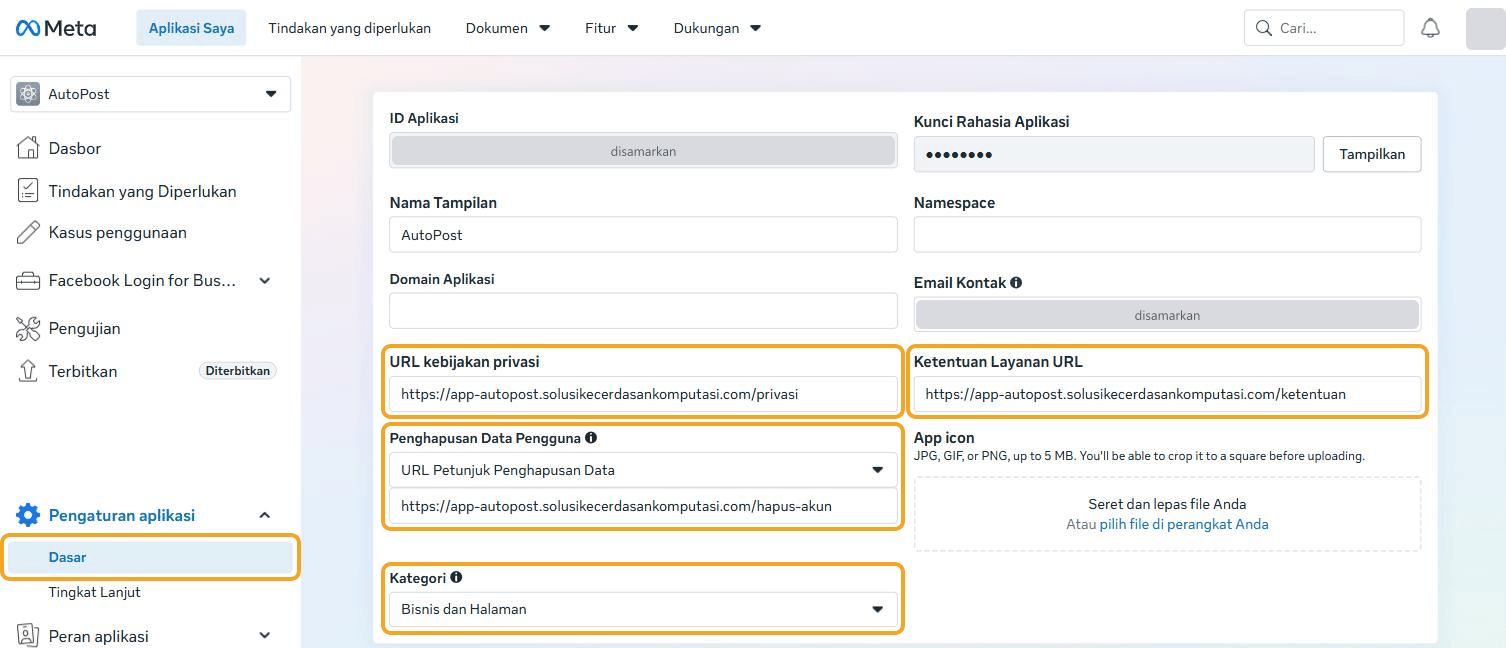
Which addresses do you enter? If your business has a website with a privacy policy page and a terms page, use those. If not, you may use AutoPost's public pages:
| Field | Address |
|---|---|
| Privacy Policy URL | https://app-autopost.solusikecerdasankomputasi.com/privasi |
| Terms of Service URL | https://app-autopost.solusikecerdasankomputasi.com/ketentuan |
| Data deletion instructions URL | https://app-autopost.solusikecerdasankomputasi.com/hapus-akun |
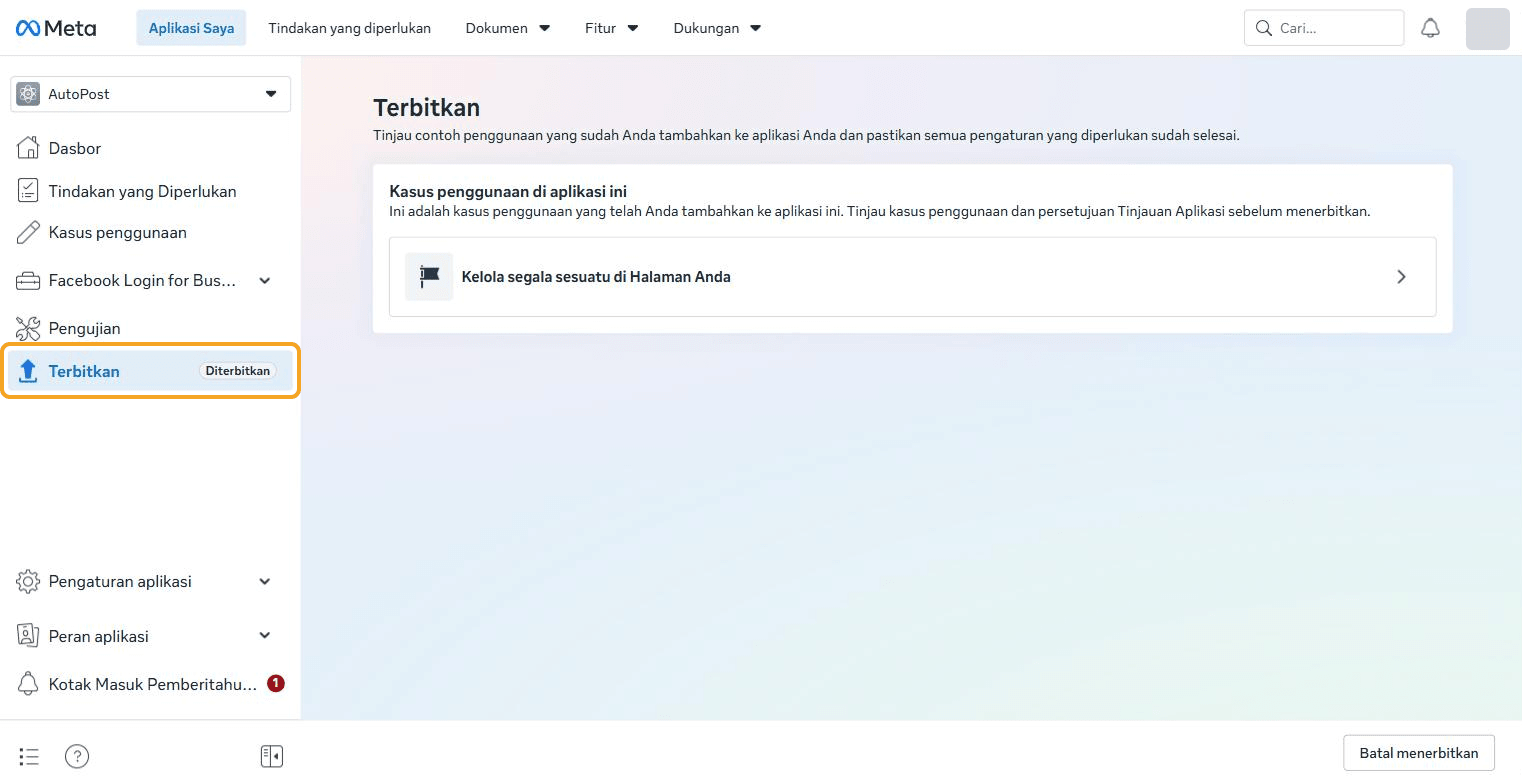
10.2 Pressing Publish
In the app dashboard's left menu, choose Publish.
The Publish page shows the use case Manage everything on your Page.
Press the Publish button at the bottom right.
Meta replies that your app was published. Close the window.
After that, the Publish menu is marked Published, and the button at the bottom right changes to Unpublish. Don't press that button — your posts would be hidden from the public again.
11. Step I — Your first post
11.1 Sending from New post
Open New post.
Write something short, for example a test sentence.
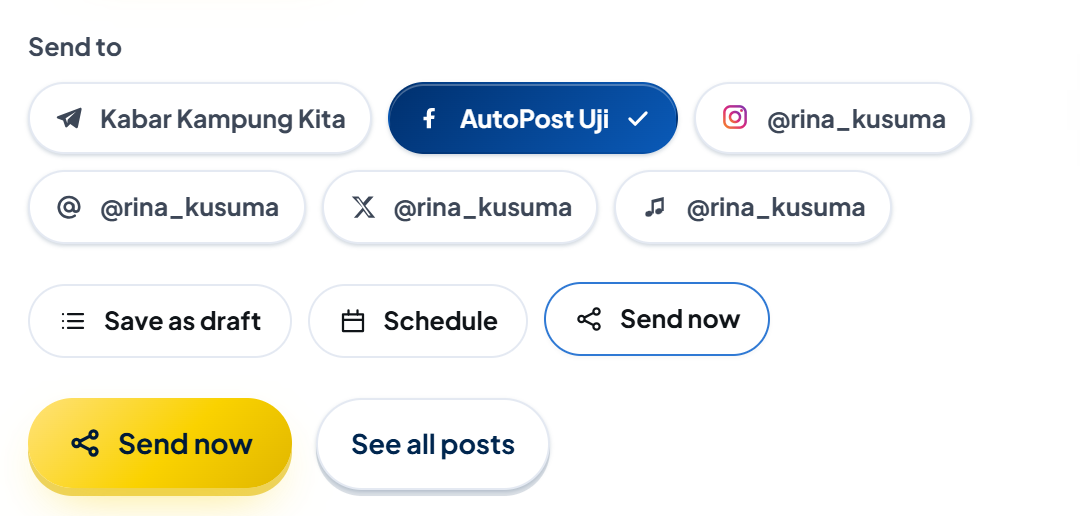
Under Send to, choose your Facebook Page account (the f icon). Deselect other accounts if you only want to test Facebook.
Choose Send now, then press the gold Send now button.
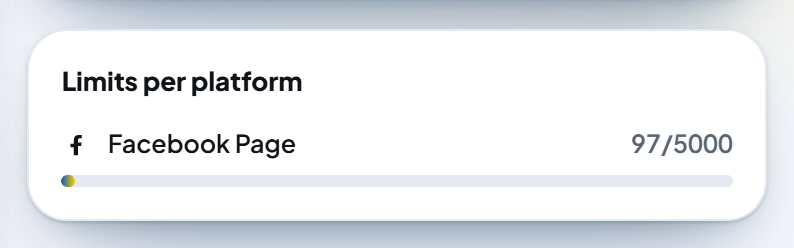
The Limits per platform card counts characters for Facebook Page against a limit of 5,000 characters (an AutoPost limit, stricter than Facebook's own). Longer text is rejected before it's sent.
11.2 Checking the result
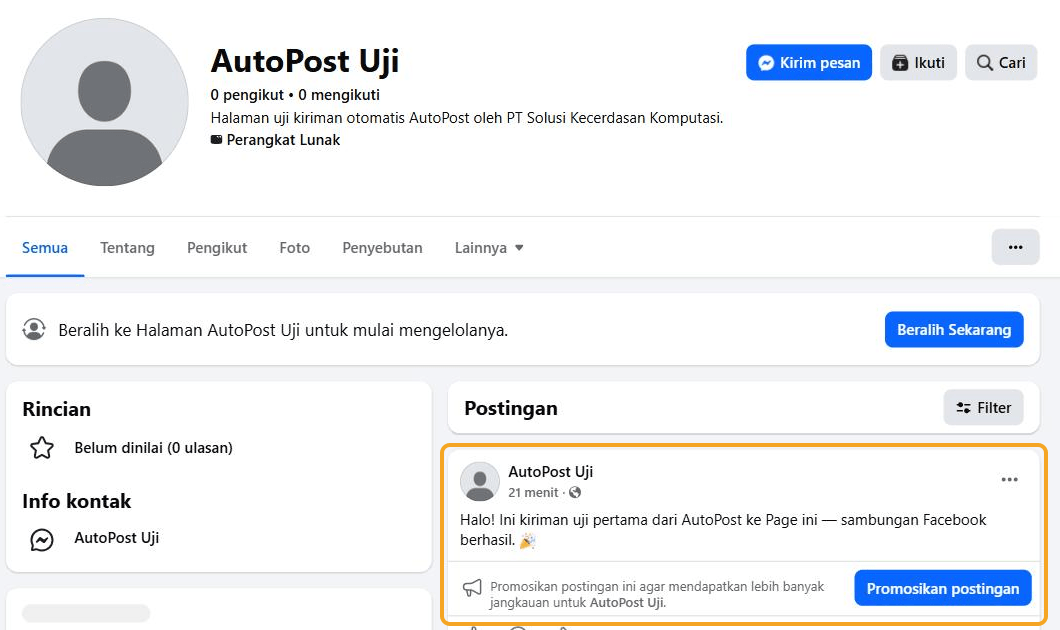
In AutoPost, the green message "Sent to 1 account." appears above the button, and the post shows up in the Posts menu with the status sent.

On Facebook, open your Page. The post appears in the Page's name with a globe icon (Public).
11.3 Scheduling and Auto post
Schedule: choose Schedule in New post, fill in the date and time (WIB), then press Schedule post. AutoPost sends it on its own at that time — your laptop can be off.
Auto post: a Facebook Page can be chosen as an auto post target. For Facebook Pages only, auto post has a First comment option that's added right after the post is published (it needs the
pages_manage_engagementpermission). If the comment fails, the post is still sent, and Details per account records "Sent, but the first comment couldn't be added: …".The full composer guide is the New post guide (in the Help menu).
12. Managing a connected Page
12.1 Retest
The Retest button on the Connected accounts card asks Meta again whether the token is still valid, whether its required permissions (pages_manage_posts and pages_read_engagement) are still there, and whether the Page is still reachable. If everything is healthy:

If Meta is busy (rate limits, network, a momentary glitch), the account status is not changed; the message ends with "We didn't change the account status — try testing again shortly." If the token has stopped working or its permissions are gone, the account is marked as needing reconnecting.
12.2 Replacing the token
Paste the new token into the same form, then press Test & connect Page. Because it's the same Page, AutoPost refreshes its token (it doesn't create a new account), and scheduled posts keep going. If the system user holds more than one Page, also enter the Page ID (see 9.5) and repeat for each Page — the token is stored per Page.
12.3 Disconnect
The Disconnect button removes that Page from AutoPost together with its token. AutoPost asks for confirmation; press Yes, disconnect to continue. The result: "Account disconnected — its row and token are gone from the database."
Disconnecting also removes that Page from the scheduled posts aimed at it. If you only want to replace the token, don't disconnect — paste a new token (12.2).
Disconnecting in AutoPost does not revoke the token at Meta. To revoke it too, open the system user in Business Suite and press Revoke tokens.
12.4 Deleting a post
Deleting a post in AutoPost's Posts menu only deletes it from AutoPost. A post already published on the Page stays there — delete it on Facebook if needed.
12.5 Adding a 2nd and 3rd Page
Assign the extra Page to the same system user (Step E1), generate a new token (Step F), then paste it into AutoPost with the Page ID field filled in (see 9.5). At most 3 Pages.
13. Troubleshooting
All the AutoPost messages below are written exactly as they appear on screen. On the Facebook Page page, messages start with "Failed:"; in Details per account, messages that will be retried get the suffix "(retrying automatically, attempt N of 4)". Parts that vary are marked "…".
13.1 When you press "Test & connect Page"

| Message | Cause & fix |
|---|---|
| The System User token hasn't been pasted. | The token field is empty. Paste the token. |
| The token format isn't recognized. A System User token starts with “EA” (e.g. EAA… or EAI…) and contains only letters/digits — copy it in full from Business Suite. | What was pasted isn't a token — often the App secret or a cut-off token. Generate a new token (Step F) and copy it in full. |
| The Page ID must contain digits only. Leave it empty if your token sees just one Page. | The Page ID field contains something other than digits, or its length is outside 5–25 digits. Leave it empty, or enter the number from AutoPost's message. |
| This token doesn't have the … permissions yet. Create a new token for the System User and tick all four permissions. (Tokens from the regular Graph API Explorer won't get these permissions.) | A required permission is missing. Check Step C (the permissions are in the use case), then generate a new token with all four permissions ticked. |
| This token doesn't see any Page yet. In Business Suite, assign the Page to the System User (Full control), then create a new token. | The Page hasn't been assigned to the system user (Step E1), or the pages_show_list permission wasn't ticked. Fix it, then generate a new token. |
| The Facebook token doesn't have the permission needed for this action. Create a new token with all permissions, then reconnect. | Usually pages_show_list wasn't ticked. Generate a new token with all four permissions. |
| This token sees N Pages: … Enter a Page ID to choose one. | See 9.5. |
| This token can't reach Page …: … | The Page ID you entered is wrong, or that Page isn't assigned to the system user. Leave the Page ID empty or use the number from AutoPost's message. |
| There are already 3 Facebook Pages. Disconnect one first if you want to replace it. | The 3-Page limit. Disconnect one Page first. |
| The Facebook token is no longer valid. Reconnect this account. | The token was revoked, is wrong, or was cut off when copied. Generate a new token and copy it in full. |
| Facebook is rate-limiting requests. We'll try again later. | Meta is limiting requests. Wait a few minutes, then try again. |
| Facebook didn't answer in time. We'll try again later. | Meta is slow. Try again in a little while. |


13.2 When sending or after scheduling
The reason for a failure is shown in the Posts menu, in the Details per account section of the post card.
| Message | Cause & fix |
|---|---|
| The Facebook token … Reconnect this account. (… = has expired, is no longer valid because the account password was changed, was revoked because the app was removed from the account, or is no longer valid) | The token has stopped working. Generate a new token (Step F) and paste it into AutoPost. A system user's Never token doesn't stop working when a password is changed, but it can stop working if it's revoked or the app is deleted. |
| The Facebook token doesn't have the permission needed for this action. Create a new token with all permissions, then reconnect. | A permission is missing. Check Step C, then generate a new token. |
| Facebook is rate-limiting requests. We'll try again later. — or — Facebook is rate-limiting requests for this Page. We'll try again later. | Temporary. AutoPost retries on its own. |
| Facebook is having a momentary problem. We'll try again shortly. | A glitch on Meta's side. AutoPost retries on its own. |
| Facebook is temporarily holding posts from this account (flagged as spam or a rule violation). Try again later or check the notifications on your account. | AutoPost retries on its own about an hour later — don't resend manually. Open the Page on Facebook, read the notifications, and cut down on repeated, similar posts. |
| The exact same post was just sent — Facebook rejects duplicates. | Change the text a little before sending it again. |
| Facebook couldn't fetch the media file. Make sure the media address is publicly accessible and its size is reasonable. | Meta can't open the photo/video address. Upload it with Upload from gallery or use a public address. |
| The object wasn't found on Facebook, or the token has no access to it. Check the ID and the System User's asset access. | The Page is no longer assigned to the system user, or the Page was deleted. Check Step E. |
| Facebook …, so the result is uncertain. Check the Facebook Page before resending so it isn't posted twice. | The connection dropped in the middle of sending. Open the Page first: if the post is already there, don't send it again. AutoPost deliberately doesn't retry this on its own. |
| This Facebook account's Page ID is empty or invalid. Reconnect the Page. | The account data is damaged. Paste that Page's token again (Step G). If the old Page still has a problem, disconnect the old Page — remember, schedules to that Page are removed too. |
| Facebook rejected the input: … | Meta rejected one of the fields (for example the link or the media). Read the rest of the message, fix the post, then send it again. |
| There's no text, link, or media to send to Facebook. | The post is empty. Add text, a link, or media. |
13.3 Problems that don't show a message
| Symptom | Cause & fix |
|---|---|
| The post shows on the Page when you're signed in, but other people don't see it. | The app hasn't been published (the badge next to Publish still says it's unpublished). Do Step H. |
| The "Manage everything on your Page" option isn't there when you create the app. | Choose the Content management filter or All. |
| The Page doesn't appear in the asset list when assigning. | The Page isn't in this business portfolio yet (Step A), or you're not an admin of the Page. |
| The app doesn't appear in the asset list. | The app was created without a business portfolio, or in another portfolio. Connect the app to the same portfolio. |
| The permission you're looking for isn't in the "Select permissions" list when generating the token. | The permission hasn't been added to the app's use case (Step C). |
| The account confirmation SMS code never arrives. | Wait a few minutes and make sure the phone number is correct. Don't request the code over and over. |
14. Security and privacy
14.1 Keeping the token safe
A system user token doesn't expire if you choose Never. That's exactly why you should guard it well.
AutoPost stores the token encrypted (AES-256-GCM) and only opens it on the server: when sending, on Retest, and to show a fragment of it. The page only shows the first 4 and last 4 characters.
AutoPost never asks for your Facebook password, and for a Facebook Page it doesn't need the App secret.
Turn on two-factor authentication on your Facebook account and on your business portfolio.
14.2 If the token leaks
In Business Suite, open Settings → Users → System users, choose your system user, then press Revoke tokens.
Generate a new token (Step F).
Paste the new token into AutoPost (Step G). Because it's the same Page, AutoPost only refreshes the token. If the system user holds more than one Page, enter the Page ID and repeat for each Page.
Press Retest on each Page in AutoPost to make sure they all use the new token.
14.3 Stopping using AutoPost for this Page
Press Disconnect in AutoPost.
Revoke the token in Business Suite (14.2, step 1).
If you no longer use the app, you may delete it at developers.facebook.com.
15. Checklist
Need help? Open the Help menu in AutoPost, or the New here? How to use this page box on the Facebook Page page.